
Burlap Love Banner & Free Cut File

Since sharing my January Silhouette Challenge project, exciting things have been happening behind the scenes. I created a Facebook group for Silhouette users looking to collaborate and encourage one another, and our group has grown to over 20 women in a matter of a few weeks. I’m excited to have more comrades tackling new projects with our machines each month.
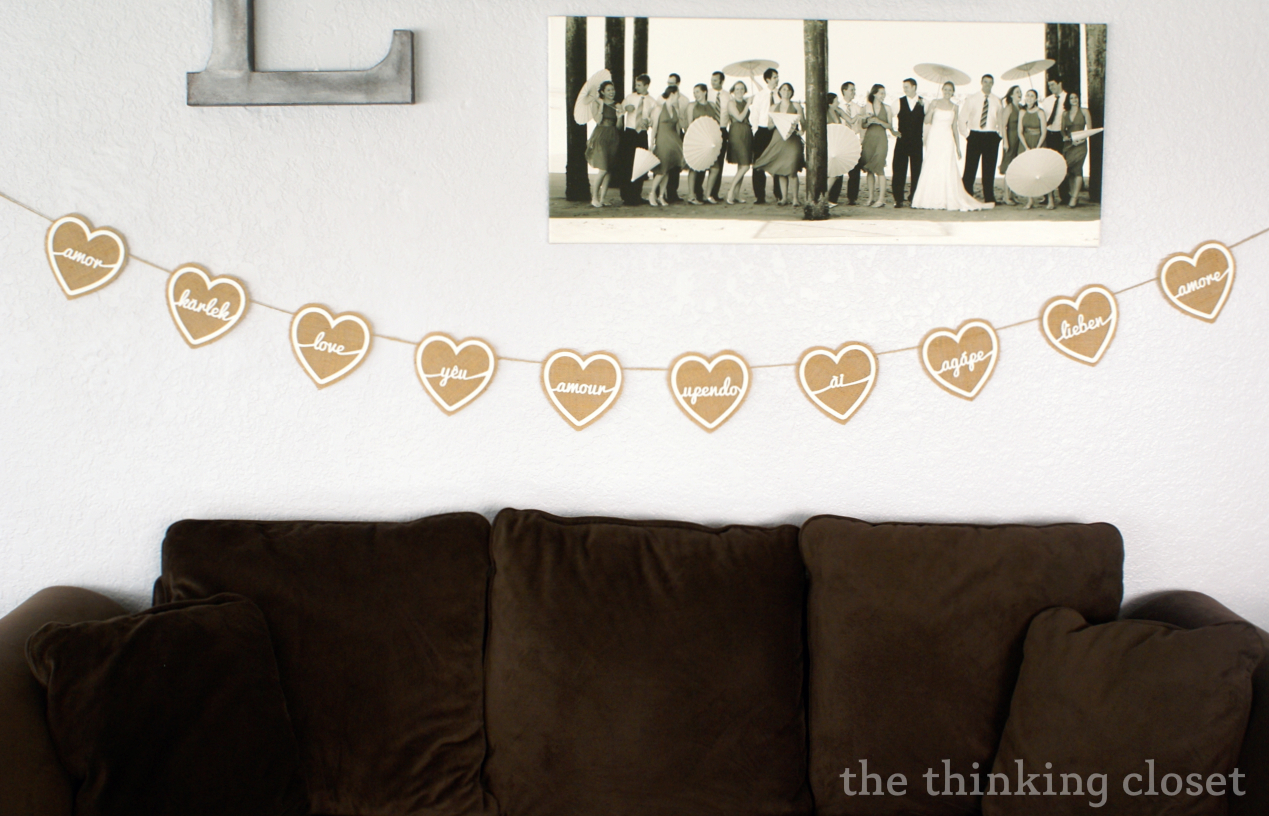
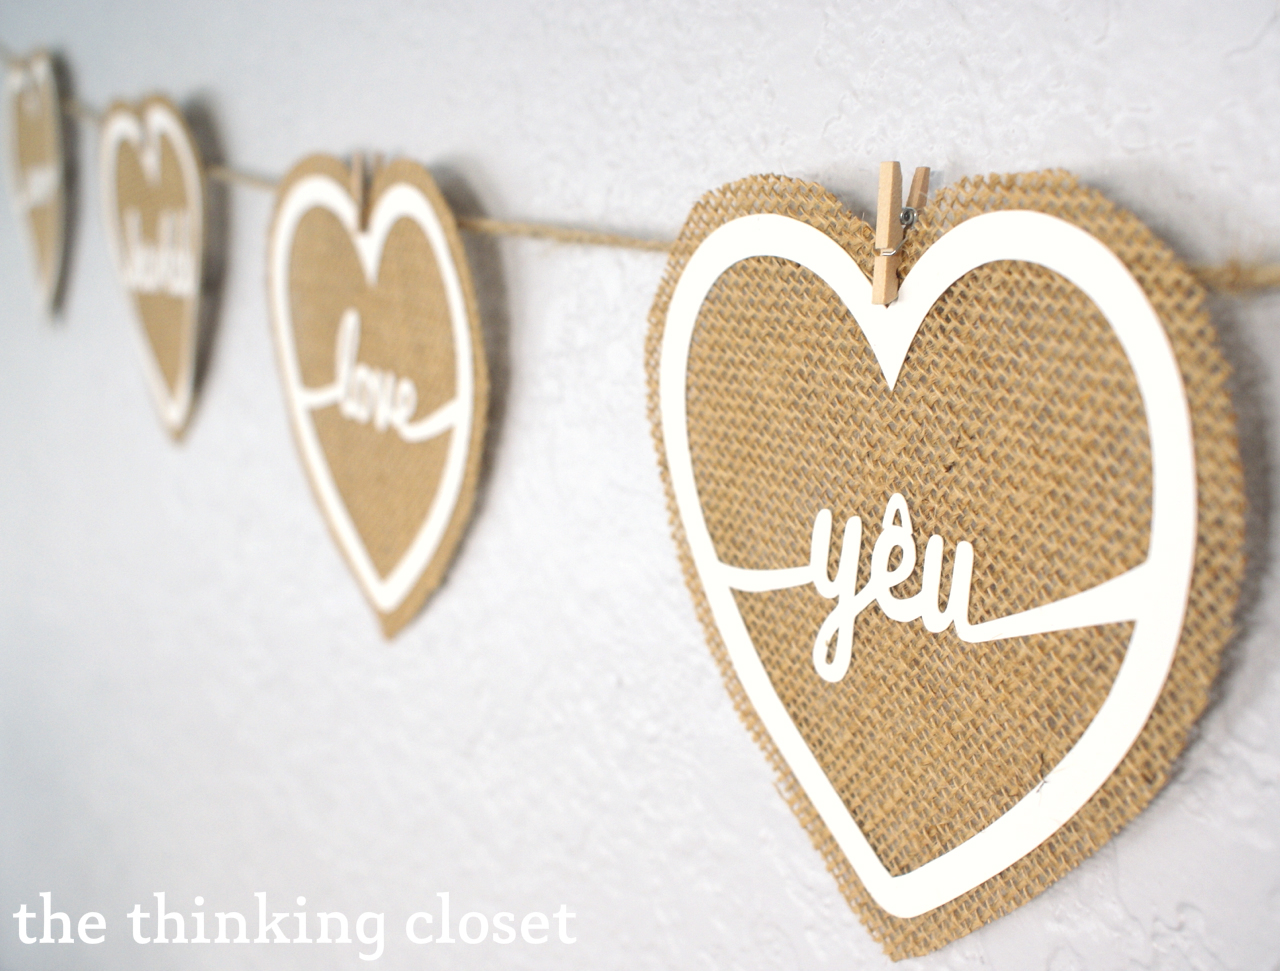
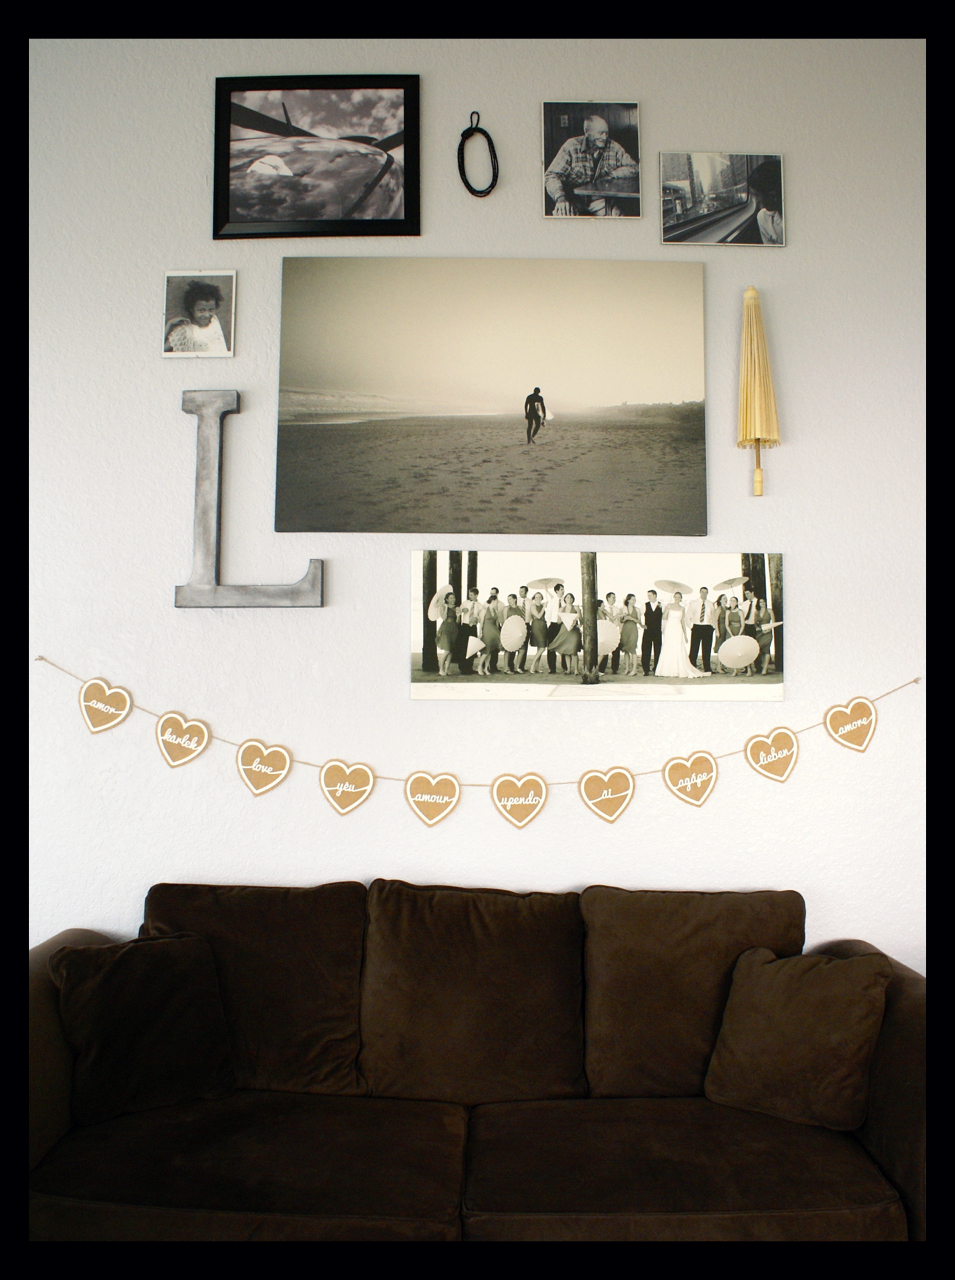
Today, I’m thrilled to share with you all my newest Silhouette creation. I’m rather proud of it, considering it started as a wild idea in my head, and somehow I figured out how to bring it to fruition on my new Cameo. Here it is, spreading the love on our living room wall:
Burlap Love Banner
Let me break it down for you.
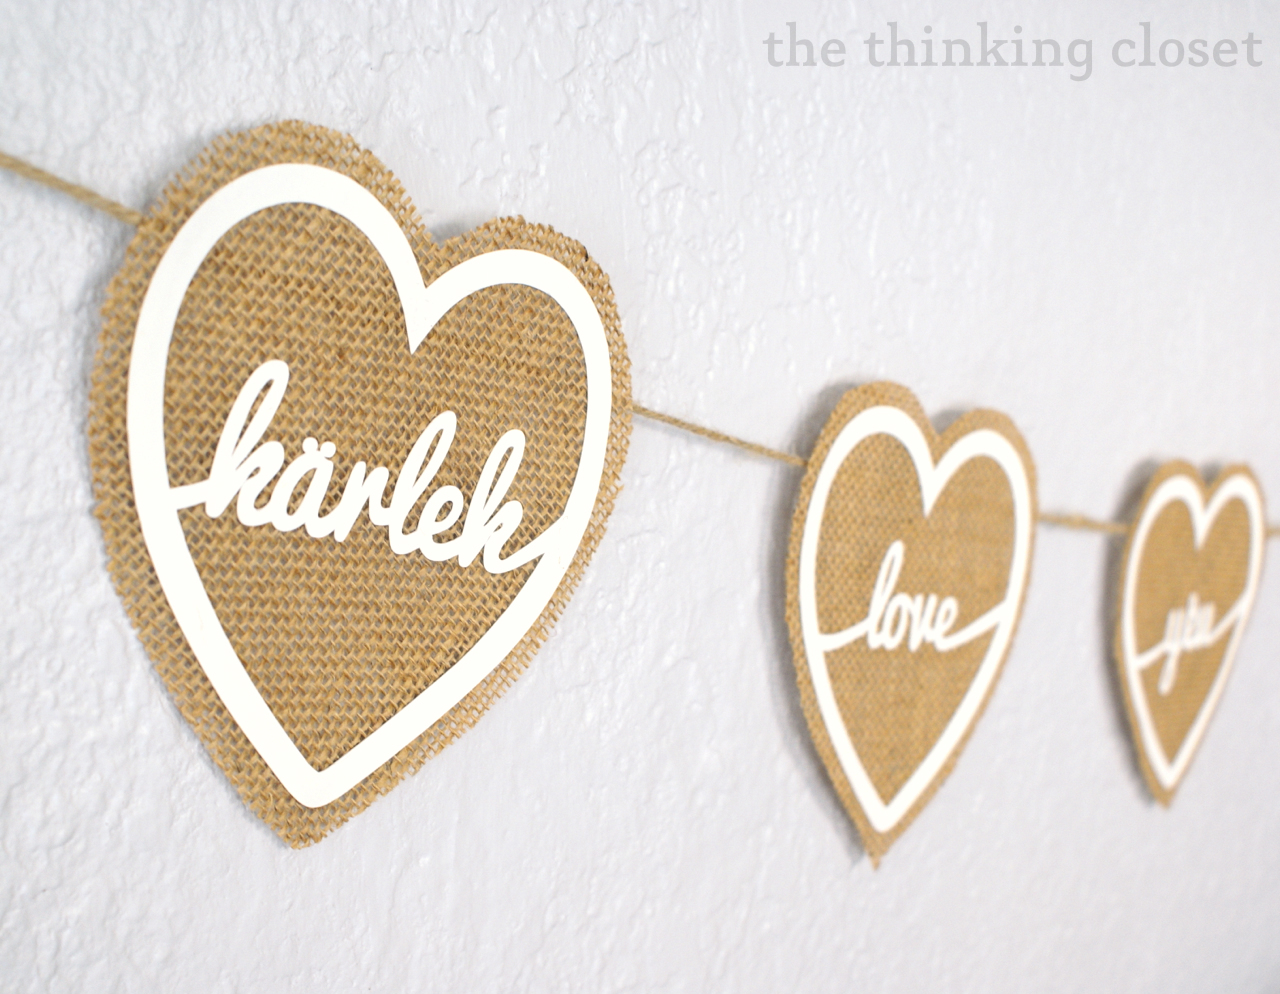
COLOR PALETTE: Rather than go with the typical colors for a Valentine’s Day banner, I chose a more neutral color palette. My eye is just lovin’ the neutrals these days. I used some of my leftover burlap from my No-Sew Ruffle Christmas Tree Skirt and some white cardstock to really let the words pop!
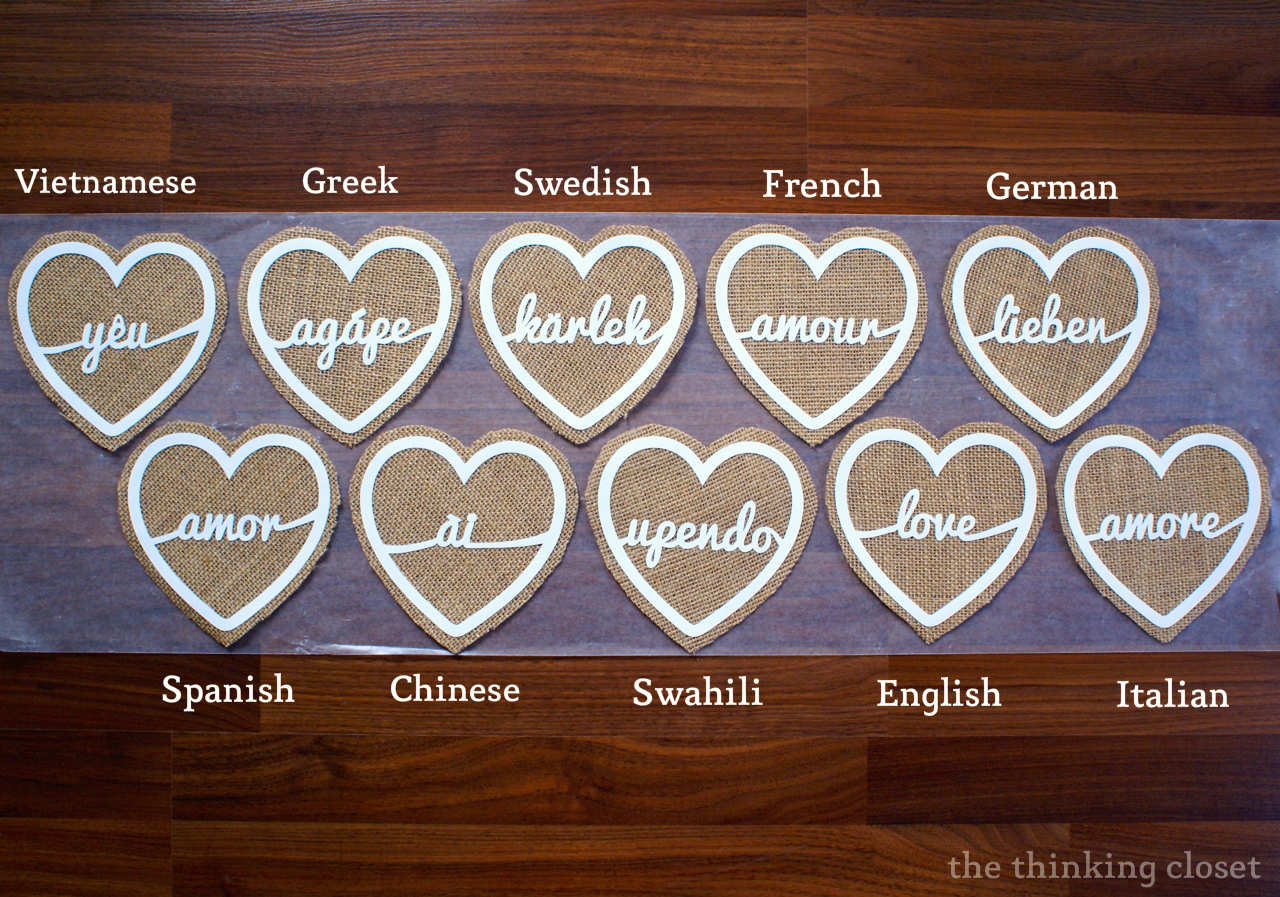
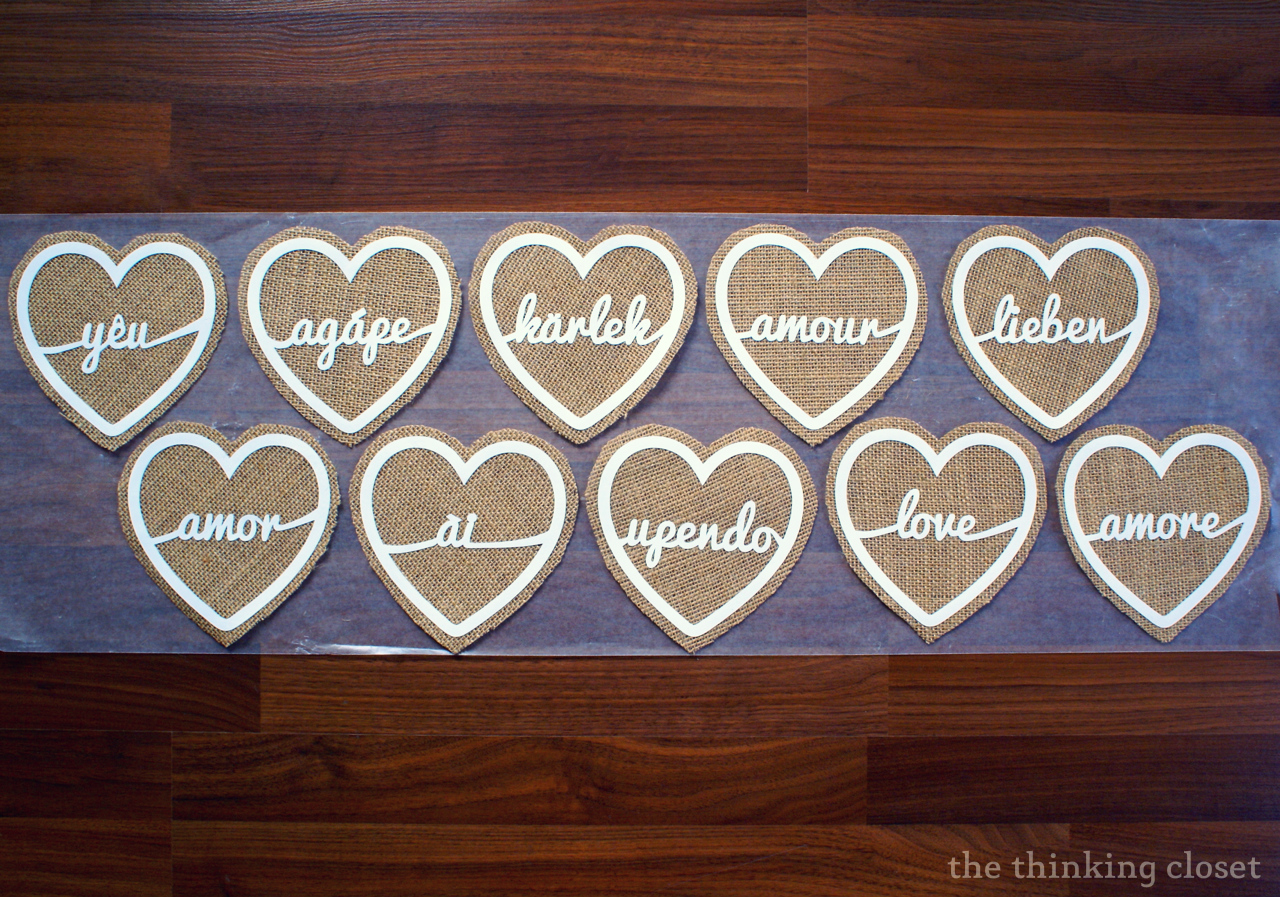
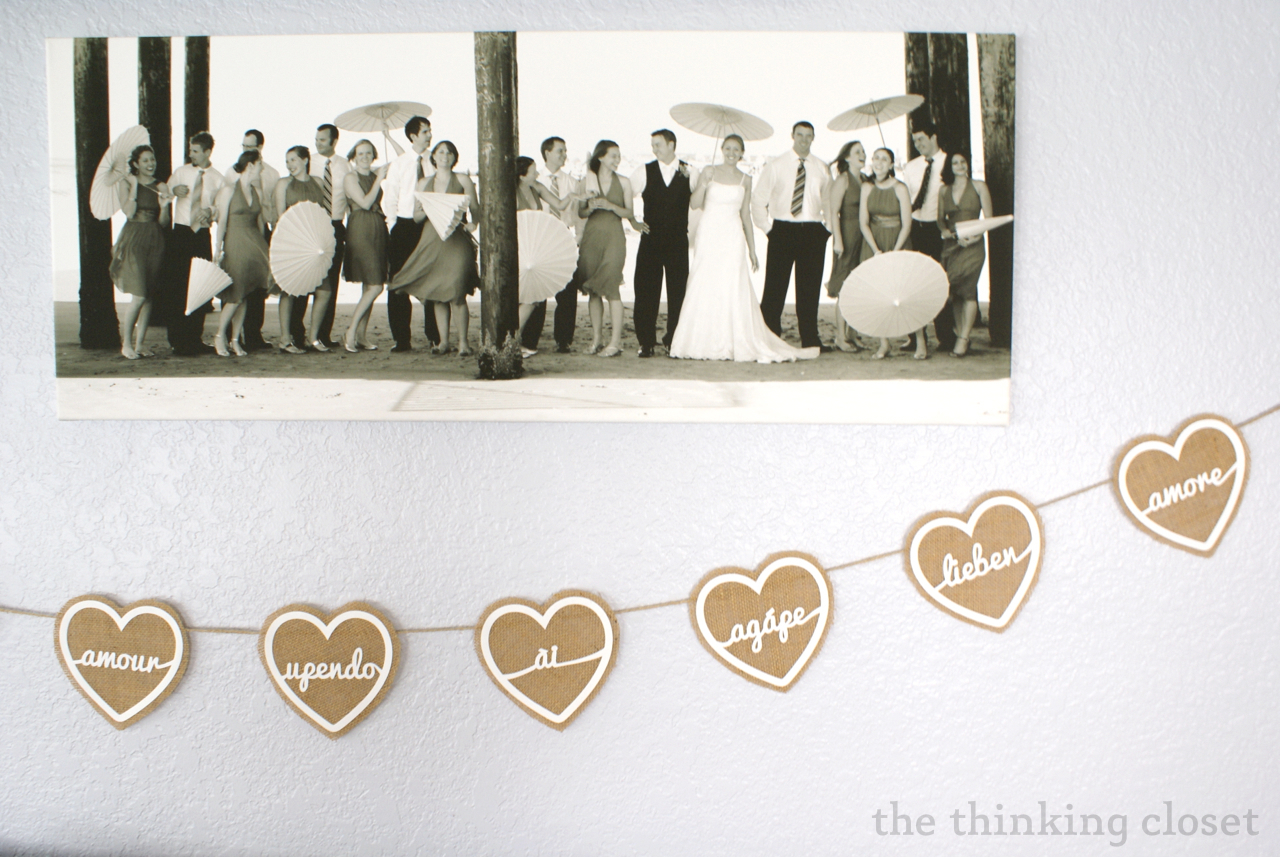
THE LANGUAGES OF LOVE: I decided to improve my language skills with this project by including the word “love” in 10 different languages. I chose languages that bore personal significance to Mark and me, whether they are the languages of our ancestors or languages spoken in countries we have visited. Each heart tells a story. (Update: to read the significance of each of these languages, check out my addendum at the end of this post.)
Free Cut File
For you folk with your own digital craft-cutter, I’m happy to share the cut file I created with y’all fo’ FREE to all newsletter subscribers. You can sign up to download your free cut file using the nifty form below or by clicking HERE. {Fine print: this design is for personal use only and is not to be used for commercial purposes. Thanks!}

Silhouette Tutorial
I also thought it’d be worthwhile to share a tutorial of screenshots for how I created my banner design, so that anyone with Silhouette Studio can continue to create “love” hearts in as many languages as her heart desires! So, whadya say? Let’s get to it!
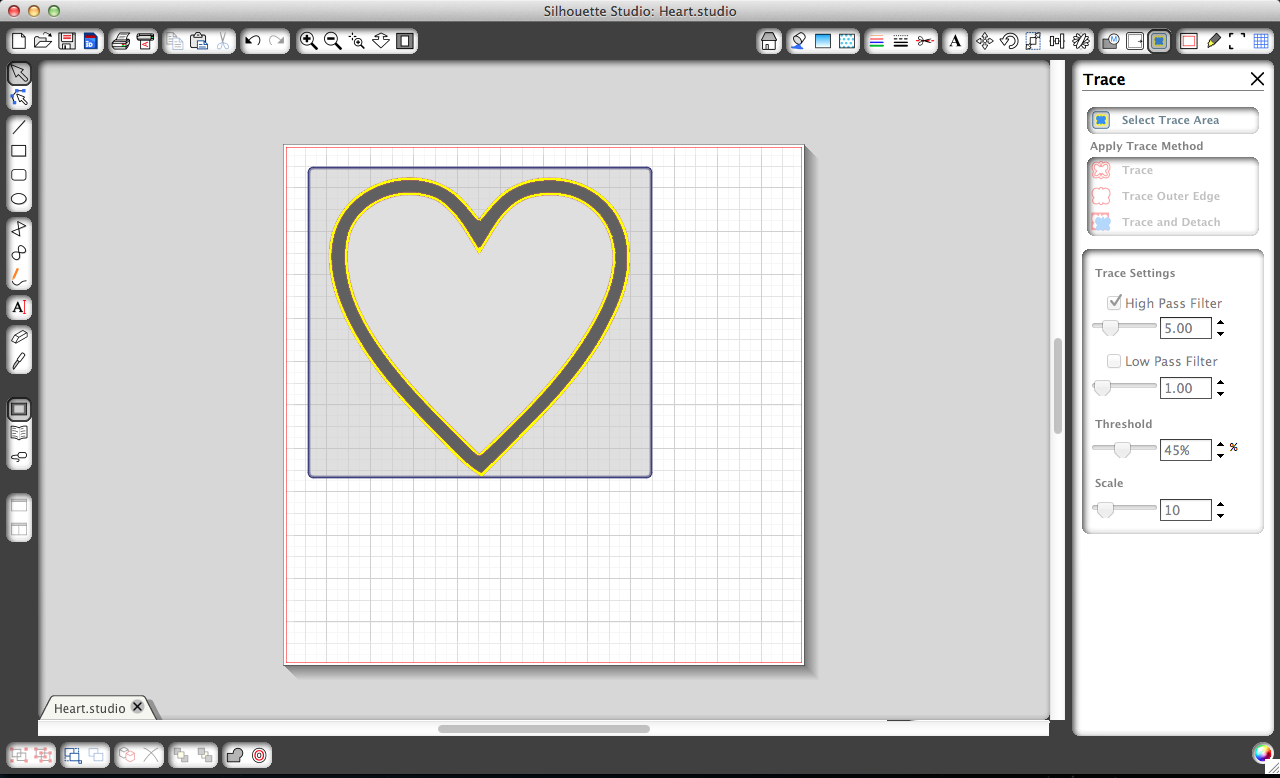
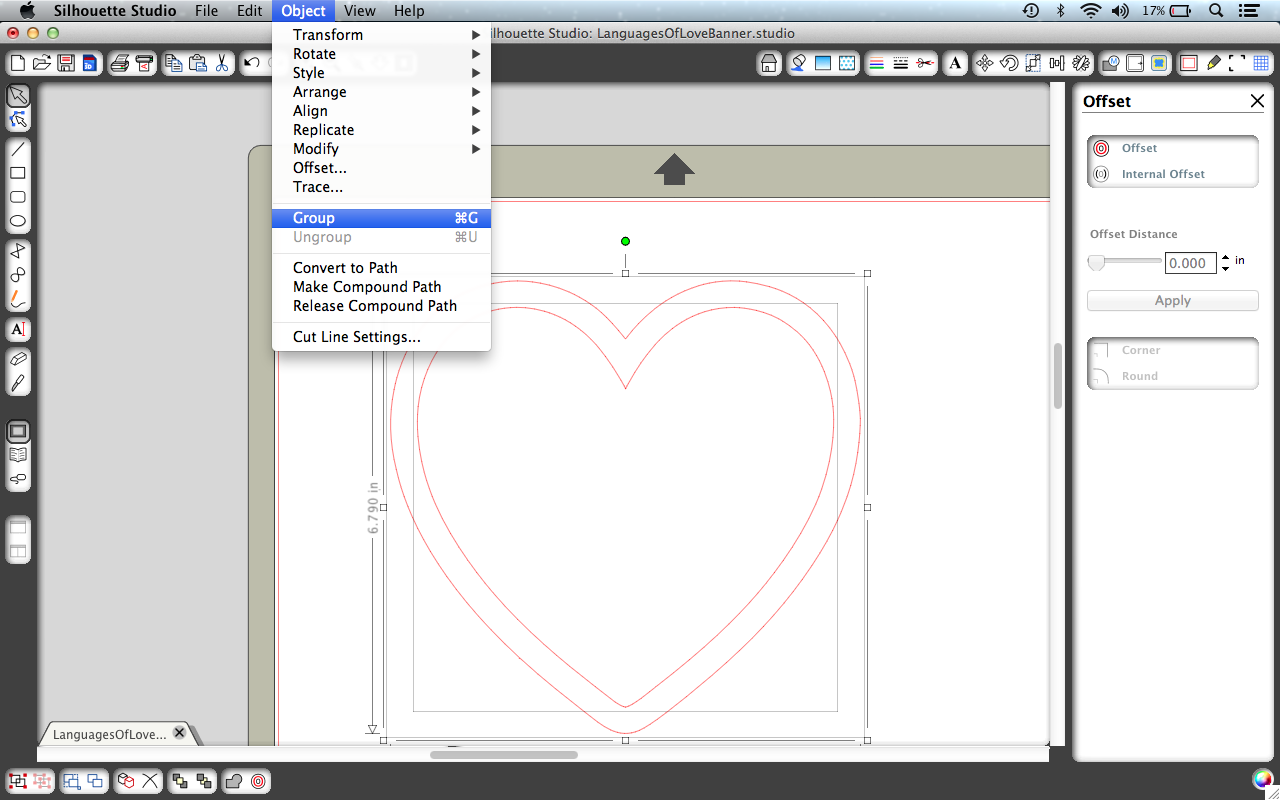
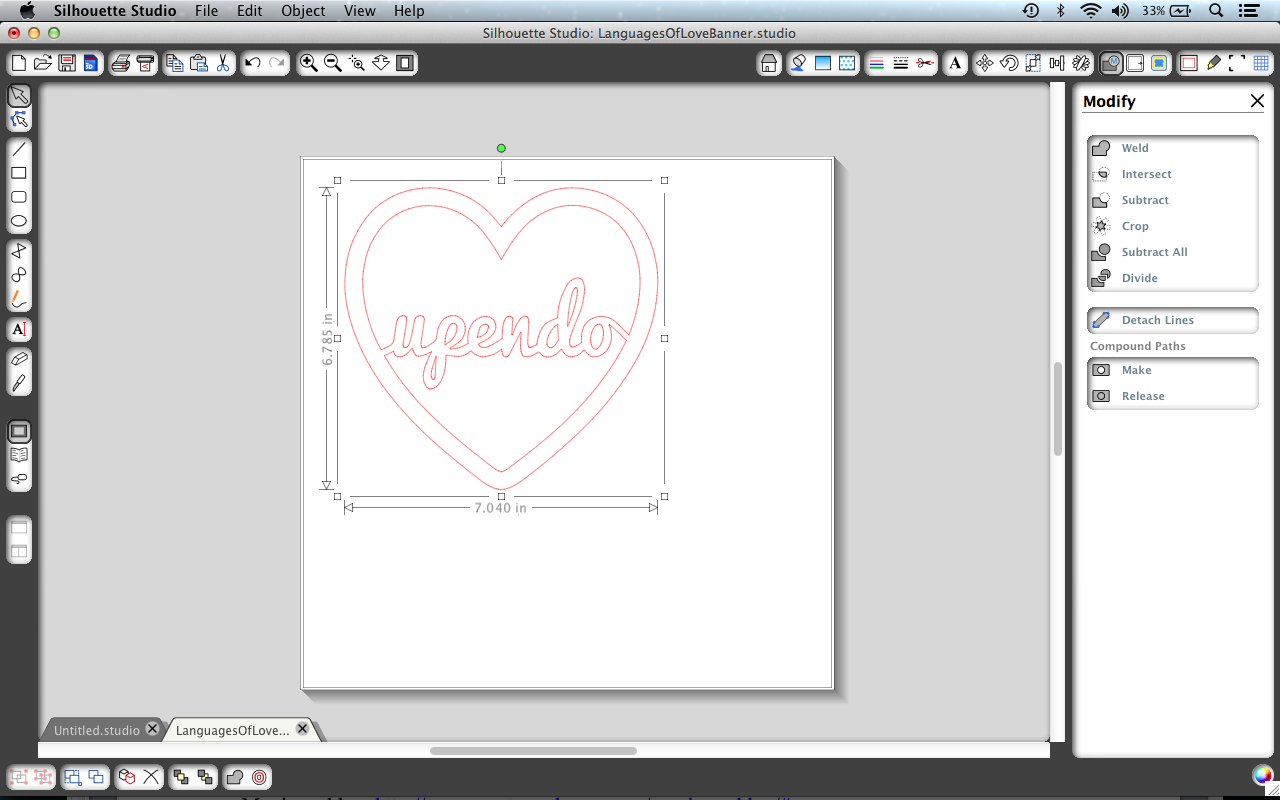
Step 1. Create a heart. Through a Google image search, I found a picture of an outline of a heart that I like. So, I saved it, then opened the png file in Silhouette Studio. I used the TRACE feature to outline the shape. You can click OBJECT then RELEASE COMPOUND PATH to delete any extra trace lines you don’t want.
Step 2. Group the heart images. With my mouse, I drew a large box over the heart shapes to select them both. Then, on the top menu, I selected OBJECT then GROUP / MAKE COMPOUND PATH to forever group these two hearts as one shape. I sized the heart to 6.79″ x 7″ (note: I changed these dimensions later on). Go ahead and make a copy of the heart, so you always have an empty one off to the side from which to make future copies.
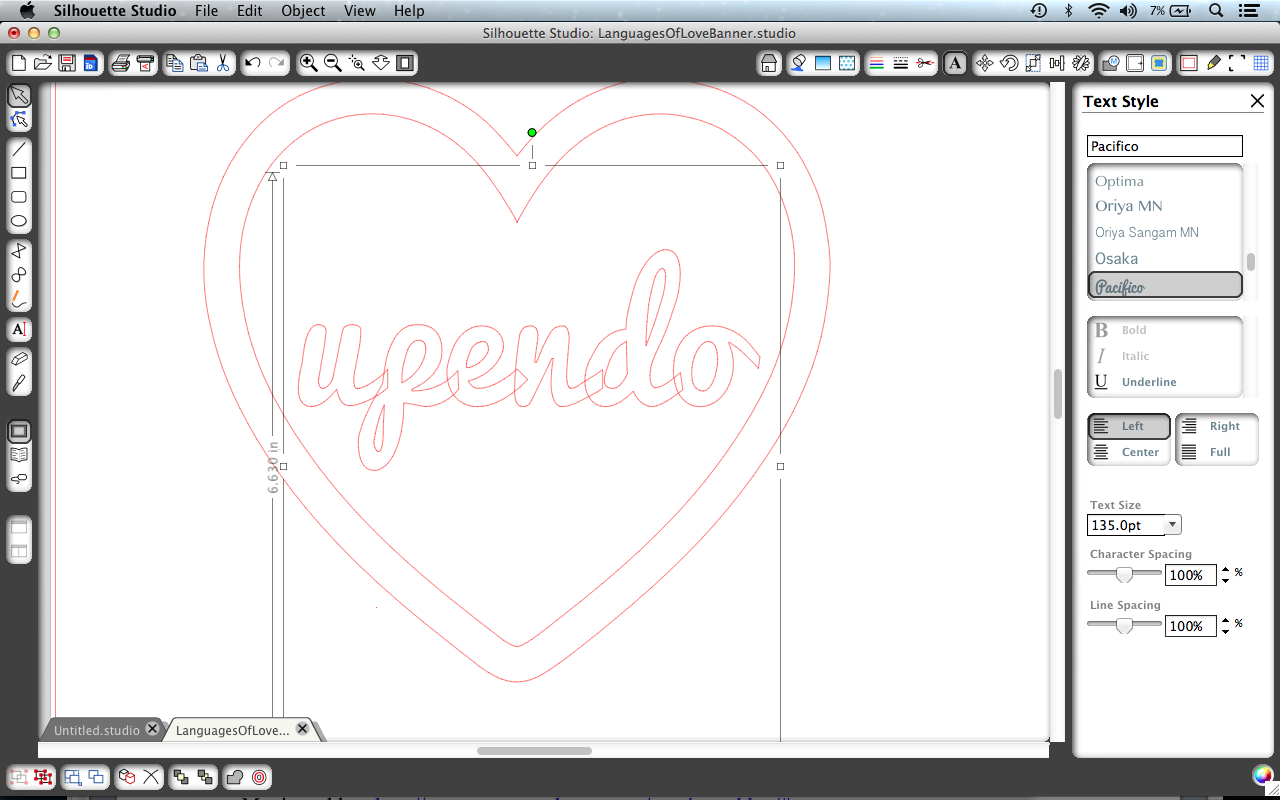
Step 3. Type your text. I downloaded the free font, Pacifico, to my computer for this project. It’s just a matter of finding your computer’s FONT folder to drag the file to once it downloads. A quick Google search should help you if you’re stuck. Close and re-open Silhouette Studio and bam, your new font should be included in your list of fonts.
Click the TEXT icon on the left side menu; this will open up a TEXT STYLE menu on the right where you can select font and size. Click the screen to bring up a cursor, and start typing. I started with my longest word, “upendo,” to help me determine font size. I settled on 135 (but again, that changed later when I resized my heart).
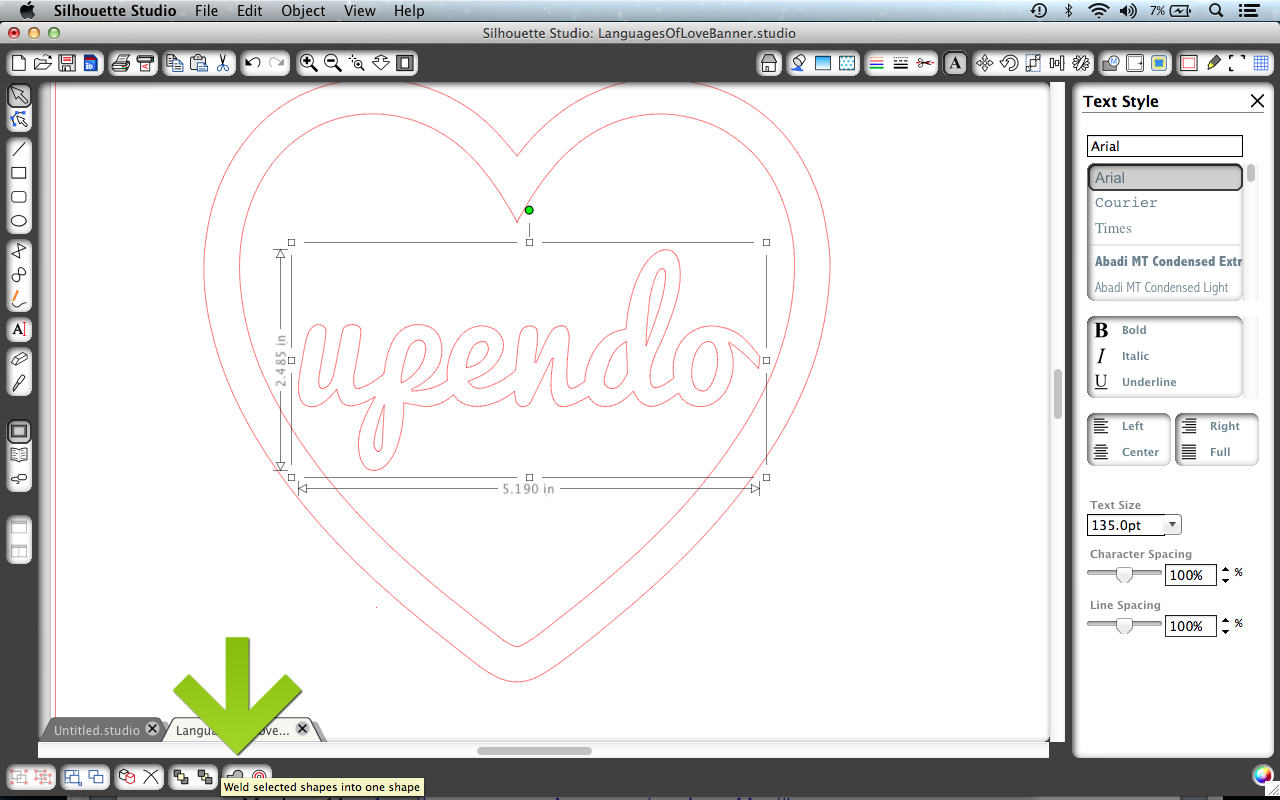
Step 4. Weld your text. I first learned how to do welding during my January Silhouette Challenge project, “A Thousand Thanks” Card & Free Cut File. It’s a very nifty tool, and one that’s fairy simple to use. Simply make sure that your text is still selected, then click the WELD icon on the bottom margin.
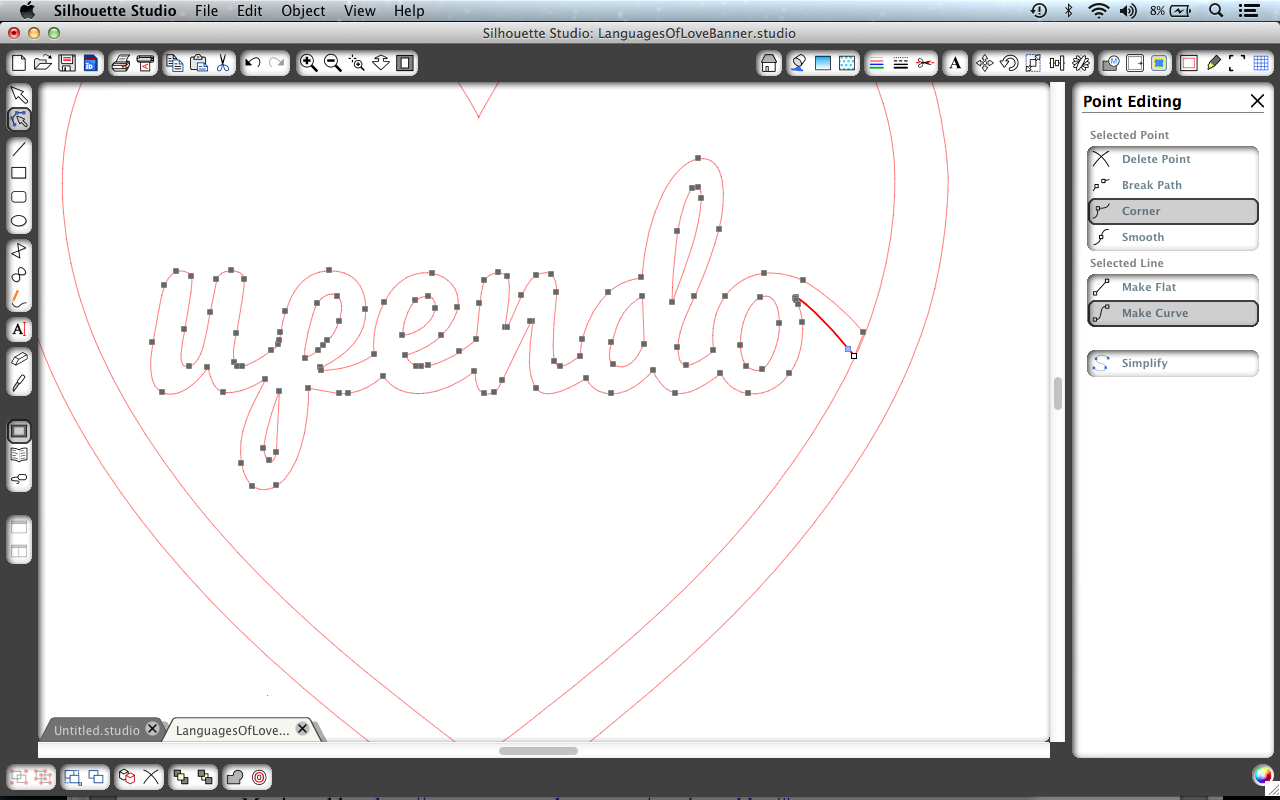
Step 5. Connect your text with the heart. In order to make these hearts one complete shape, I needed to extend the first and last letter of the word, so that they’d be touching the outline of the heart in order to weld them all together. To do this I used two different methods.
My first method: I selected EDIT POINTS from the left menu and dragged the outer points of the word over to the side. I usually kept my settings on SMOOTH and MAKE A CURVE. This tool takes some fiddling around with to get used to, but I was able to get the hang of it after a few tries. There are plenty of tutorials on this tool on YouTube if it’s new to you.
My second method: I used the ERASER tool on the left menu to snip off parts of other letters to create a piece that I would weld together as a bridge between the text and the side of the heart. (You’ll see in my free cut file that I left a few of these extender pieces on the side for you to use with future hearts.)

Use your select tool to draw an outline around the entire heart and text within (all shapes selected). Then, WELD these shapes together.
After you have welded your text to your heart outline, click OBJECT, then MAKE COMPOUND PATH.
Pull this heart off of your “mat” on the screen, set it off to the side, then start the process all over again with a new copy of the empty heart.
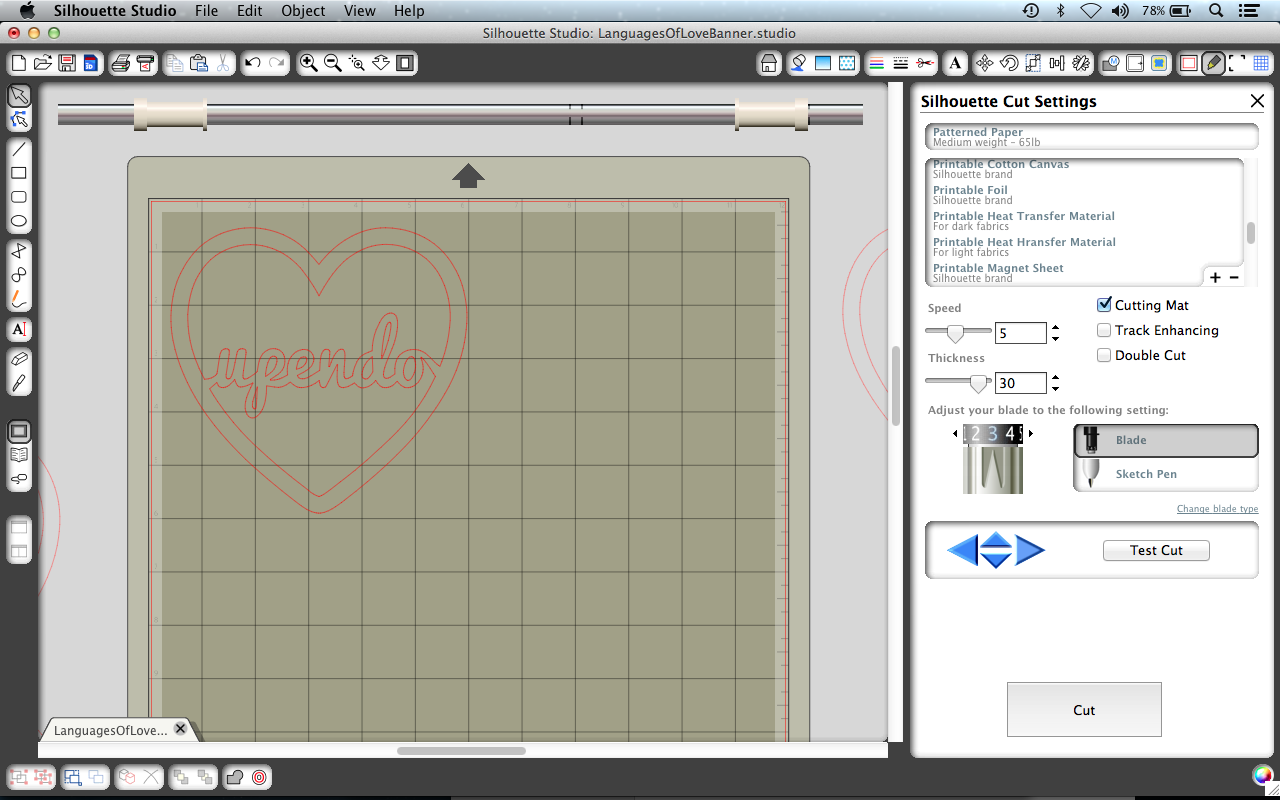
Step 6. Cut! When all of your designs are completed, it’s time to cut. I did a test-cut and decided that my original heart was too large. So, I resized all of my hearts to 5.35″ x 5.55″. I was using a medium-weight cardstock, so I used the patterned paper setting which recommended a speed of 5, thickness of 30, and blade setting of 3. My Cameo cut out each heart with ease!
The Crafty Part
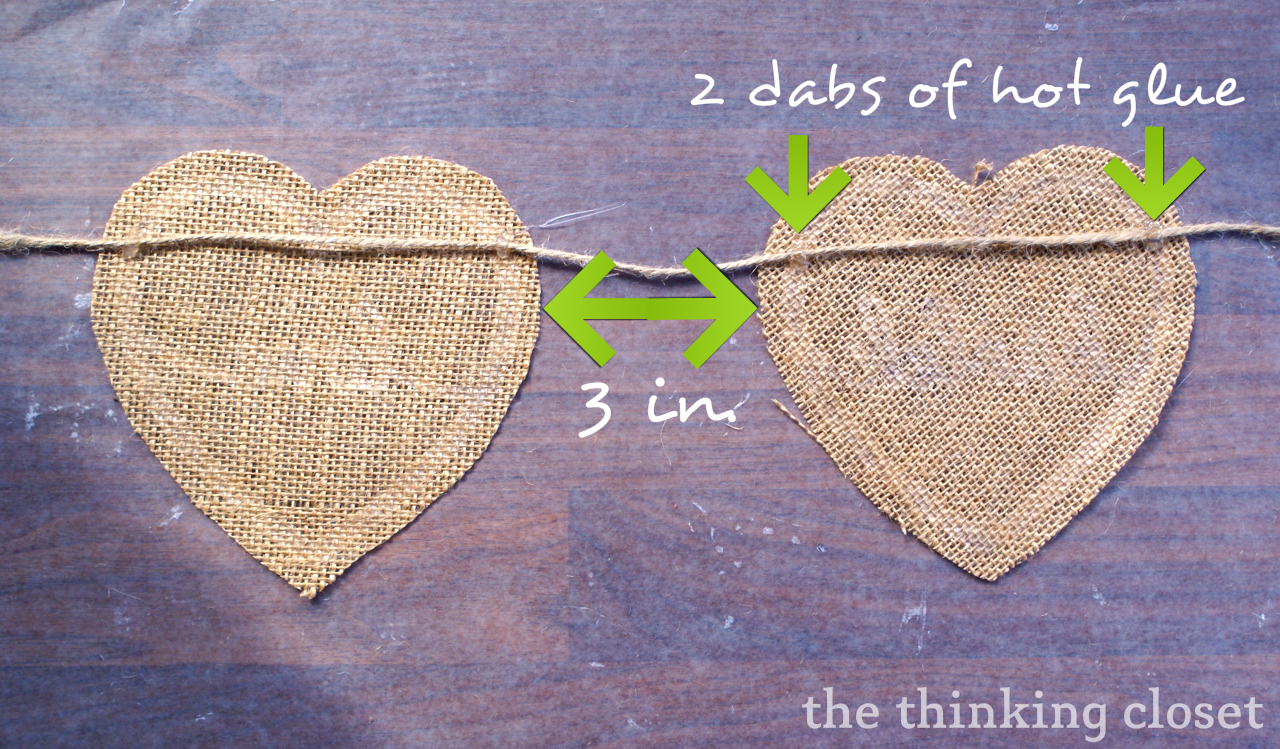
Step 7. Glue hearts to burlap. After cutting out all 10 hearts, I glued each one to a scrap of burlap using Elmer’s Craft Bond: Fabric & Paper Glue. Then, I laid them out on wax paper to dry.
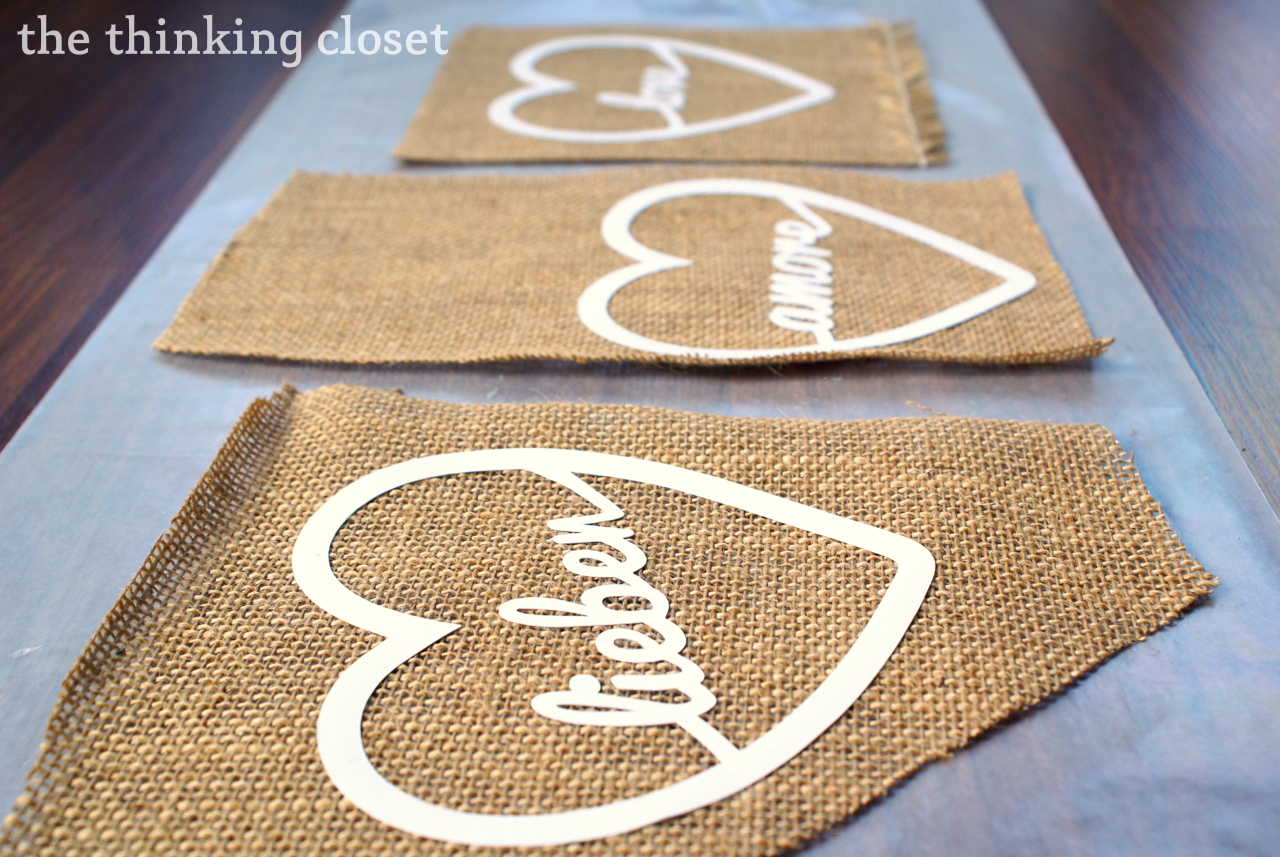
Step 8. Trim burlap into heart shapes. I let them dry overnight, then cut the burlap to match the heart shape, leaving a margin around the edges about the same width as the heart. (No measuring here – – I just eyed it.)
Step 9. Test run. I grabbed some twine I had on hand and strung it between two thumb-tacks on my living room wall. Then, I attached each heart to the twine using mini-clothespins, just to get a sense of layout and distance between each hearts.
Step 10. Glue twine to back of hearts. Once I settled on a distance of 3″ between each heart, I laid the hearts face down and used two dabs of hot glue on each heart to secure it to the twine.
I gave the glue a millisecond to dry, then hung it up so we could start enjoying it…and broadening our language horizons.
Our burlap love banner has been a delightful addition to our living room wall display. If you dare me, I just might leave it up even after Valentine’s Day has come and gone. I mean, it’s right beneath my favorite photo from our wedding day. It just feels like it belongs.
Thanks to one and all for stopping by today. Sending lots of love your way.
Amor, upendo, lieben…

P.P.S. At my sister’s suggestion, I’m adding in the significance of the languages I chose to include in my burlap love banner to satiate the curious:
Vietnamese: My Mom spent her high school years in Vietnam and Malaysia as her parents were missionaries to the American servicemen and women in Saigon during the Vietnam War. We hope to visit there someday.
Greek: I have a dream to go to Greece one day, and I love this particular meaning of love (Greek has four different words for love). Agape: sacrificial love.
Swedish: Sweden is the home of my maternal great grandparents. Our family celebrated St. Lucia Day growing up, a Swedish Christmas tradition, where the eldest daughter (me!) prepares breakfast for her family and delivers it to everyone while they are still in bed.
French: I have French blood on my paternal grandmother’s side. And the French are such a romantic culture, I had to include them in a love banner!
German: My husband’s ancestry is German on both sides; and he speaks a little, too.
Spanish: I have a huge heart for Spanish-speakers and have traveled to Spanish-speaking countries on many mission trips: Mexico (2x), Cuba (3x), and Ecuador (1x). One of my goals is to become fluent in Spanish in the next few years.
Chinese: Mark has taken a trip to China and Mongolia. It was one of his favorite adventures!
Swahili: I visited Arusha, Tanzania in summer of 2011 to teach a theatre and playwriting workshop to secondary students there. It proved to be one of the most challenging and inspirational experiences of my teaching career. And I learned a few Swahili words, too!
Italian: Italy was the homeland of my paternal great grandparents. I also grew up in a suburb of New York City that was practically Little Italy, so this is the culture with which I identify most strongly.
Do you have this as a PDF?
I don’t, sorry! But you can download the free software and save it as a PDF on your own if you’re still interested. Here’s a tutorial.
I just made a card using this. Thank you so much this is awesome!
Thanks so much for sharing another great file!
I loved this banner when I made it so much so that I just adapted it into a St. Patty’s Day banner because I wasn’t ready to totally let go of it off my mantel yet. I shared it on my blog and linked back to you (multiple times) because this really was a genius idea! I’m new to my Silhouette and this tutorial was easy to follow. Thanks for sharing!!
http://thecolorlesscottage.blogspot.com/2014/02/st-pattys-day-banner.html
I’m still so blown away by this project, and I cannot WAIT to share it with my readers in March during my next reader showcase. Thanks again for stopping by to let me know about it! And thanks again for the sweet link love. You’re the best! Welcome to the wonderful world of Silhouette; your life will never be the same, lol.
Absolutely LOVE it!!! Thank you for sharing.
My pleasure, Kina! Thanks so much for stopping by!
Hi Lauren,
I love everything about this project!!! The project itself looks great but hanging it with your wedding photograph looks amazing! (What a gorgeous wedding!) I LOVE how you’ve translated the world “LOVE” into all the different languages. Even more, I love how you included the stories behind why you chose each language. So much fun to read!
Thanks for the great tutorial and for generously sharing the file! It’ll be easy for others to make! Since your “Thousand Thanks” tutorial inspired my very first Silhouette Cameo project, I’m incredibly honored that my “LOVE Banner” was included in the “Round-Up” along with your great banner!!!
Peace, Love and Joy,
Joyce
http://peaceloveandjoyce.com/silhouette-cameo/
Aw, thank you for the high praise and kind words, Joyce! Yes, that black and white landscape shot is one of my favorites from our wedding. Thanks for noticing! And I’m delighted to know you’re a fan of the burlap love banner. It was proud to be featured alongside your awesome “LOVE Banner” in Meredith’s round-up, as well! Banner buddies!
Love your enthusiasm and positivity, Joyce. So glad you’re in The Silhouette Challenge with us!
I love your creativity! This banner is amazing. I am constantly learning the possibilities with my Silhouette!
Aw, thanks, Angela! The Silhouette is pretty remarkable isn’t it? And we’re loving our Burlap Love Banner as much this year as we did last year! It has held up remarkably.
This is so lovely! And thank you for the very thorough tutorial. 🙂
Lauren, these are really sweet. LOVE is such a powerful word and it’s nice to read it in other languages too! Thank you so much for linking up to Get Your DIY On this past week. I hope you’ll join us tomorrow with any furniture makeovers!!
Mandy @ The Hankful House Blog
Thank you! I adore this cut file and your fantastic tutorial. That you included Greek made my day. My Cameo will arrive next week and i think the cut of that heart may be my very first project.
You are so welcome, Jen! I’m glad that you delighted in my Greek “heart”! And I’m so excited for you getting a Cameo next week. Be prepared to have a blast! (And I see you do Project Life. I don’t – – yet – – but I can only imagine how you’ll take it and run with it now that you’ll have a Silhouette.) Happy cutting!
This is so cute — I love it! I have serious Silhouette envy and have told my husband that I’d like one for my birthday… which is still months and months away.
If you haven’t already, I’d love if you’d come join my How To Tuesday link party, too.
http://housewifehowtos.com/link-party-2/how-to-tuesday-link-party-10/
Thanks, Katie! And I do hope you can get your hands on a Silhouette soon…it has taken my crafting to a whole new level (and there’s SO MUCH you can do with it…it’s kind of unreal). Out of curiosity, when is your birthday? Ha ha, I’m anxious FOR you!
Oh, it’s in June. And that means I have three more months before I can nag my husband into giving me presents. LOL
LOVE the look! Thanks for sharing the file and linkin up! Featuring it this weekend 🙂
Kristine from The Foley Fam {unedited} Blog
Whoo hoo! That’s super exciting. Thanks for the feature, Kristine!
Such a cute project, Lauren. Would love for you to share at my linky party going on right now. http://www.mandatorymooch.blogspot.com/2013/02/tasty-thursdays-29.html
Thanks, Nichi – The Mandatory Mooch
Thanks, Nichi! Love your Dad’s nickname for you: “Mooch!” 😉
Love that you actually added the languages! Our gain…love learning about you and knowing you more and more each day.
Back atcha, sister!
Hi, Id like to know what program did you use for the banner, i cant open it…thank you
Carla, I used Silhouette Studio (The file is .studio). I believe that even if you don’t have a Silhouette (but have a die-cutter), you can still use the same software. Here’s a link to a forum where they discuss how to convert .studio files for use with a Cricut: http://www.twopeasinabucket.com/mb.asp?cmd=display&thread_id=3098595. Hope that helps!
Congratulations! You’ve been featured on Wicked Awesome Wednesday! Thank you for sharing your step by step instructions for the burlap banner! Please stop by the website to pick up your “I’ve been Featured!” button!
That’s Wicked Awesome! (Sorry, I couldn’t resist.) Thanks for the feature.
Love this! So so cute!
Thanks, Ms. Meg! Or should I say, Gracias!
Love this! Totally pinning for next year
I’m honored and appreciative of the pin, Kim! And thanks for stopping by to let me know. 😉
I’m just stopping by to let you know I featured this on my blog today! Thanks so much for sharing! You can check it out and grab a Featured button here: http://practicallyfunctional.net/2013/02/the-fun-in-functional-link-party-38/
Thanks, Jessi! I appreciate the feature!
This is so stinkin’ cute! Thanks for the great tutorial! You have been featured! I would love for you to stop by and grab a feature button! http://www.thecraftyblogstalker.com/2013/02/blog-stalking-thursday-features.html
Woot woot! That’s super exciting. Thanks for the heads-up, Katie, and that button has just been nabbed and added to my features page. Thanks again!
I have been in desperate need of a good explanation on using my silhouette software. I got one for Christmas (yay!) but have been a little on the intimidated side about busting it out!!!
I was, too, Allison…so I started The Silhouette Challenge as way to motivate myself to just dive in each month. It has REALLY helped…and there are some great video tutorials out there to help you navigate the software, so don’t let fear hold you back. You are so creative, I can only imagine the fun projects you’d come up with on your Silhouette. Also, if you’re looking for support and trouble-shooting help, I can send you an invite to our Silhouette Challenge Facebook group. Those ladies are AWESOME.
Beautiful Burlap Banner!!!! I love it! Thanks for sharing @ Submarine Sunday!
T’onna
Thank you, T’onna! You’re so kind to stop by and comment each week.
I found you from the DIY Showoff Link party. Your burlap hearts are adorable! Nice job on the banner!
Missy Inspired
http://missyinspired.blogspot.com
Thanks, Missy Inspired! I appreciate it. Heading over to check out your blog now!
oooo so cute! I want a sillioute now!!!(actually i did before too)…LOVE… the languages of love :o) I host a Tuesday Link Party if you are interested in checking out a new party… I’ve also got some awesome giveaways on now until Monday night… stop by!!! http://www.nap-timecreations.com/2013/02/chinese-new-year-in-boracay.html
I didn’t even know what a Silhouette was until I started blogging this fall…I, too, was enticed after seeing so many great projects by other bloggers online. Thanks for the invite to your linky party. I hope to check it out!
I found you from Sugar Bee Crafts! I’m your newest follower via GFC. I host Fluster Creative Muster Party on Wednesdays and I would love it if you would come by and party with us. Hope to see you there!
Hugs, Smiles, and Blessings,
Robin
Fluster Buster
Thanks for the follow, Robin, and for the invite to your linky party. I hope to check it out.
Such a pretty idea!
Thank you, Kara, for stopping by, and for the kind words!
Incredibly awesome project, but I have to say, my eye was totally drawn to that wedding photo. How insanely gorgeous!!!!!! I love it… Way to go on all the blogging goodness… you’ve stepped up your game and it shows! Everything looks amazing! 🙂
I am floored by this oh so encouraging comment. Thanks, Thalita! And I’m excited to hopefully share more pics from our wedding this spring / summer when I do a series on our DIY wedding. We were blessed with an awesome photographer who captured so many beautiful moments.
Beautiful project! I just bought a silhouette last week and I’m pinning this tutorial to give the tips a try. Thanks so much for sharing.
Congrats on your new Silhouette! Prepare to have your crafting world turned upside down (in the best sense).
Wow this is awesome! I love the hard work and attention to detail that you put into this!
Thank you! I can tell you put a lot of hard work and detail into your photography. Amazing work!
It’s just beautiful!!!
Thank you, dear Katherine. Sending three exclamation points right back atcha!!!
Love it! Just pinned it!
Happy Valentines Day <3
Thanks for linking up with the Wildly Original Crowd at I Gotta Create!
<3 Christina
Thanks, Christina! I appreciate you stopping by today and for the pin. Happy Valentine’s Day to you!
Gorgeous! These would look stunning at a country wedding… x
Thanks, Franki! Yes, you’re right. And I can’t help but think of McDreamy’s line from Sweet Home Alabama, “I think a nice, quiet, country wedding is just the ticket.”
These hearts are seriously adorable!! And what a fun way to add some culture!! Love it!
Thanks so much! You have quick the array of fantastic Valentine’s Day projects yourself on your blog. Decorating for holidays other than Christmas is somewhat new to me…so I love seeing what others do. There’s so much inspiration out there!
i ‘amour’ this project! and yes, it should stay…happy ‘engagement anniversary’ tomorrow 🙂 love to you and mark in every language!
Ha ha! Gracias, Jodi. And happy engagement anniversary to you two, as well! Fun that we share that connection – – of the date and approximate location! We delight to remember spending our engagement anniversary with you guys a few years back. Was it 2011? I remember playing euchre together (or was it Dominion?) and laughing until my face hurt. But that about happens every time we’re with you guys. Sending love.
Lauren, this is so cute- I love that it is the same word in diff languages! I am also loving burlap at the moment and need to go buy some while it is on sale! Happy V-Day!
Another fan of burlap?! Yay! Burlap on sale? Where and when?! I should totally invest in some more for future projects. Happy V-Day to you, too, Kelly.
What a fun way to decorate! Thanks for commenting at my blog earlier!
Thanks, Elise! Love your heart rock project that you shared on your blog…oh how fun it would be to hap across one of those rocks while out jogging. And how fun it would be to be able to say that I jog! (Ha. I don’t.)
Wow! This is such a great idea. I absolutely love that you have written this in so many different languages. You are so creative!
Aw, thanks Jodi! It was fun to learn some new words in languages of cultures that I love.
Lauren, I don’t have a silhouette machine. I bought a cricut machine for scrapbooking almost 3 years ago and have rarely used it. Maybe now that I’m retired I might have more time? Is a silhouette machine similar. I’ve been thinking about selling all my scrapbook supplies and getting into painting furniture. I love using Annie Sloan chalk paint and love the power of paint. Ah, but then it’s nice to do paper crafts and a few sewing projects too. I’ll surely visit here more often for inspiration!
Sandy, my understanding is that the Cricut and Silhouette are similar in that they’re both digital craft cutters; however, the difference is that you don’t need to buy cartridges for the Silhouette. Any shape or font you have or can create on your computer can be sent to your machine for cutting, including extremely intricate designs. It’s pretty sweet! However, I know many folk who are faithful to the Cricut and love it…so to each her own! If you’re interested in painting furniture (how fun is that?), a Silhouette could be nice for creating stencils for designs on your furniture pieces, though. And I know what you mean about the power of paint. It’s amazing how it can transform a space! I look forward to seeing you venture into furniture painting. We just did a furniture makeover project that I’ll share next week!
Lauren,
I love the burlap heart banner! What an extensive and comprehensive tutorial! I can see the teacher in you! Your blog is such an inspirational happy place to be! I really admire the brave, bold, creative, beautiful confident person you are! The best part, you inspire others to create and to be confident. This 57 year old woman just loves it when you pop over and offer kind and encouraging words. I’m going to stop talking and catch-up with some of your projects. Incorporating love in several different languages is brilliant. I love the neutrals too!
Sandy, thank you for your most affirming comment! It feels wonderful to know that you have felt inspired by me and my humble projects. That’s always been my goal, whether in the classroom or on my blog. To inspire. You’ve always shown such generosity of spirit with your readers through your blog, your posts, your comments…so thank you for always being such an example of a welcoming blogger. I admire you and your work immensely!
Hello, Lauren – This is a Lovely project and a great tutorial! Thank You for sharing it all – The above Comments must be SO encouraging to You! I look forward to joining in with projects in the coming months! ;-}
Lynden
http://aneleganttouch-lynden.blogspot.com
https://www.facebook.com/pages/An-Elegant-Touch-/162889457132788
You are right, Lynden. They are MOST encouraging. It’s comments like me that fuel my DIY fire and inspire me to keep on creating! And yes, I’m so looking forward to having you and your talented self join us for our next group posting event. Yay!
This is lovely! What a cool idea to use “love” in different languages for your banner. 🙂
Visiting from Tuesday Timeout.
~Emily
http://www.texaslifeblog.com
Thanks for stopping by Emily and for your kind words. Your blog is beautiful…so many fun projects caught my eye! Love your style.
Beautiful! đẹp! όμορφος! vacker! beau! schön! bonito! 美丽! nzuri! bello!
If I have butchered anyone’s language, I sincerely apologize and ask you to blame google translate.
Seriously, Lauren, this is beautiful! You are rockin’ that Silhouette machine. The choice of neutral burlap is perfect and I triple dog dare you to leave it up as it looks just right with your super fun wedding picture.
Thanks for sharing your creation with us at my Monday Makeover party!
Ha ha! When I first saw your comment and read the first line, I thought it was spam, not realizing it was you, Jessica, my bloggy friend, trying on new languages for size. Me encanta. (I love it!)
It’s definitely staying up for Febs…though a triple dog dare may tempt into March! Thanks for your kind words and for hosting such a grand party, Jessica.
Your lovely banner was featured this week at my new and improved link party, “A New Creation”! Thanks for sharing with us!
Thanks for the feature, Jessica! And I’m loving the new and improved linky party name, button, and your blog design. Everything is looking so spiffy!
I love burlap and always have a bunch of it, this will be a great use for it! Also, can I just say how classy your silhouette wall is! Great photos, i love the way you’ve arranged them. Who am I kidding! I love it all!!
I love that you have burlap on hand, Dusty. A girl after my own heart! And you made me smile to hear you describe our gallery display as “classy.” Mark and I had fun putting it together. The parasol was from our wedding, and somehow, Mark managed to hang it up using pins. I keep expecting it to come crashing down, but so far, so good! 😉
Hey Lauren! I love how your burlap hearts turned out, and what a great tutorial! I love how dainty and light they are! Would love for you to link up at the party tomorrow! Newest Follower! xo
http://www.osiemoats.com/
Wow! Thanks for the follow, Bridgett, and invite to your linky party. Just visited your blog and fell in love with your graphics. Such a cool effect!
Just found your page from Cozy Little House and started and finished it in a couple hours. Bookmarked your blog. Thank you! That was the easiest thing I have done with my Cameo.
Jeanette! Whoah, girl. Way to make my day! I’m elated to know that my banner has a twin out there somewhere and that you found it easy to create. You’ve made warmed this blogger’s heart tonight, that’s for sure.
Happy Valentine’s Day! Everyone has loved my banner. I need to work on a heart for Polish to add to it for next year. I hope I can figure it out.
Hopefully I made things clear in the tutorial (and you’ll see in the cut file that I included a blank heart for you to work with)…but if you run into any troubles, let me know! I’ll try to help you out. I’d love to add a polish heart to mine next year, as well. 😉
This project is fantastic. I love everything about it, the burlap, the languages, the pattern. Genius! If you get a chance I would be tickled if you would link up at my Tuesday Pin Party.
http://sarahdawndesigns.blogspot.com/2013/02/pintastic-tuesday-link-party-26.html#.URp4AKXoTCc
(Blushing now.) That’s high praise! Thanks, Sarah. I linked up! Thanks for the personal invite. You have a loverly blog.
Lauren, this project makes me wish I had one of these fancy machines. Very cute! Visiting from Sweet Anne Sweet Sharing Mondays
I appreciate your sweet words, Rachel. And the machine is pretty nifty, but as I’ve said before, never underestimate the power of a freshly sharpened x-acto knife! 😉 It’s definitely more rewarding!
love this! Pinning to my Silhouette board! I’d love for you to come link this up at my Tuesday Time Out!
Melanie Reasons To Skip The Housework
Thanks for the pin, Melanie! And you can bet I’ll be linking up; love your party.
Oh wow! This is so, so beautiful. I’m don’t usually dig valentines decor in my house, but I LOVE this. Now I just need a silhouette machine to fall out of the sky and into my lap. That happens, right?
Ha ha. Kelly, that totally happens. At least, that’s what I hope! And I’m with you; I’ve never been one to decorate for holidays besides Christmas, but blogging has sort of opened my eyes to making decor work for YOU and your own style. Hence, the burlap! 😉
So thoughtful and amazing…I love the languages you chose, too! 🙂 You are very generous to share with others!! LOVE/AMOUR you always!! xxoo Happy V. Day!
Thought you’d appreciate some of these! 😉 Thanks for always instilling in me a love of other cultures…and a hunger to see the world!
Thanks for “catching” that love and hunger!
Oh my gosh, I LOVE it! My husband gave me a Cameo for my birthday last month and I have NO idea what to do with it {I’m not very crafty, but he heard me talk about it and therefore, the gift … he’s so sweet}. Now I know where to go!!!!! Thank you, Lauren! xo
I didn’t know you have a Cameo, Michelle! How sweet of your hubby to surprise you with that gift. It was a bit daunting for me, too, at first…but after managing my way to a few projects now, my confidence is building…as is my love for this incredible machine. What can’t it do? Hope you enjoy your new machine and those first few cuts.
I love this Lauren, it’s a great idea and it looks great! Of course you should leave it there after Valentine’s, I think it goes well with the gallery! it’s beautiful and great tutorial too! 🙂
Thanks, dear Ingrid! Your comments are always so uplifting and encouraging. It’s decided then. The banner STAYS! 😉
🙂 thanks! I think it should! 🙂
Lauren, I LOVE this! Pinning it for next year. Super cute and thanks for sharing the file!
Thanks, Coley. And I’m so glad you participated in our first group posting event this month…even with how busy you are. You rock, sister!
Sweet! Thanks for the great tute also!
Thanks Torrie! So glad you enjoyed it!
Astounding! Your banner is brilliant, Lauren. Like Tried & True, I “love” how you showed us how to make the file as well as sharing them. Thanks!
Wow, that’s generous praise, Mel. Thank you! I suppose I am a teacher through and through. 🙂
You tricked me! I was talking about my project and you had me thinking that you were just going to do a lil papercraft project! THIS IS SO FREAKING CUTE! I love it…I’ll have to wait and get some burlap…
Also, I wanted to THANK YOU for creating this challenge, and the group on FB. It has been a real privilege and joy to get to know our group, and I’m happy to call you my friend now too!
You’re too funny, Jacquelyn. I’m glad to know this suits your fancy! Burlap is the my new favorite material to work with. And I can’t wait to read more about how you made your onesies. I’m 99% sure that onesies will be my March Silhouette Challenge project…so send your tips my way!
Thank YOU for being such a supportive and encouraging member of our Silhouette Challenge Facebook group! You really embody the spirit of what I was hoping for when I started the group. 🙂
Your friend,
Lauren
I absolutely love this banner! And that you took the time to make the tutorial too? You rock!
Ha ha! Well, in part it’s selfish. I’m a beginner, so by creating a tutorial to teach others, I have to really learn it myself. It cements it in my brain! 😉 Thanks for the love, Vanessa. And for participating this month! Your project turned out fabulously.
These look AMAZING! I love the neutral color scheme and I love burlap fabric. Thanks for adding the free file and the tutorial too – awesome post all around!
Thanks, Leah! You are so welcome. Sharing is caring, right? 😉 I’m guessing you have a Silhouette then? Are you loving it?
I don’t have a Silhouette but I’m really hoping to get one soon! 🙂
Your banner looks wonderful. In fact I know someone who would probably like it as part of their wedding decorations. You have a lovely blog. I’m definitely checking out your meal planner.
Ali x
Oooo! Great idea to incorporate this into wedding decor. I hadn’t even thought of that! Brill. Thanks for the kind words; skipping off to visit your blog now, Ali.
I love this project! I wish your tutorial on how to use the trace function had been up yesterday as I spent over an hour trying it figure out the right heart shape for a stencil I was making with my sister. I need to post the photos I have of my cards I made in the group. I had a really great variety for my kiddo and realized I didn’t photograph those before the package was in the mail…just an excuse to make more.
Thanks, Diana! And I think I discovered the TRACE function by accident one time (happy accident?)…. Can’t wait to see your card creations! Yes, do post them if you can snap some pictures next time. (Any excuse to make more, right?)
“Love” it Lauren!
Ha ha! Thanks, Mindi. 🙂
I love this project/challenge on so many levels. Firstly, as a lover of all things geography, I’m drawn to the many languages that you have chosen. Although, I wish you would have given us a bit more insight into the languages you chose in terms of which languages/countries are ancestral and which you have visited (or both).
Secondly, I adore the neutral color palette. I am not one to decorate for anything but Christmas, birthdays, and solstice/equinox celebrations, so Valentine’s Day usually does not make an appearance at our home. I could get behind this banner for may reasons.
Lastly, you are so creative, talented, and generous. Keep up the great work!
Ask and you shall receive! (You and my hubby would get along swimmingly – – he is a geography fanatic, as well!)
Vietnamese: My Mom spent her high school years in Vietnam and Malaysia as her parents were missionaries to the American servicemen and women in Saigon during the Vietnam War. We hope to visit there someday.
Greek: Have a dream to go to Greece one day. Love this particular meaning of love (Greek has four different words for love). Agape – sacrificial love.
Swedish: Sweden is the home of my maternal great grandparents. Our family celebrated St. Lucia Day growing up, a fun Swedish Christmas tradition.
French: I have French blood on my paternal grandmother’s side. And the French are such a romantic culture, I had to include them in a love banner!
German: My husband’s ancestry is German on both sides; and he speaks a little, too.
Spanish: I have a huge heart for Spanish-speakers and have traveled to Spanish-speaking countries on many mission trips: Mexico (2x), Cuba (3x), and Ecuador (1x). One of my goals is to become fluent in Spanish in the next few years.
Chinese: Mark has taken a trip to China and Mongolia. It was one of his favorite adventures!
Swahili: I visited Arusha, Tanzania in summer of 2011 to teach a theatre and playwriting workshop to secondary students there. It proved to be one of the most challenging and inspirational experiences of my teaching career. And I learned a few Swahili words, too!
Italian: Italy was the homeland of my paternal great grandparents. I also grew up in a suburb of New York City that was practically Little Italy, so this is the culture with which I identify most strongly.
I’d love to know which of these you were drawn to, Christine! I have a guess about a few….
Receive I shall! Thanks for taking the time to respond. I will fill you in later – two little ones in my lap at the moment. too. hard. to. type
Oh, this is lovely to read. Thanks! 🙂
Love, Midsommarflicka
I love how thoughtful you were about the languages you picked, it adds an extra layer to the project. (And very cool that you are such a world traveler). I agree that the neutral palette looks great here. Also, that picture right above the banner is magical.
You’re a world traveler yourself, Jess! And thanks for your kind words. That black and white photo canvas of our wedding party is one of our most treasured photos from our wedding day. There’s so much activity going on in that one photo…so much laughter. I did have 10 bridesmaids, so laughter certainly abounded! 🙂
I’m so glad you gave us more deets about the languages….I’m wondering if you could re-add that into your post as an addendum, perhaps? Could give others the chance to read the more personal side of the languages if they want to and don’t look over comments! I was wondering about Chinese….will have to hear more about Mark’s adventures to China and Mongolia sometime!
Great idea to add it as an addendum…will do! Yes, Mark has some incredible stories from that trip he took; we’re hoping to visit China and Mongolia together someday. It sounds like an incredible place!
These are so cute! Where do you buy your burlap at? I see it used widely but don’t recall ever coming across it during my shopping trips.
I got mine at JoAnn’s around Christmas; it might be a “seasonal” fabric for fall and winter, though, I’m not certain…. Not too expensive, either. Maybe $3.99/yard? And I’m sure you could find it online!
Great tutorial Lauren! Thanks so much for the free cut file and for linking up to Monday Funday! I am pinning this an sharing on my Facebook page! xoxo – Cheryl
You’re oh so welcome! I am LOVING Monday Funday each week; it’s one of the most happening parties in town. Thanks for the pin and share, Cheryl!
This is just cute!
On a side note: You wrote the noun “love” in all languages, didn’t you? (I just understand 3 languages completely and in one more only this one word…)
But the german word (which I definitely understand, as it is my mother tongue) you took the verb, not the noun. It shouldn’t bother you. because if you’ve taken the noun it would be needed to begin with a capital letter: “Liebe”. This is our great german grammar! 😉
Love, Midsommarflicka
I knew I probably made a mistake somewhere! Google can’t be perfect at all things, can it? Thanks for clarifying on the noun versus verb distinction. I might have to change that for next year! Thanks, girl.
Oh no, google can’t be perfect! As English’s not my mother tongue, but I’m nevertheless blogging in English I don’t want to know how many weird soundings might be in all my posts! I’m just always hoping that the people get the main idea!! 😉
(I use dict.cc a lot, they have many languages and lots if explanations.)
I actually love to hear people talk for whom English is not their native tongue because I think the unconventional way that they word things is so beautifully. Like my Tanzanian student, Barack, who when asked what his favorite color was, wrote: “My favorite color is watercolor (colorless).” I love to hear things spoken in a different way than my ear is used to. So keep your comments comin’, Midsommarflicka!
This is really cute and so festive!!
Kenley
Thanks, Kenley! I had fun creating it. Never much got into decorating for holidays besides Christmas in the past…but now that I’m blogging, I suppose I’ve been influenced by the holiday craze of blogland.
Love this Lauren! If I don’t have a silhouette machine by next Christmas I am going to have to ask you to cut out some moose for me for my garland (ever try cutting out a Moose’s antlers with scissors? Oh man…)
Just in case you ever want Love in Polish it’s “Kocham”. 🙂
Ha ha. I’d be happy to cut some moose for you. (Cutting out moose antlers with scissors might be the kind of craft task that could push a gal over the edge…yikes!) And thanks for the language lesson in Polish! I’m really loving enjoying being able to express my “love” in more languages than just a couple now.
This really makes me want to go out and get some burlap!! I love the white card stock against the neutral burlap. And thank you so much for including the tutorial!
Burlap is fun stuff, and I’m sort of obsessed with it right now, though it can be a messy fabric to work with. (Nevertheless, I love it just the same.) So glad you joined us this month! Your mantle turned out fabulously, Monica.
I love it, Lauren! It really does feel like it belongs under that wonderful gallery. I dare you! Haha! Looks like a great tutorial too. You are making me want a Silhouette Cameo more and more. Oh, all the wonderful projects I could do!
Consider the dare accepted then! (See, I didn’t need much convincing.) Thanks for the kind words, Bethany. And I know it was the influence of other bloggers that made me really want a Silhouette Cameo in the first place…guess I’m a part of the peer pressure for you, too, now! 😉 And you keep making me want to invest in jewelry-making supplies with all of your amazing creations.