
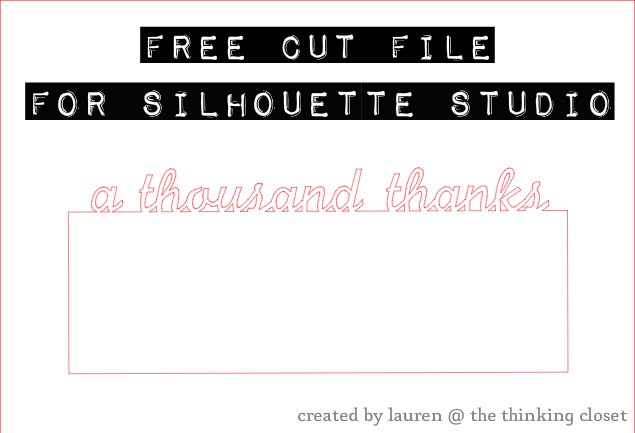
“A Thousand Thanks” Card & Free Cut File

Here’s my first completed project in my new series, The Silhouette Challenge: a thank you card a la William Shakespeare. What I love about the shape of this stationery is that it’s designed to fit easily into a legal-sized envelope, which is unexpected for a thank you card. It also suits people like me who tend to be a bit (ahem) verbose.

Free Cut File
My initial inspiration came from these letter-sized thank you cards by Kolette Hall that I found at the Silhouette online store. I decided to design my own rendition using the phrase “a thousand thanks” from Shakespeare’s Henry V in a more playful font.
For you folk with your own digital cutter, I’m happy to share the cut file I created with y’all fo’ FREE. Just click HERE to access the download. {Fine print: this design is for personal use only and is not to be used for commercial purposes. Thanks!} Then, warm up that machine to start cuttin’ up cards for those Christmas thank yous.
Now me and my verbose self can’t just walk away and leave this post at that! I think it would be just as valuable to share a run-down of how I made this, so those of you with Silhouette Studio software can adapt this design to suit your fancy. I can attest, this is a great beginner project and was the very first thing I cut on my new Silhouette machine. If I can do it, so can you!
Silhouette Tutorial:
Step 1. Open up Silhouette Studio. Click on the rectangle icon on the left toolbar. Create a rectangle around 9.3″ x 3.9″ or slightly less to ensure your card fits in a legal-sized envelope.

Step 2. Click on the text icon on the left toolbar and the text style icon on the top right toolbar. Select a font you like and type out your text! (I used PilGi for mine.) Click on the select icon on the left toolbar to drag your text to the top of your rectangle. To re-size the text so it fits the width of your rectangle, click on the text box in any one of the corners.

Step 3. Now, using the rectangle icon from step 1, create a new rectangle that will sit within the large rectangle and butt up against the bottom of the text.

Step 4. You can now get rid of the original large rectangle by dragging it off of your grid to the margin (for use with future letter-sized projects). Use the magnifying glass icon on the top left margin to zoom in on your letters. You’ll note that some of your letters aren’t seated evenly on the top line of your rectangle, and if you chose a script font, some of your letters might not even be linked. We can fix that! Make sure your text box is selected. Then, on the bottom margin, click on the icon that reads “ungroup selected shapes.” This will allow you to work with each letter individually.

{Update: Since publishing this post, I learned a MUCH easier way to do step #4 & #5…although the old method is good to know about, so you might want to go through those motions just to learn about ungrouping. But in the Text Style window there is a “Character Spacing” dial at the bottom. Just adjust that until your letters are slightly overlapping! And voila! Easy peazy. You’re ready to hop down to step 6!}
Step 5. Work with each word to ensure that each letter is touching or even slightly below the top of your rectangle, as well as linked to the letters on each side. The overlap is really important as we prepare for our next step. Special tip: once you’re satisfied with the spacing within one word, you can draw a box over it, and use the group icon to group those letters back together, that way, you don’t lose the work you did as you make adjustments in spacing between words.

Step 6. Now, it’s welding time! We need to weld together all of the lines that are touching or overlapping. Draw a box around your entire design to select every item. Then, click on the welding icon on the bottom toolbar.

Step 7. If you generously overlapped your text in step 5, you might be ready for the next step. But if you zoom in and see a few areas you want to clean up like the “o” in “thousand,” there’s an easy way to do it.

On your top menu bar, click OBJECT, then RELEASE COMPOUND PATH. Then, zoom in the section you want to work on first. On the left toolbar, click on the “edit points” icon. You can now adjust the points so that your lines are smooth and less jagged, or you can connect lines that might be broken. Fiddle around with this tool to get a sense for how it works. You can always hit “undo!”

Step 8. Now, you’re ready to send your design to the Silhouette machine for cutting! Lay your paper of choice on your cutting mat in the same spot as your design appears on the screen (this is mostly important if you are working with a half sheet or scrap). If you’re using cardstock like I did, a blade of 3 and speed of 4 works well. And if you’re working with a brand new mat like I was, you may find that your paper curls as you peel your finished card off of the mat. One tip I learned is to place the card face down on your table and peel the mat up off of the card instead of the card off of the mat. Also, the more projects you do, the less sticky your mat will be, and the less your paper will curl. Happy card-making!

No Silhouette? No problem!
You can totally recreate this effect without a digital craft cutter by following these simple steps:
- Cut a piece of cardstock to the size of an envelope.
- Open up your word processor and type out your word(s) in your font of choice. Use the ruler in your program to match the width of your text to the width of your cardstock. Print.
- Using scissors, cut off any excess paper around the four edges of the text. Tack the text to the top edge of your cardstock using small pieces of double-stick tape.
- Use an x-acto knife to trace around your letters, cutting through both the paper and the cardstock. OR use a sharp tool to outline the letters to give you sightlines, remove the paper, and cut out your text then. Done!
I hope you enjoyed this insanely long post. I’m loving discovering the ins-and-outs of my new Silhouette Cameo and can’t wait to tackle a new project in The Silhouette Challenge for next month.

To review more easy-to-follow tutorials like this one, check out my Silhouette project gallery: The Mother Lode of Silhouette Tutorials for Beginners. You’ll find tutorials organized by both material and project type! Happy cutting!
{I link up here.}
![]()
Thanks so much for your great tutorial and (for those of us a little time challenged at the moment) your cut file. 🙂
A thousand thanks for this cutting file and for so generously sharing your creative Silhouette ideas!! I shrunk the file down to the size of envelopes that I have on hand and made several cards. You’re spreading gratitude like wildfire around the world :).
Thanks so much for this great tutorial and for offering the cut file. Just found your blog. Am looking forward to taking a closer look at your projects! TFS!
Just stopping by to say Happy Birthday!
Hi Lauren,
I’m so excited about my first Silhouette Cameo project based on this tutorial. I made a blog post about it with links to your web page and to this tutorial. I also posted about it on my Facebook page!!! Can hardly wait to try another of your tutorials!
Here’s the link to the blog post if you want to see what I had to say about The Thinking Closet and The Mother Lode of Tutorials:
http://peaceloveandjoyce.com/my-very-first-silhouette-cameo-project-peace-love-and-joy-notecard/
A thousand thanks for this great tutorial. You made my first attempt at using the Cameo a really positive & exciting experience!!!
Peace, Love and Joy,
Joyce
http://www.facebook.com/peaceloveandjoyce
I’m so EXCITED!!! I fell in love with Silhouette projects I had seen on Pinterest & various blogs so I asked Santa (my very generous husband) to bring me a Cameo. I finally got to unpack it this evening and installed the software. After a quick Google search, I found your tutorials and based my very first project on your “Thousand Thanks” card. I used the same font, just changed it to “Peace, Love and Joy”. I can’t believe I did something so cool on my very first attempt!!! I had a few issues with not “welding” things perfectly in a couple spots, and my mat is way too sticky so I tore the paper a little trying to remove my notecard, BUT I am totally excited.
Thanks for this great tutorial. It was very easy to understand, which I really appreciated since I had never actually seen an electronic cutting machine before and didn’t have a clue how to use the machine or the software. Now my only problem is that it’s already 12:47 a.m. and I want to play some more but I really need to get some sleep!!!
Thanks again!!! I’m so anxious to come back and try your other tutorials!!!
Peace, Love and Joy,
Joyce
http://www.peaceloveandjoyce.com
http://www.facebook.com/peaceloveandjoyce
Yay, Joyce! I’m so proud of you, girl! Isn’t it empowering to create something you dreamed up like your “Peace, Love, and Joy” card? And this is the tip of the iceberg of what you can do with your machine! And ya know, since writing that tutorial, I learned a trick for welding script fonts that is 10x easier, so I’m going to go back into my post and edit it for others. And yeah, the sticky mat thing will be an issue at first. Just rub a pair of jeans on it a few times to get rid of some of the stick. But not too much! In a few more projects, you’ll be wishing you had more! Lol.
Oh, and if you think of it, I’d love to see a photo of one of your cards! You can send it to me via email if you like, and then I can feature you in my next Reader Showcase!
Now get some sleep! And sweet dreams of Silhouette cutting!
Thank you for sharing. I am going to have to try this for sure!
You can do it, Sarah!
I followed this tutorial just now for my first experience creating on the Silhouette software… and I got there… made what I wanted! Playing with the “edit point” took me the longest… totally worth it because it turned out perfectly! Now to unpack the cutter and try it out!
Thanksssss!
You’re so welcome, Katie! I’m glad it was a do-able first project for you, as well. (And hopefully you were able to cut it without too many issues.) Onwards and upwards now!
I just used the weld tool for the first time. I never realized how easy it was!!!
Isn’t it awesome? Opens up a whole new world of possibility, too!
Thanks for this studio file it’s great!
Aw, you are so welcome, Diane! I hope you get some good use out of it!
Love this design and extremely helpful tutorial! Which font did you use? I’d like to do some notecards with a name on the edge and love the font you chose. Thanks!!
Yay! I’m glad it was helpful to you, Missy. To answer your question, the font I used was PilGi…but I had another reader tell me that she could not find that font on her computer, which made me wonder if it’s only on Macs. Then, I scoured the internet trying to find her a free download…and had no such luck. So, if it turns out you don’t have that one, here are links to ones that are similar:
http://cooltext.com/Download-Font-%EC%9D%80+%ED%95%84%EA%B8%B0+Un+Pilgi+A
http://designinstruct.com/articles/resources/font-collections/10-free-beautiful-script-fonts-to-download/
http://sparklingallison.com/2012/04/11/fonts-for-the-silhouette-cameo/
There are a large assortment of script fonts out there, though, and if you find one you like, download it, drag it to your fonts folder in your library or on your hardrive (you can google where to locate it), and then it should open in Silhouette.
Best of luck!
Thanks so much for the links to other script fonts! I found several more for my collection. I have a mac, so I do have PilGi, but now I have other options too! Looking forward to your next Silhouette post!
Hooray! I’m glad you found some keepers…and that you have PilGi, too! Happy to help, Missy.
What a pretty idea! Thanks for linking up!
Kim
I appreciate your kindness, Kim. And how you find the time to visit us and leave a comment is beyond me. Thanks for being such a superstar party host!
Thanks a milion! Just got a Silhouette and starting the learning process!
It’s a joyride, let me tell you. It seems like a lot of folk have gotten Silhouettes in the past couple of months…must have been something in the air this holiday!
Love this! Thank you so much for sharing 🙂
Happy to do so, Krafty Kellie! I hope you enjoy it!
Hi Lauren,
I featured your thank you cards at my Monday Makeover link party tonight. They are so lovely. I’m glad you came and shared them!
http://www.ahumblecreation.com/2013/01/monday-makeover-link-party-take-6.html
What an honor! Thank you, dear Jessica. Your blog and linky party are SO welcoming.
This is amazing, Lauren! Thank you ever so much for sharing your gorgeous file, as well as the idea and even how to make our own versions. Can’t wait to try it out.
My pleasure! And I just came back from visiting blog with all of your amazing printables that you share. So lovely! Bookmarking your blog so I can return there in the future. Cheers!
Thanks for sharing this!!! I just got a silhouette for christmas so I am a huge newbie! I’ve been trying to figure out how to do things! You tutorial helped me a ton! Thanks for linking up to Tell Me Tuesdays!!
Ooooo, Tori, I’m so thrilled for you! Welcome to the newbie club! So glad that you found the tutorial useful. I know I watched a lot of other tutorials when figuring out how to do what I wanted (I love how generous everyone in blogland is). Also, I’m going to shoot you an email with an invite to our little Silhouette Challenge facebook group. It would be a great place for you to ask questions and find encouragement in these beginning days of exploring your new Silhouette! (It has been that for me.)
This is so cool, now I don’t think I need a cricut!
Hopping by and following your lovely blog’s G+ and Pinterest. I blog @ Getting Healthy with Essential Oils
Thanks, Lynn! And congrats on publishing a book! Very exciting indeed. Following you back on G+ and Pinterest.
Wow! Fantastic card pattern. Thank you for partying with the Wildly Original Crowd.
<3 Christina at I Gotta Create!
Thank you for being hostess of the mostess, Christina!
I saw this fun little project made its way onto craftgawker! Great job Lauren!
He he. Sure did. Thanks, Jessica! First one in a while…I even took photos with that in mind (made sure I’d have enough room on the top and bottom to crop as a square). That was key, I think.
Good strategy! I’ll keep it in mind. Sadly, they didn’t like my new pillow pictures. Oh well!
Thanks for linking it up at my Monday Makeover. It is definitely “table” related – you made it there, but also to me table is more a concept of hospitality and relationship, not just a tangible space. So your notes definitely fit that mold!
Aha, just reading your other post, I expressed a desire to see your January challenge, and here it is! Ask and you shall receive! 🙂 That’s so sweet of you to share the file with people…it’s such a lovely design. And I, too, love your Shakespearean choice of phrase! This encourages me to get going on my thank yous!!
Seems like you’ve already gotten going! We received such a lovely thank you card from you in the mail the other day (with the owl package). We soaked up every sweet word your wrote, and the card is now displayed prominently on our “Christmas Card Display,” so we think of you every time we pass by and see it.
Glad you enjoyed the shout-out to Billy Shakespeare. And speaking of Shakes, we had some folk over last night (friends of Mark from Wheaton/Honeyrock), and one of them had seen you in the Hamlet Project and of course LOVED IT. We discussed your stellar performance as Polonius (which might have been my favorite of your acting roles to date). Your entrance alone was pure genius.
Great tutorial, Lauren! I love how you first gave the file for others to download, then explained exactly how you made it, then gave directions for those of us who doesn’t have a silhouette cameo to recreate the effect. I love your card, btw. What a fun surprise for someone who opens it!
Ha ha. Thanks, Bethany! (You comment so specifically, which I love.) The post was a little over-achiever of me, I’ll admit. I guess I just wanted to make sure it was helpful to EVERYONE, not just those with a Silhouette. I may not be able to keep up that pace each month, but I thought that my kick-off post needed to really reach more than a small percentage of folk, ya know?
Lauren, GREAT JOB! I love what you created, and you’re so generous to share it with the rest of us ‘fo free!’ Love it love it love it. You’re a pro already! I’ll definitely be using your download myself. Enjoy the rest of your weekend!
Debbie
Thanks so much, Debbie! You’re kind to say so. I’m definitely figuring things out as I go along and am very glad to share the file I created. Hope it’s of use to you!
These really turned out great Lauren!!
Kenley
Thanks, Kenley! Though the design is simple, the letter-sized card concept still kinda rocks my world.
I’m loving my new Cameo right now too! The only downside is not having enough hours in the day to make things with it, right? Thanks for the free Silhouette file, absolutely beautiful!
You’re welcome, Vanessa! I’m happy to share it. And I agree, so many cuts I want to make – – not enough time. Sigh. 🙂
I’m so envious of your Christmas gift. I still use a craft knife, my cutting board and my hand if I need to cut out any stencil and it takes FOREVER. Very nice! I owe you an email reply. It’s coming I swear.
No worries, Alex! I think I may have figured out some of the answers to my follow-up questions, so only if you find time. Your first email was so incredibly informative, you’ve already been an immense help to me. Getting closer and closer to making that migration.
And as I said in a previous post, never underestimate the power of a freshly-sharpened x-acto knife. They really can work wonders!
These look beautiful! So glad you’re enjoying your new gift! And I think it would be more accurate to say “If I can do it, you can at least make a noble attempt” 😉
Oh, Gianna, you don’t give yourself enough credit, my love! You are such a creative bird – – your lovely home is evidence of that!
What a fun and lovely idea!!! Thank you, Lauren! 🙂
You’re so very welcome! It was a joy to create the card, the file, and the tutorial!
Oooh I’m definitely going to do something like this but with my handy dandy x-acto knife! 🙂 I love that stinkin’ knife!
Me, too! I don’t want my x-acto knife to feel neglected (we’ve had many a good time together), so I’m sure I’ll still be using mine for projects to come. There are definitely some things that are better done by hand (if you’re a handsy type). 🙂
Hehe. The only thing I have considered buying that is less by hand is an electric saw. But, for now, I’m using my hand saw. Oh I do use an electric drill from time to time, but it was free. Otherwise I enjoy doing everything by hand because it’s often cheaper and the work always feels good.
You’re right about the work feeling good. I can get lost in a project working with my hands for hours (hence my 8 hour long tree skirt). And Mark is the same way – – in fact, he’s outside right now, working on making a box out of those pallets we found. Cheap therapy, right?
Great minds think alike because I spent yesterday sanding and sawing something I found. 🙂 I’m sore as heck from all that sawing but it feels good. 🙂
Also, you have beautiful handwriting Lauren!
You could see that? 🙂 Tee hee. Thanks, Aubrey! I was a notebook doodler all throughout school, so I credit my handwriting skills to all of those hours I wasted doodling away, refining my “font.” 😉
Very impressive….not sure I would have the patience without a Silhouette to cut out the letters but I love the phrase…it’s just right…and Shakespeare, no less! Also the hand-written note is a rarity these days and demonstrates a personal touch of love! It’s wonderful you are loving and USING your new gift!
You are the queen of the handwritten note – – the woman with “a friendly pen.” Hopefully, you’ll be getting “a thousand thanks” of your own in the mail very soon.
So sweet of you to remember what my roommate Beth said so many years ago…you are amazing!
Oh boy, I look forward to a thousand thanks of my own in the mail! The trick for me is to slow down and take the time to write something unique and encouraging with true gratefulness to others…sometimes I confess I write just to get them done. But when I write to really express my gratefulness, it’s a joy!!
For some reason that phrase that Beth coined has always stuck with me – – in fact, I’ve given that compliment to a few others since first hearing it. But you’re the original “friendly pen,” ‘fo sho.
And I think we all feel that desire to write something from the heart and not just to get ‘er done. Your letters have always been heartfelt from my standpoint, so I wouldn’t give yourself too hard of a time!
Ooh, I don’t remember the “friendly pen” story, but it is such an apt phrase to describe Mama.!..she’s got a friendly pen for sure, and friendly typing fingers now too! She is the best encourager via facebook, blogs, emails, as well as cards and packages, am I right, Laur?
Amen to that! You are SO right. I hope to only be half as encouraging and uplifting and affirming as she is. Which reminds me, I need to finish my thank yous…especially now that I have the cards cut and no excuse to delay! 🙂
P.S. I dig your tute skeelz, lol. 🙂 You broke it down like a pro!
I learn from the best! (Seriously, I think your screenshots the other day with your tutorial-just-for-me were my inspiration! Thank you, again, Carly.)
Very darling! They radiate appreciation. Kudos to you for challenging yourseld to tackle all things Silhouette this year.
Great verb, “radiate.” Must use that more often. And I figure one project a month is do-able as it should still allow me time to tackle other fun projects…like sewing and journaling.
You are just so very talented and generous! Great challenge to yourself!
Thanks, Christine! I can be quite the procrastinator at times, so it feels good to accomplish January’s challenge now. Now, I can get a head start on Febs!
Love it, Lauren!! Since I didn’t get a Silhouette for Christmas, why don’t you send me a few and I will promptly write you a thank you note! 🙂
Seriously, great job on your first challenge and thanks for sharing! I’m going to pin this for the someday when I get one.
Ha ha! Great idea. And believe me, I have so many pins for projects I can’t accomplish right now (either for financial or practical reasons), but that’s what Pinterest is for – – a dream board for the “someday” ahead! 🙂