
Punched Tin Ornament Tutorial
In case you missed my guest post on Lines Across last Wednesday, here it is, friends.
Happy ornamenting!
I’m eager to share with you my new favorite d.i.y. project: a punched tin ornament. What I love most about this ornament is that it can be made using items from your recycling bin and toolbox! How sweet is that?

“Where did the inspiration for this ‘lil guy come from?”
I’m so glad you asked! Well, it came from a candle-holder I picked up at Crate & Barrel. I just love the way the gold shines through the pinholes, casting a brilliant light on the table where it sits….
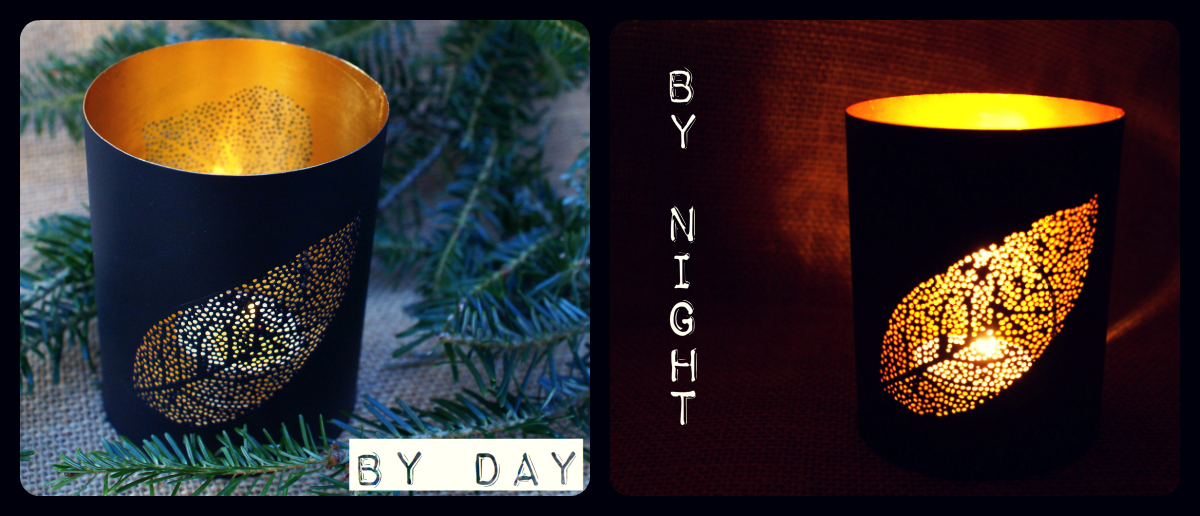
Mesmerized by the golden glow one evening, I got to wondering if the same effect could be re-created…in an ornament.
Wonder no more. Folks, I can be done!
Here’s the how-to, so you can make your own punched tin ornament this holiday season.
SUPPLIES:
- Tin can
- Rice or sand
- Hammer
- Drywall screw
- Black spray paint with matte finish
- Metallic gold acrylic paint
- Ribbon or hemp
- Other items: towel, wax paper, permanent marker, rubber bands, paintbrushes.
- Optional: Drill, scrap wood, and sandpaper.
Step 1. Prep your can. Rescue a tin can from your recycle bin and give it a good rinse in the sink to help remove the label (goo gone works wonders). Then, fill your can with rice or sand, up until 1/4″ from the top. (I didn’t initially do that…and you’ll see in moment why I should have.) Fill it to the same level with water, and place it in the freezer for at least 6 hours. This will allow you to easily punch the tin without denting your can. The rice/sand helps keep the water from causing your can to bulge in the process of freezing. Thanks to Fine Gardening for that tip!

Step 2. Prep your design. Remove your can from the freezer, place it on a thick towel atop a hard surface, and prepare to get to work immediately. You can sketch out your drawing on wax paper and secure it to your can with rubber bands, or if you plan ahead, sketch your design directly on your can using a permanent marker prior to freezing.

Step 3. Punch your tin. Not with your fists! (But you knew that.) I used a drywall screw with a pointed tip, however a nail could suffice or an awl if you have it. Tap the screw with your hammer 1-2 times to make a tiny hole in your can; you’ll find it easily punches through. Working from top to bottom will work best as you’re trying to work on sections before they melt. Don’t forget to make two holes on the sides for your string. When your punching is complete, let the rest of the frozen rice thaw in the sink. Rinse and dry your can.

Step 4. Drill your tin. Now is the time to create a hole in the base of your can through which a Christmas light will nest. My hubby helped me with this part and used a 3/8″ bit to drill a hole in the bottom of the can. For stability and to avoid denting the can, he placed a piece of scrap wood inside the can and drilled directly into that. Then, he used a tiny piece of sandpaper to smooth the sharp edges of the opening. No drill? No problem. Simply create the outline of a circle with your screw in step 3, and punch it through to make the hole.

Step 5. Spray paint your can’s exterior. Face your can downward to spray paint your can’s exterior with a black matte finish paint. I used Krylon Chalkboard Spray Paint that I already had from my Wooden Chalkboard Label project. I gave mine four coats, allowing the coats to dry at least 10 minutes in between.

Step 6. Paint your can’s interior. Part of what I love so much about my Crate & Barrel candle-holder is the vibrant gold on the interior, so I was committed to creating the same effect with my ornament. I used metallic gold acrylic paint on the interior of my can. Two thick coats sufficed! You’ll see from the photo below that I didn’t paint over the punched holes to avoid clogging. The top rim also needed a thin line of black paint.

Step 7. Apply the finishing touches. Tie black ribbon or hemp string through the side holes (I made my knots on the inside). Consider including a personalized note and the date on the bottom of the ornament, so you remember it for Christmases to come.

You’re done, dearies! Hang it up on your tree with a Christmas light nestled in the bottom. Then step back and take in the magic of your glowing punched tin ornament.


I link up at these partays.
![]()
I like what you have created! But that was back in 2012…The tin cans now are ridged…Do you have a suggestion where I can find smooth tin cans?
Hi Ramona! I would still search your grocery store in search of smooth tin cans (perhaps the ethnic food aisle). I have hope that there are still some out there! Best of luck.
This is such a cool tutorial! What a neat process to make such a neat ornament 🙂 Awesome. Thank you so much for linking up to Get Your DIY On with us last week! I hope you’ll join us tomorrow with your hand made gift project!
Mandy @ The Hankful House Blog
Thanks for taking the time to check it out, Mandy! I heart your linky party, and I will definitely be back with some handmade gifts to link up. Thanks to you and hostesses for all that you do.
Ok, officially LOVING this! Can’t believe I’ve not seen your blog before, but thanks to KnockOffDecor, I’ve officially fallen in love with it! All subscribed! LOVE this gorgeous tutorial (pinned to my “I think I can pull that off” board, here… http://www.pinterest.com/orachel/i-think-i-can-pull-that-off-jewelry-crafty-tutoria/) and see about 10 more I’ve gotta check out asap! Thanks so much for the inspiration and the creativity! GORGEOUS blog artwork for ‘thinkingcloset’, btw!
Hugs & Hope,
rachel of OddModicum
http://www.OddModicum.etsy.com
Aw, thanks for your support, Rachel! I’m so delighted that you moseyed on over; I’m a fast fan of YOU! Off to visit your etsy shop!
And thanks for the kind words on my blog and my header! Gotta give props to Rachel from Sincerely Peachy for the design work on that!
HI Lauren, Thanks for linking this beautiful ornament up at the Link It or Lump It Link Party! The Thinking Closet is fast becoming one of my favorite blogs. I don’t subscribe to very many, but I just signed up for your emails! I find myself continuing to click photos and projects that catch my eye at link parties and so many times they bring me right here! Love your ideas and inspirations.
xo
Melissa
Super cute! Pinning this. Thanks for stopping by Sweet Sharing Monday.
This is inspiring. I’m collecting DIY gift ideas and this one looks totally do-able (and beautiful). I tried doing something like this before but it didn’t come out right. Now I see why, based on your tutorial. Pinning now!
So beautiful and lovely! Pinned and loved – thank you for sharing at MightyCrafty Mondays!
Thanks for hosting, Lissa!
These are awesome! You are a featured favorite this week on Saturday Show & Tell on Cheerios and Lattes! Thanks for sharing last week; we can’t wait to see what you’ve been up to this week! 🙂
Merry Christmas!
Mackenzie
Wow! That’s so exciting! Thank you, Mackenzie. Can’t wait to stop by and join in on this week’s party.
Would it work to paint the inside of the can before punching? Then one wouldn’t have to do all the tricky part of painting around the pattern holes.
Cathy, that’s a good thought. My only hesitation would be that the spray paint might ruin the paint job because it’ll get in through the punched holes. But it might just need some minor touch ups. It’s definitely worth a try!
So cute, thanks for the great tutorial! I pinned this for the future……..love them you did a great job…….andi thewednesdaybaker
Thanks so much for your sweet comments, Andi! Glad you liked the tut.
Excited to try this project! Thanks for a great tutorial.
You’re welcome! My absolute pleasure!
Very pretty!
Thanks, Erin! The star tin ornament is definitely my favorite of the year this year.
great project. I have done something simular but this is outstanding.
I must try this.
Following
Janice
Ooo! How neat! Any tips or tricks from your experience? Thanks for the follow, too, Janice.
No tips, you dont need any. Mine was so long ago i had forgotten so this was a great reminder
So pretty! I would love if you linked up at Fall Into the Holidays-
http://redcrowgreencrow.wordpress.com/2012/12/15/fall-into-the-holidays-13/
Katie @ Horrific Knits
Thanks for the invite! And what a fun blog title you have. Makes me smile.
Woo – these are beautiful. My Aunt used to make these and I’ve always wondered how she did it. The flow from these are so pretty. Thanks for a tutorial!
How neat that your aunt made these! I wonder if she would have any tips or tricks of her own? Thanks for your sweet comment, Rachel!
Beautiful!! Thanks for the rice & water tip. Your designs are fantastic.
Thanks so much for linking up at the party,
<3 Christina at I Gotta Create!
Thank you so much, Christina! I appreciate you stopping by.
Beautiful! I’m sharing this my future sister-in-law, she’s going to love this rustic look. Thanks for sharing!
Thanks for the share. Hope she enjoys it! 😉
So vintage and cute…how did you figure out about the rice? Neat trick!
I linked to the article that gave me the idea in the first place. I knew there had to be an alternative to freezing plain ole water in the can (which many people said torked the can), and happed upon that really helpful tip from Fine Gardening. It was super easy to punch the tin with the frozen rice inside!
I love this! I have a whole section in my pantry of cans and glasses that I cleaned out and saved. I saw one tutorial on Pinterest where you punch holes in the cans, making patterns. I haven’t seen them use rice to do it or make an ornament out of it so I love it, very clever! I can’t wait to get started on that project, something I needed quite a few cans for and now have enough. 🙂
I can just picture your pantry with empty cans and jars, waiting for a second life! I love it. (I should clear some space in order to do the same.) I can’t wait to see your multi-can project…you’ve got me curious about it now!
super cute!
Why thank you, Kelly! I was really pleased with how they turned out.
These are wonderful! I love how they look — and that the steps really seem “do-able”. 🙂
Kenley
When I write tutorials, I always hope that folks will think that, so I’m glad to hear it!
What a great idea, Lauren. I like that it can be adapted for any season or decor.
Blessings,
Holly
http://thesouthernhomemaker.com
That’s very true! Lanterns for your lawn or deck steps would be really fun to create…with tea candles inside. I think you’ve inspired a future post for me, Holly!
So pretty, Lauren!!! 🙂
Thanks, Katherine! I had fun making them.