
Wood Pallet Sign Tutorial
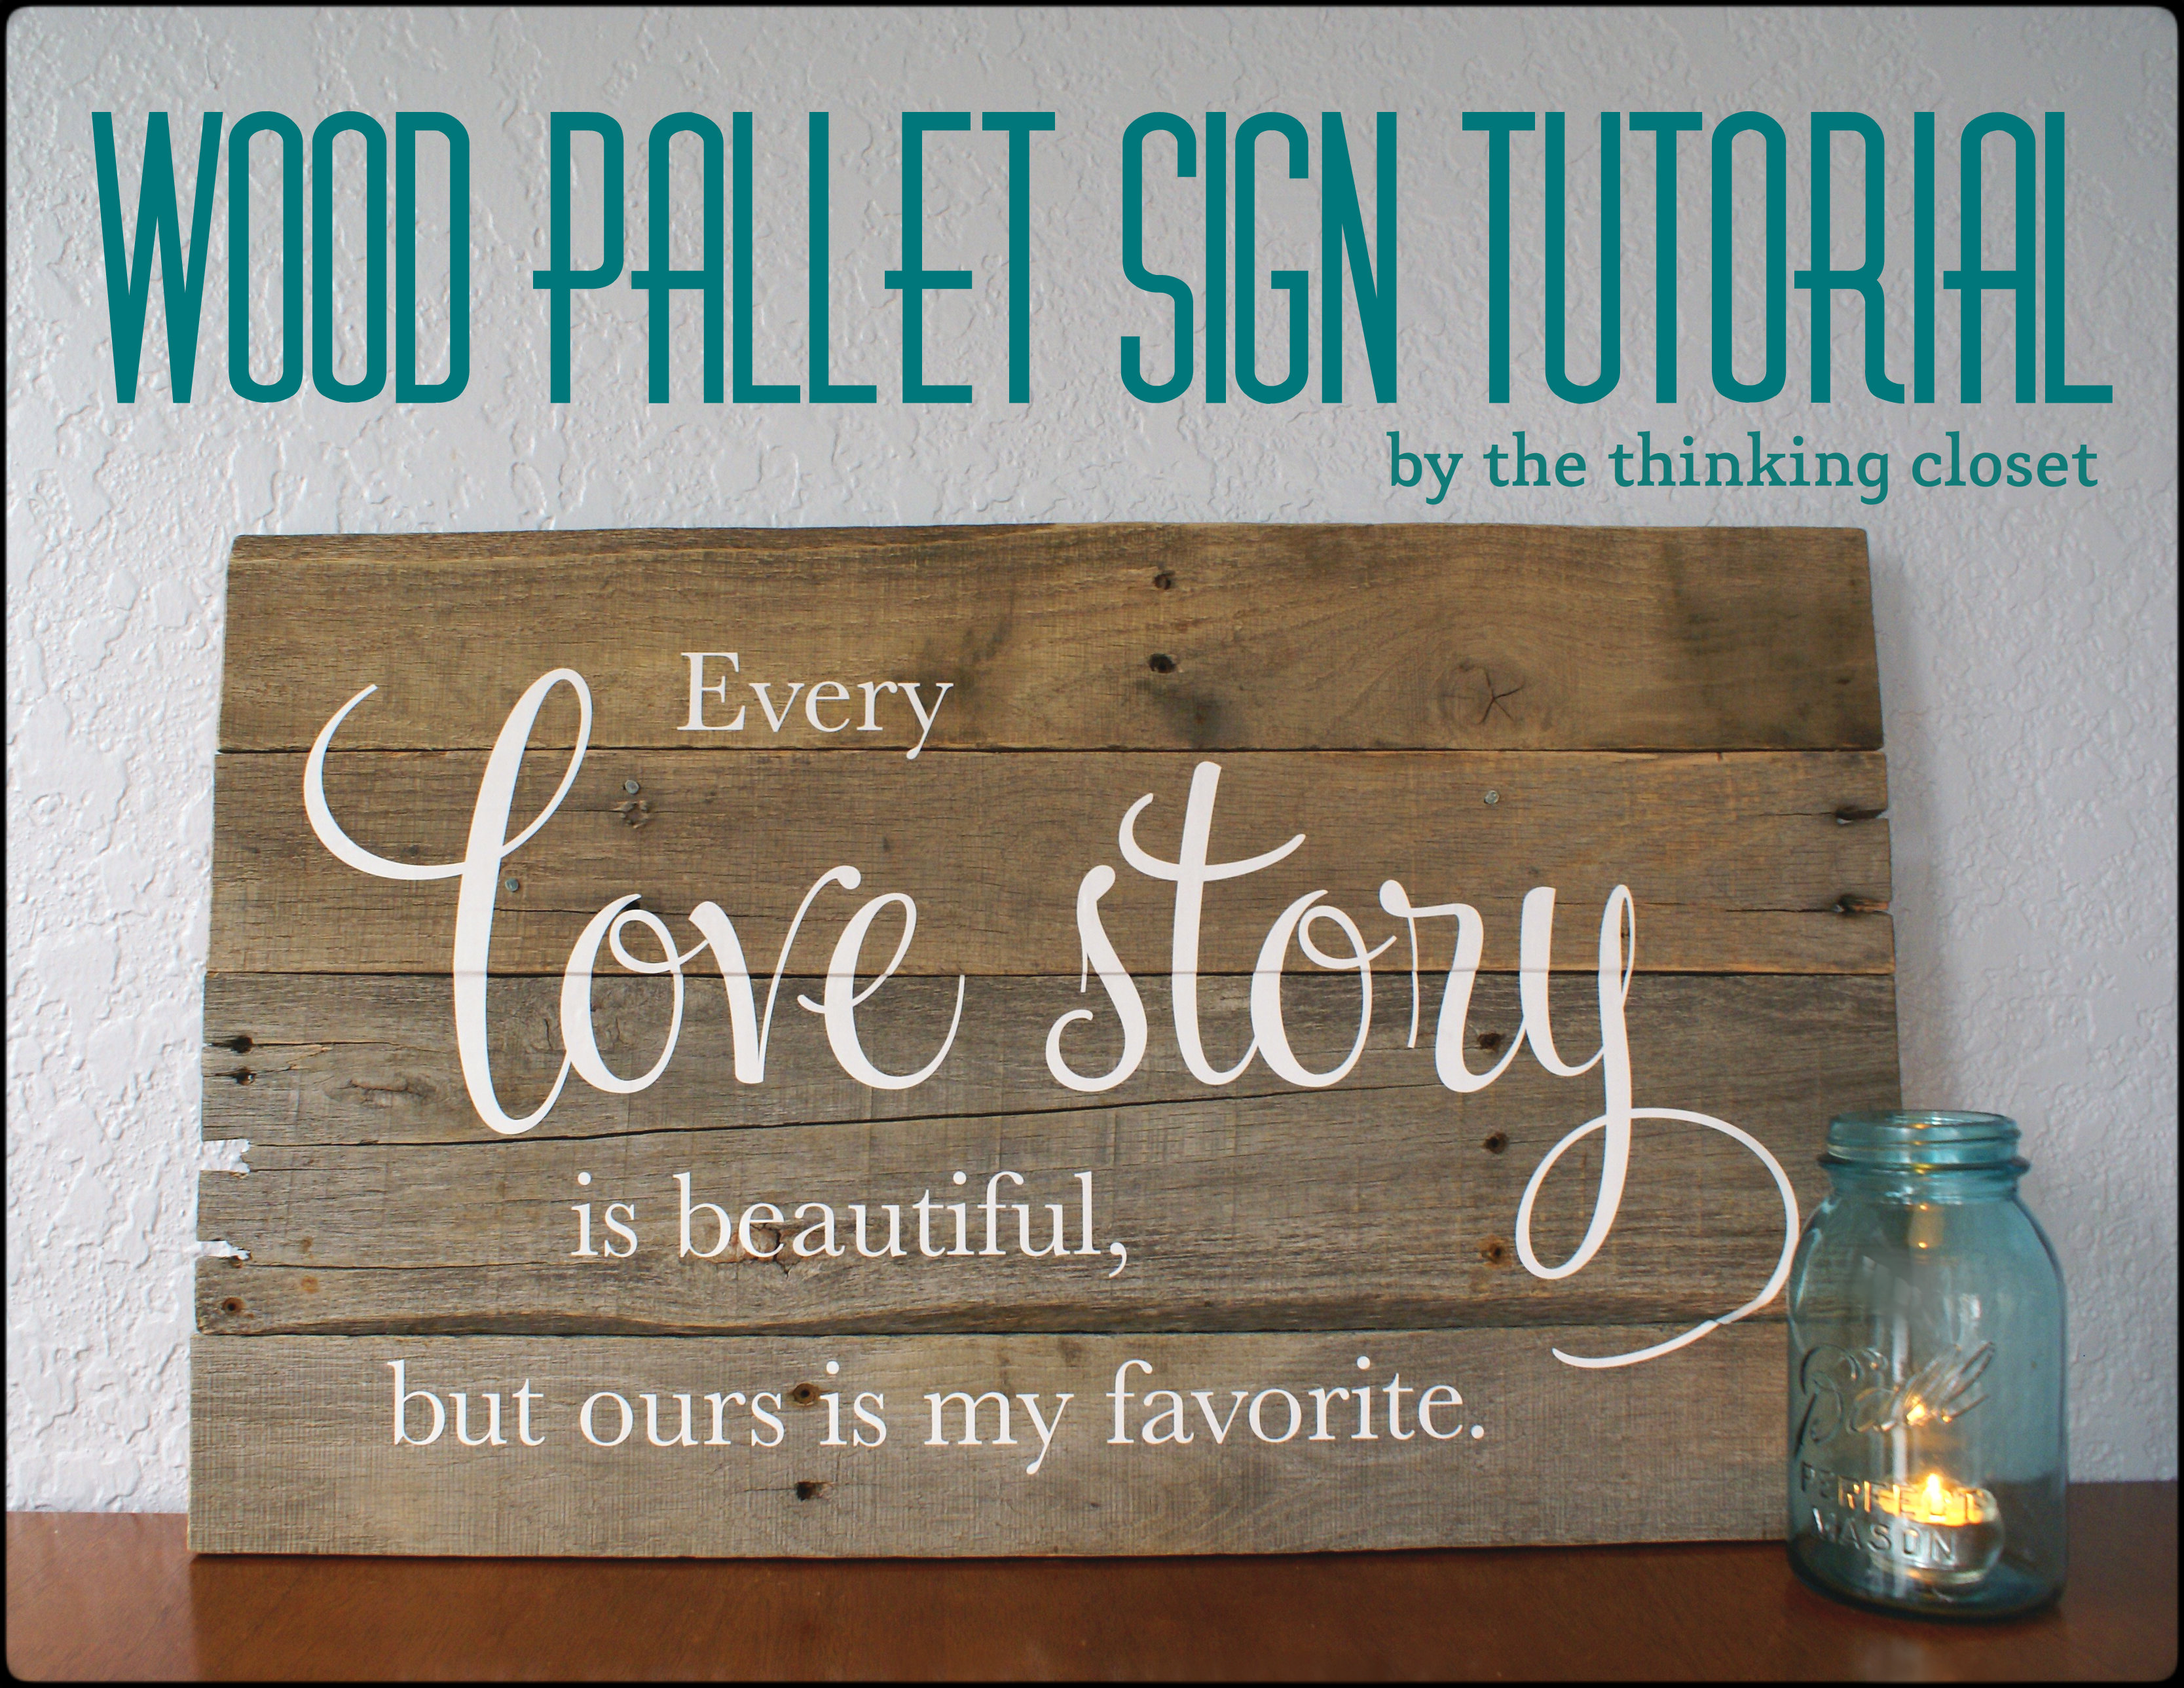
It was like giving your Mom a baseball mitt for her birthday.
For Mark’s b-day last week, one of his gifts was the opportunity for us to create a wood pallet sign together! Mark is passionate about wood-working, so I figured he could tackle the wood pallet part, and I could do the lettering – – it would be a team effort!
To start, we needed rustic wood. So, we went to our local lumber shop, Thomas Lumber, in Winter Park, FL. Mark’s eyes lit up as soon as we entered the wood-yard. He was like a little kid in a candy shop.

We initially purchased a piece of reclaimed wood out of which we were going to create our sign; however, on our way to get the car, we spied this….
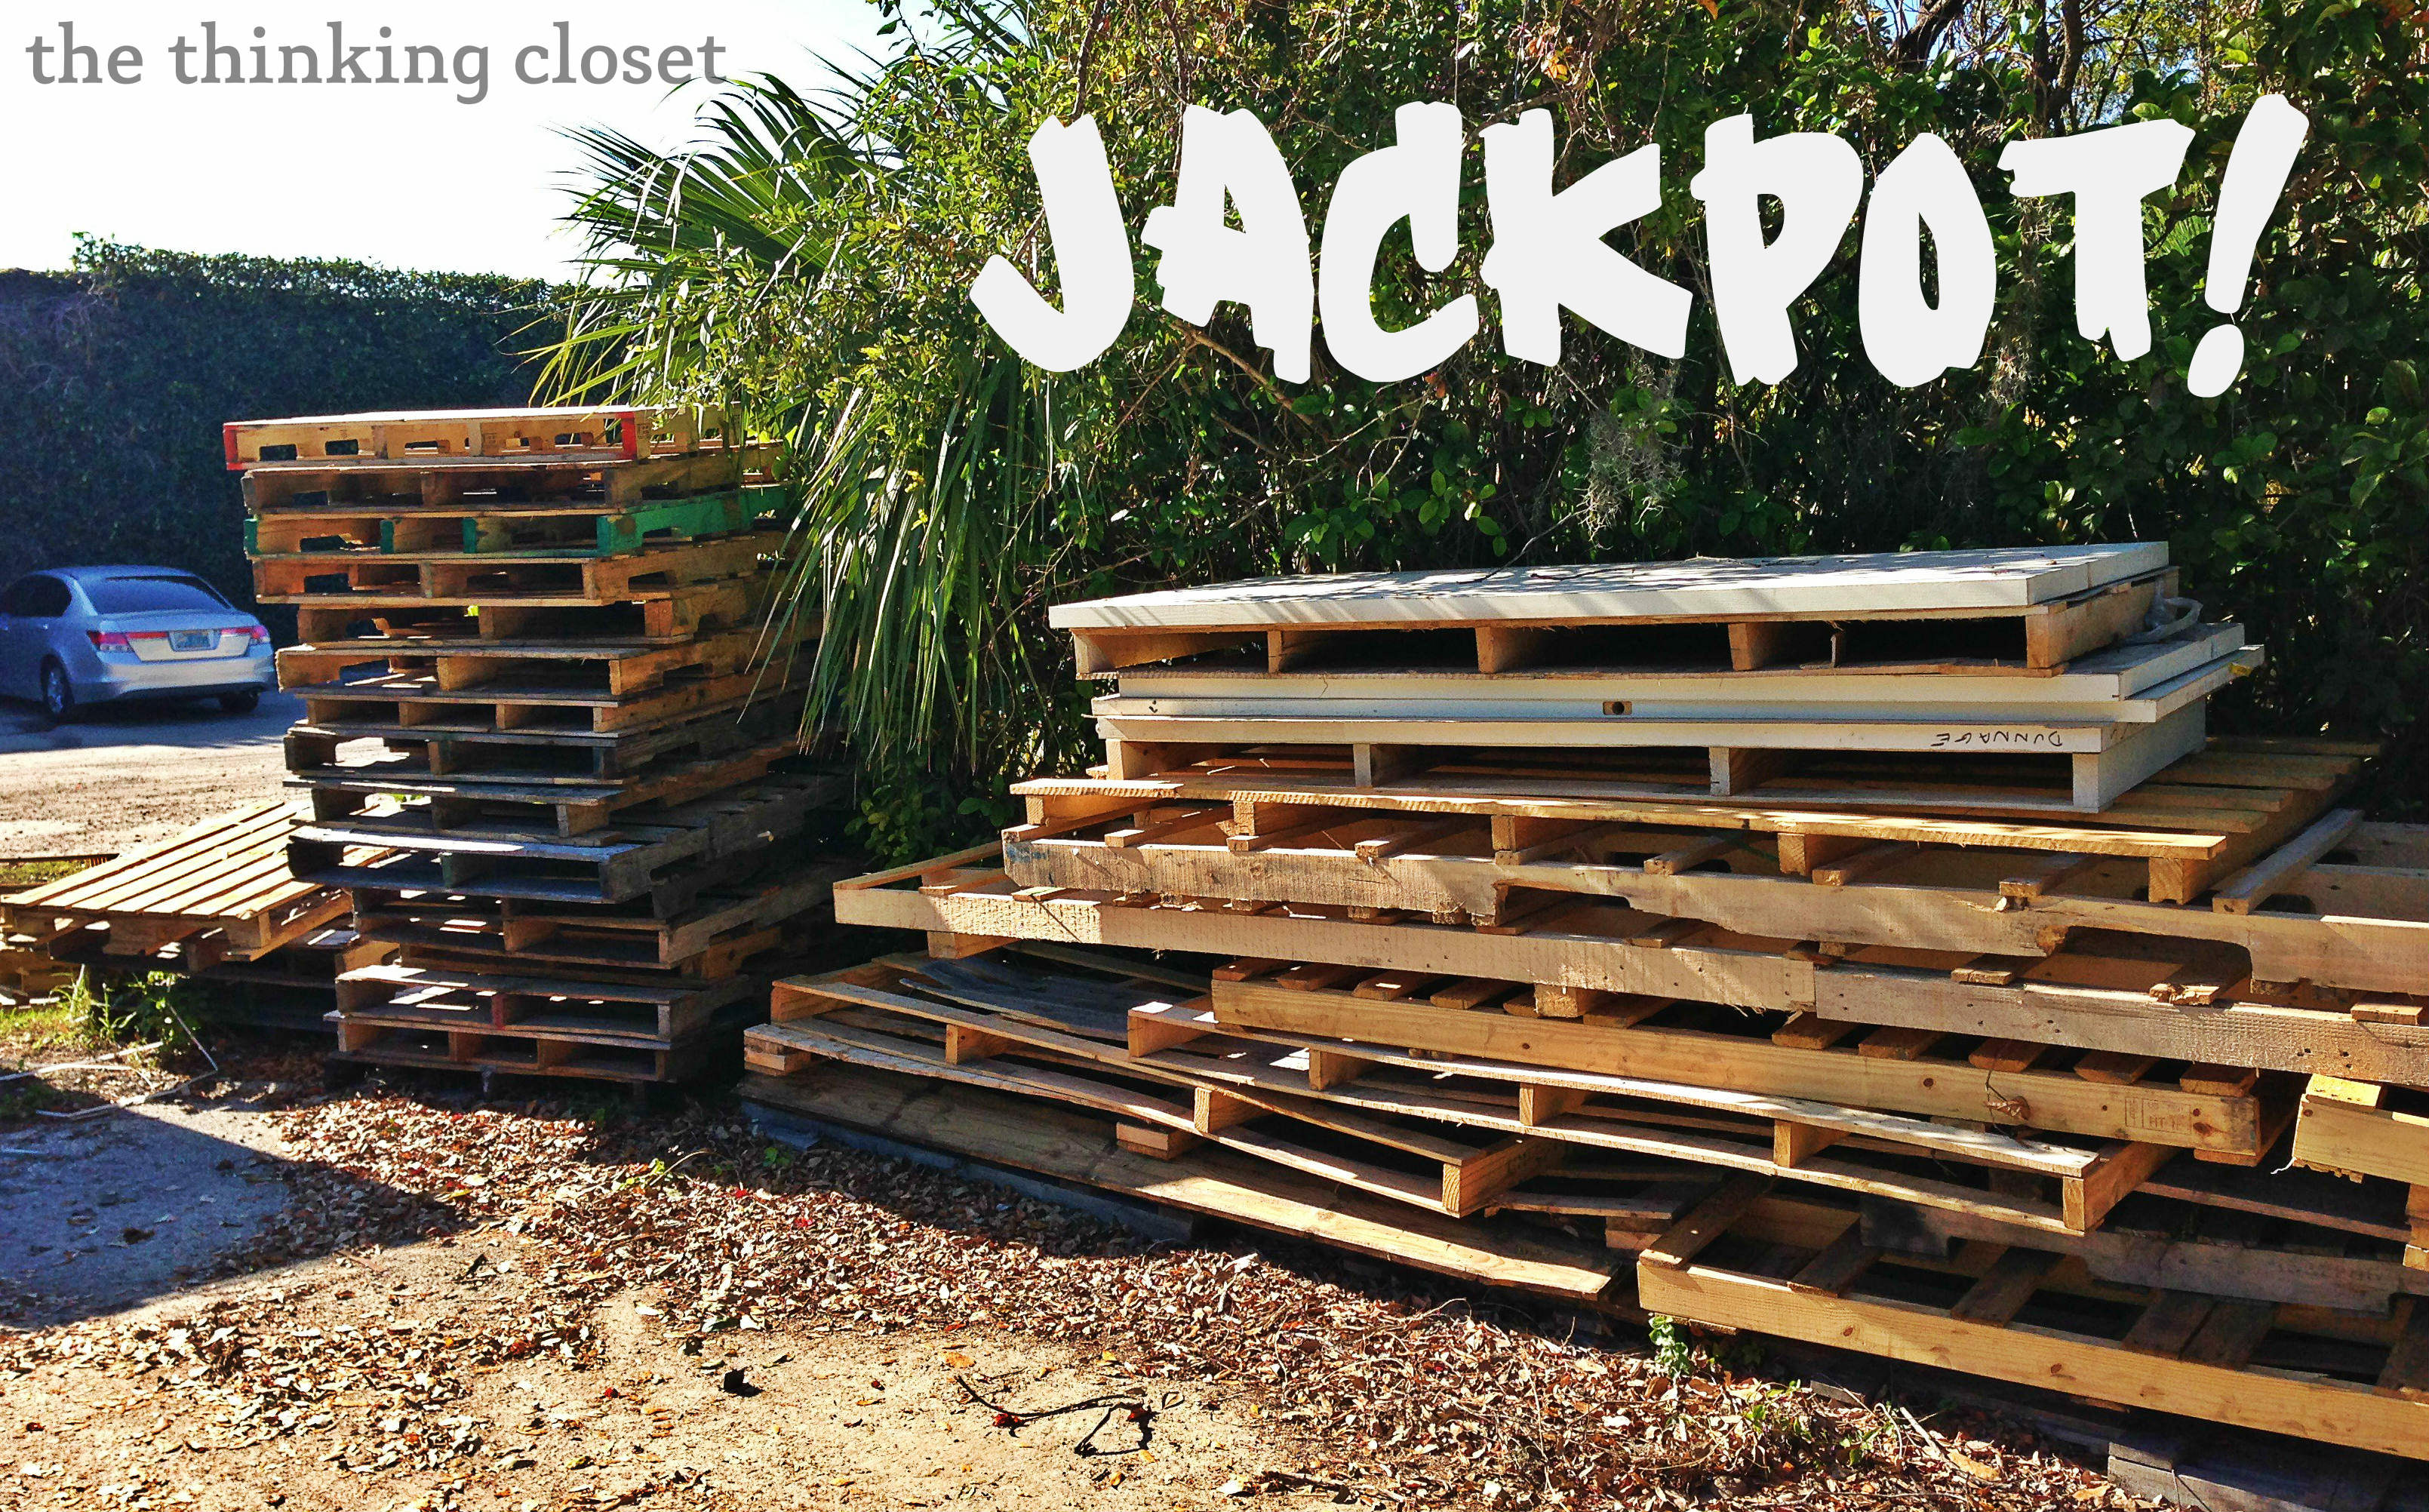
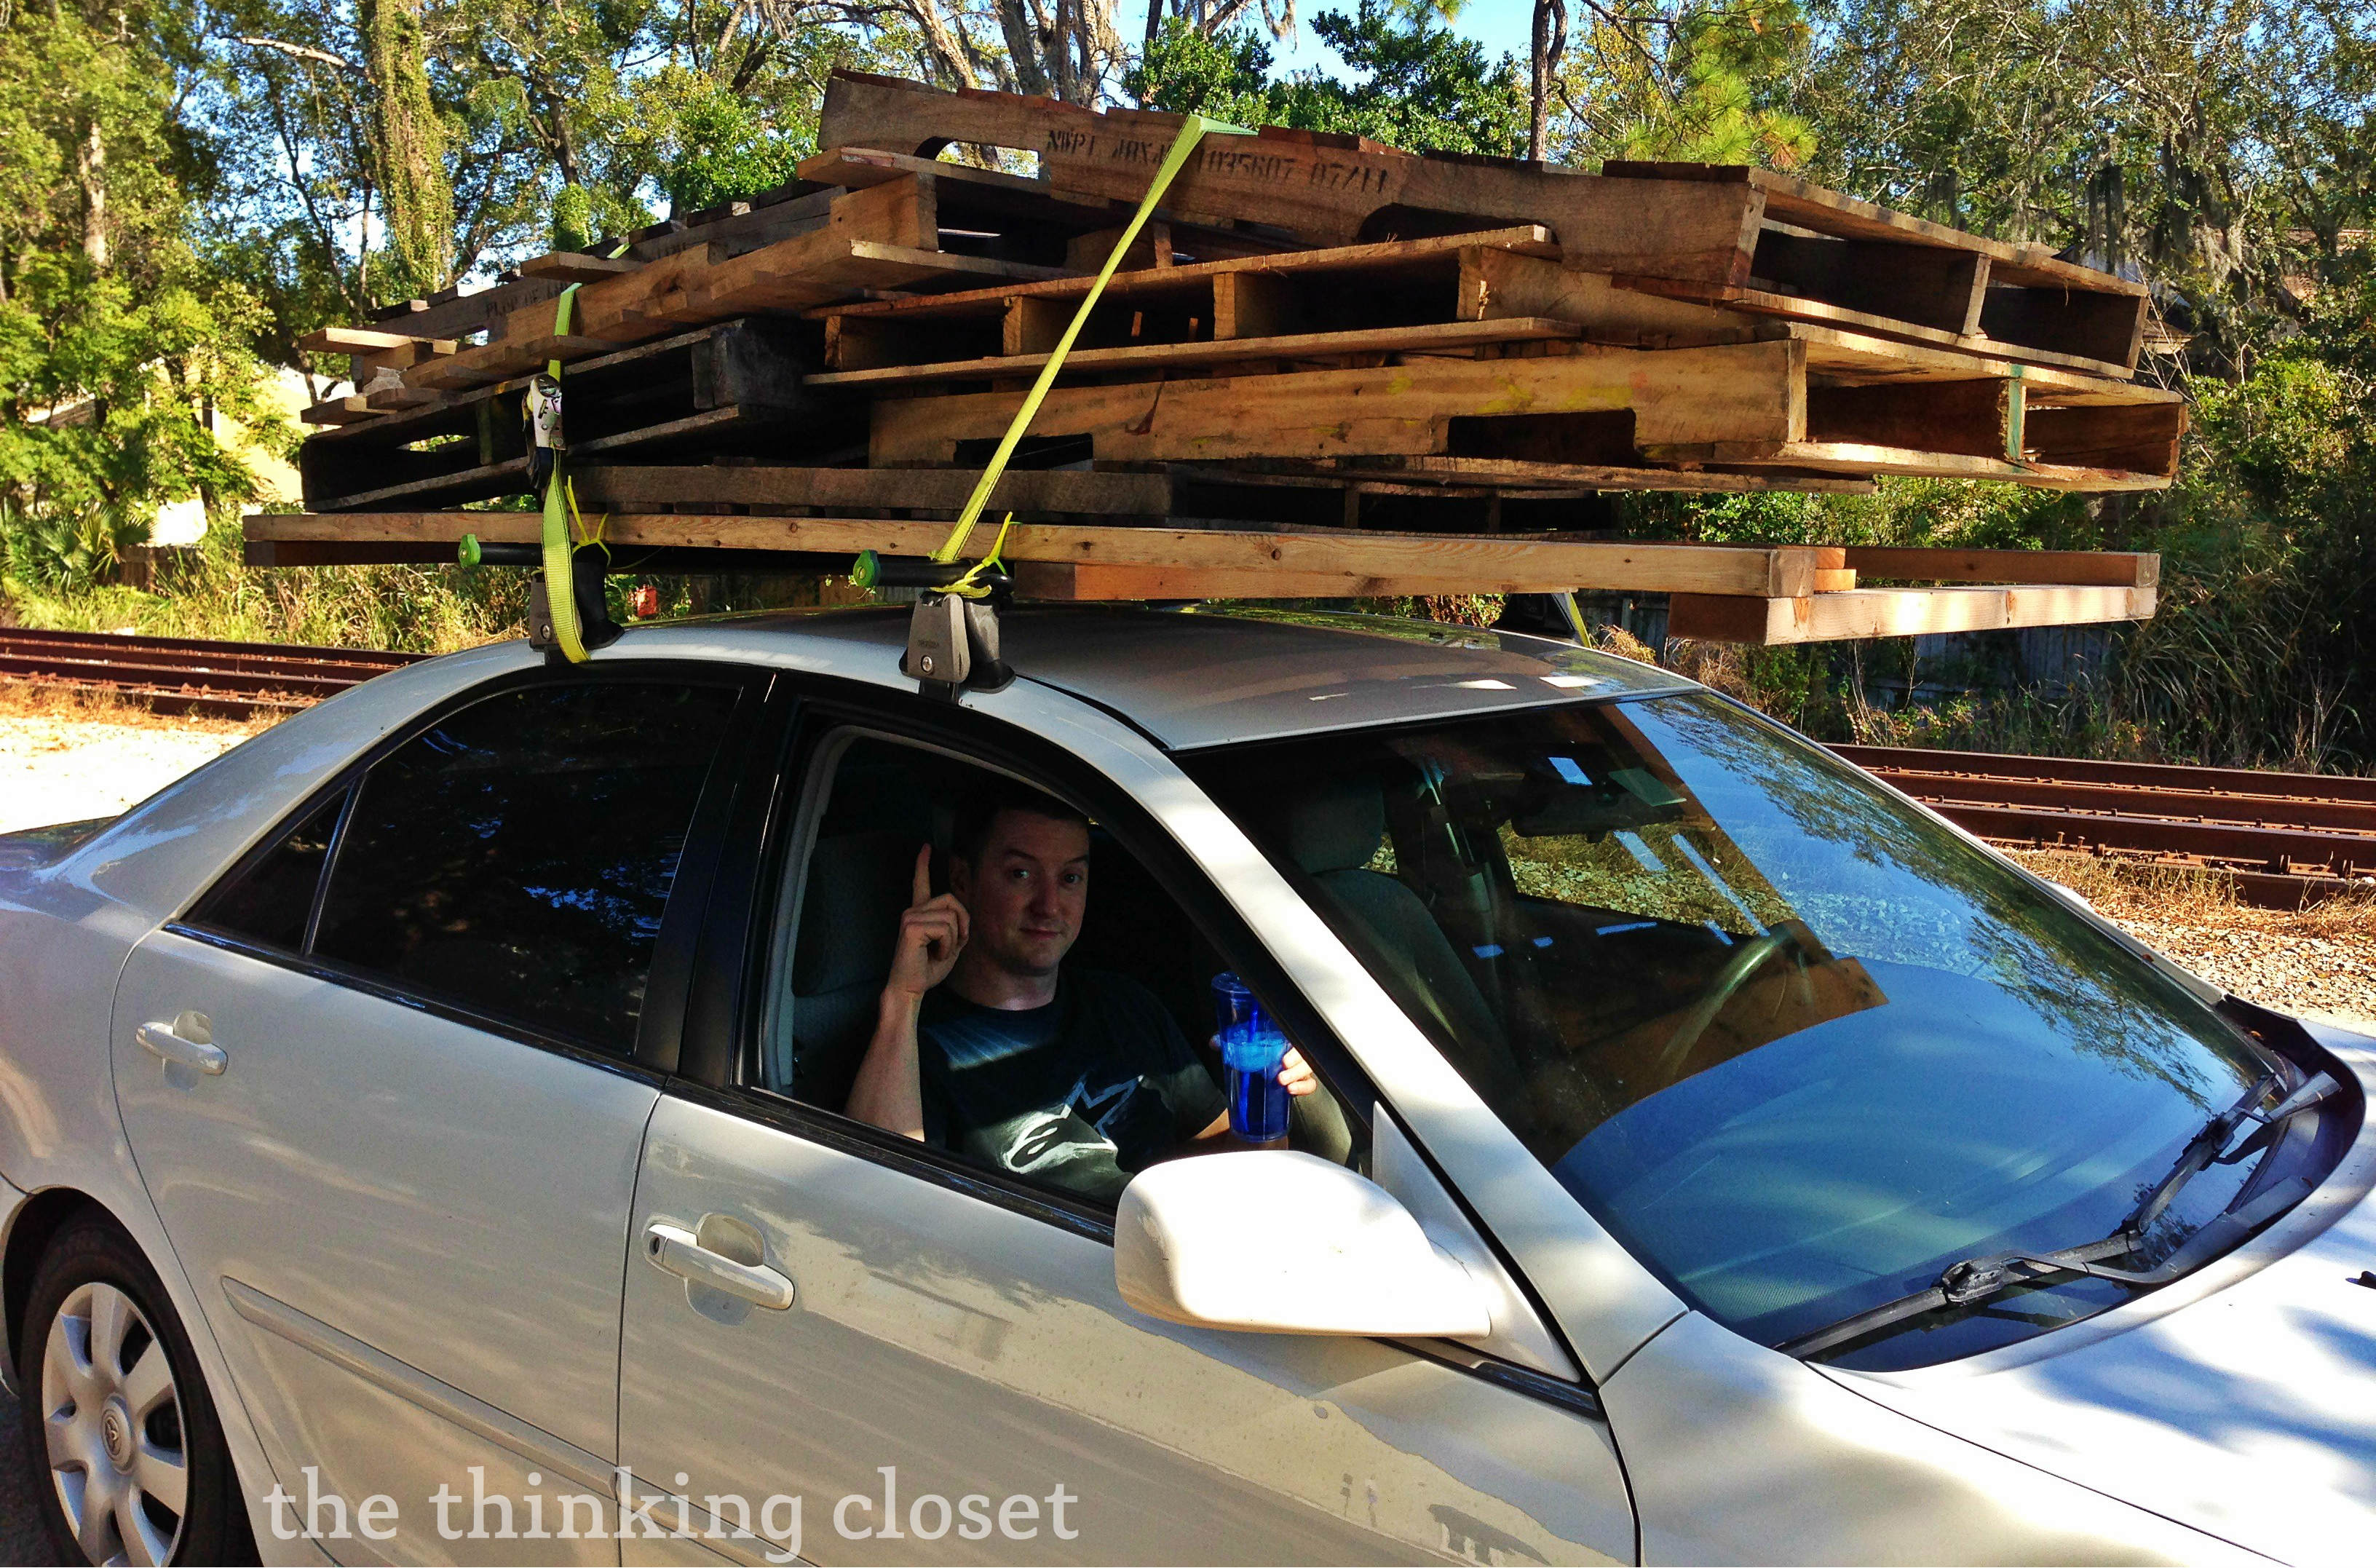
Stacks and stacks of free wood pallets by the dumpster! We ended up returning the reclaimed wood board and piled several pallets atop our Camry. Thankfully, Mark knew the difference between “good” wood and the “junk” wood!
And now, I’ll bow out to let Mark share about his side of the project. Just a heads-up that this is the “technical” part, which is totally Greek to me. But he wrote this with the hope that someone who hasn’t worked much with wood before could easily “d.i.y.” on the wood pallet part. If you’re more of a visual person, just look at the pic below and go crazy! Or if you know someone who could assemble your board for you, skim on.

MARK: “Hi readers. For your raw material, you’re going to want some old boards. One great (and inexpensive) source for solid hardwoods is old pallets, “crates,” that are used for shipping heavy things like car parts, boxes, or furniture. Because they are made for strength, most often the wood is oak (red or white), rough-cut and still with transverse lines from the sawmill. In comparison to the more ubiquitous soft woods like pine, oak is much harder, stronger, and more durable. While it takes more power to cut, sand, and fasten oak, it is well worth the effort. You’re going to be spending some quality time with the wood, so start with something you like. The smell of oak sawdust is one of life’s good things.
LIST OF MATERIALS:
- Pallet with at least 6-8 boards as described above, approx 1/2″ thick x 3 1/2″ wide by 26″ long.
- Wood screws (from 3/4″ to 1 1/4″ depending on board thickness). I like black drywall PH2 screws best.
- 16 gauge wire or 1/16″ cable, approx. 2 ft long.
TOOLS: sandpaper, drill, saw, clamps. I have a Rigid 18V cordless drill that I use for drilling, screwdriving, AND for sanding, using an arbor and backing pad with discs of sandpaper. Ideally you want a chop saw and circular saw, but a handsaw could be used.
So you’ve assembled your pallet, other materials, and tools. Let’s get started.
1. First, sand the portion of the pallet you will use.
2. Cut the boards from the pallat, as close as possible to the ribs where the wood is secured with nails. The nails used in crates are very difficult to pull, so I recommend leaving them and just using the clear sections of wood.
3. Cut each of the boards to a similar length (I used 26″ horizontal pieces), and sand both sides and all edges.
4. Arrange the boards in the desired sequence, side by side. Measure the height of this sequence (pallat boards are 3 1/2 inches wide, so somewhere around 14 inches +/-).
5. Subtract 2 inches from this number, then cut 2 boards to this length, to be used for the vertical braces.
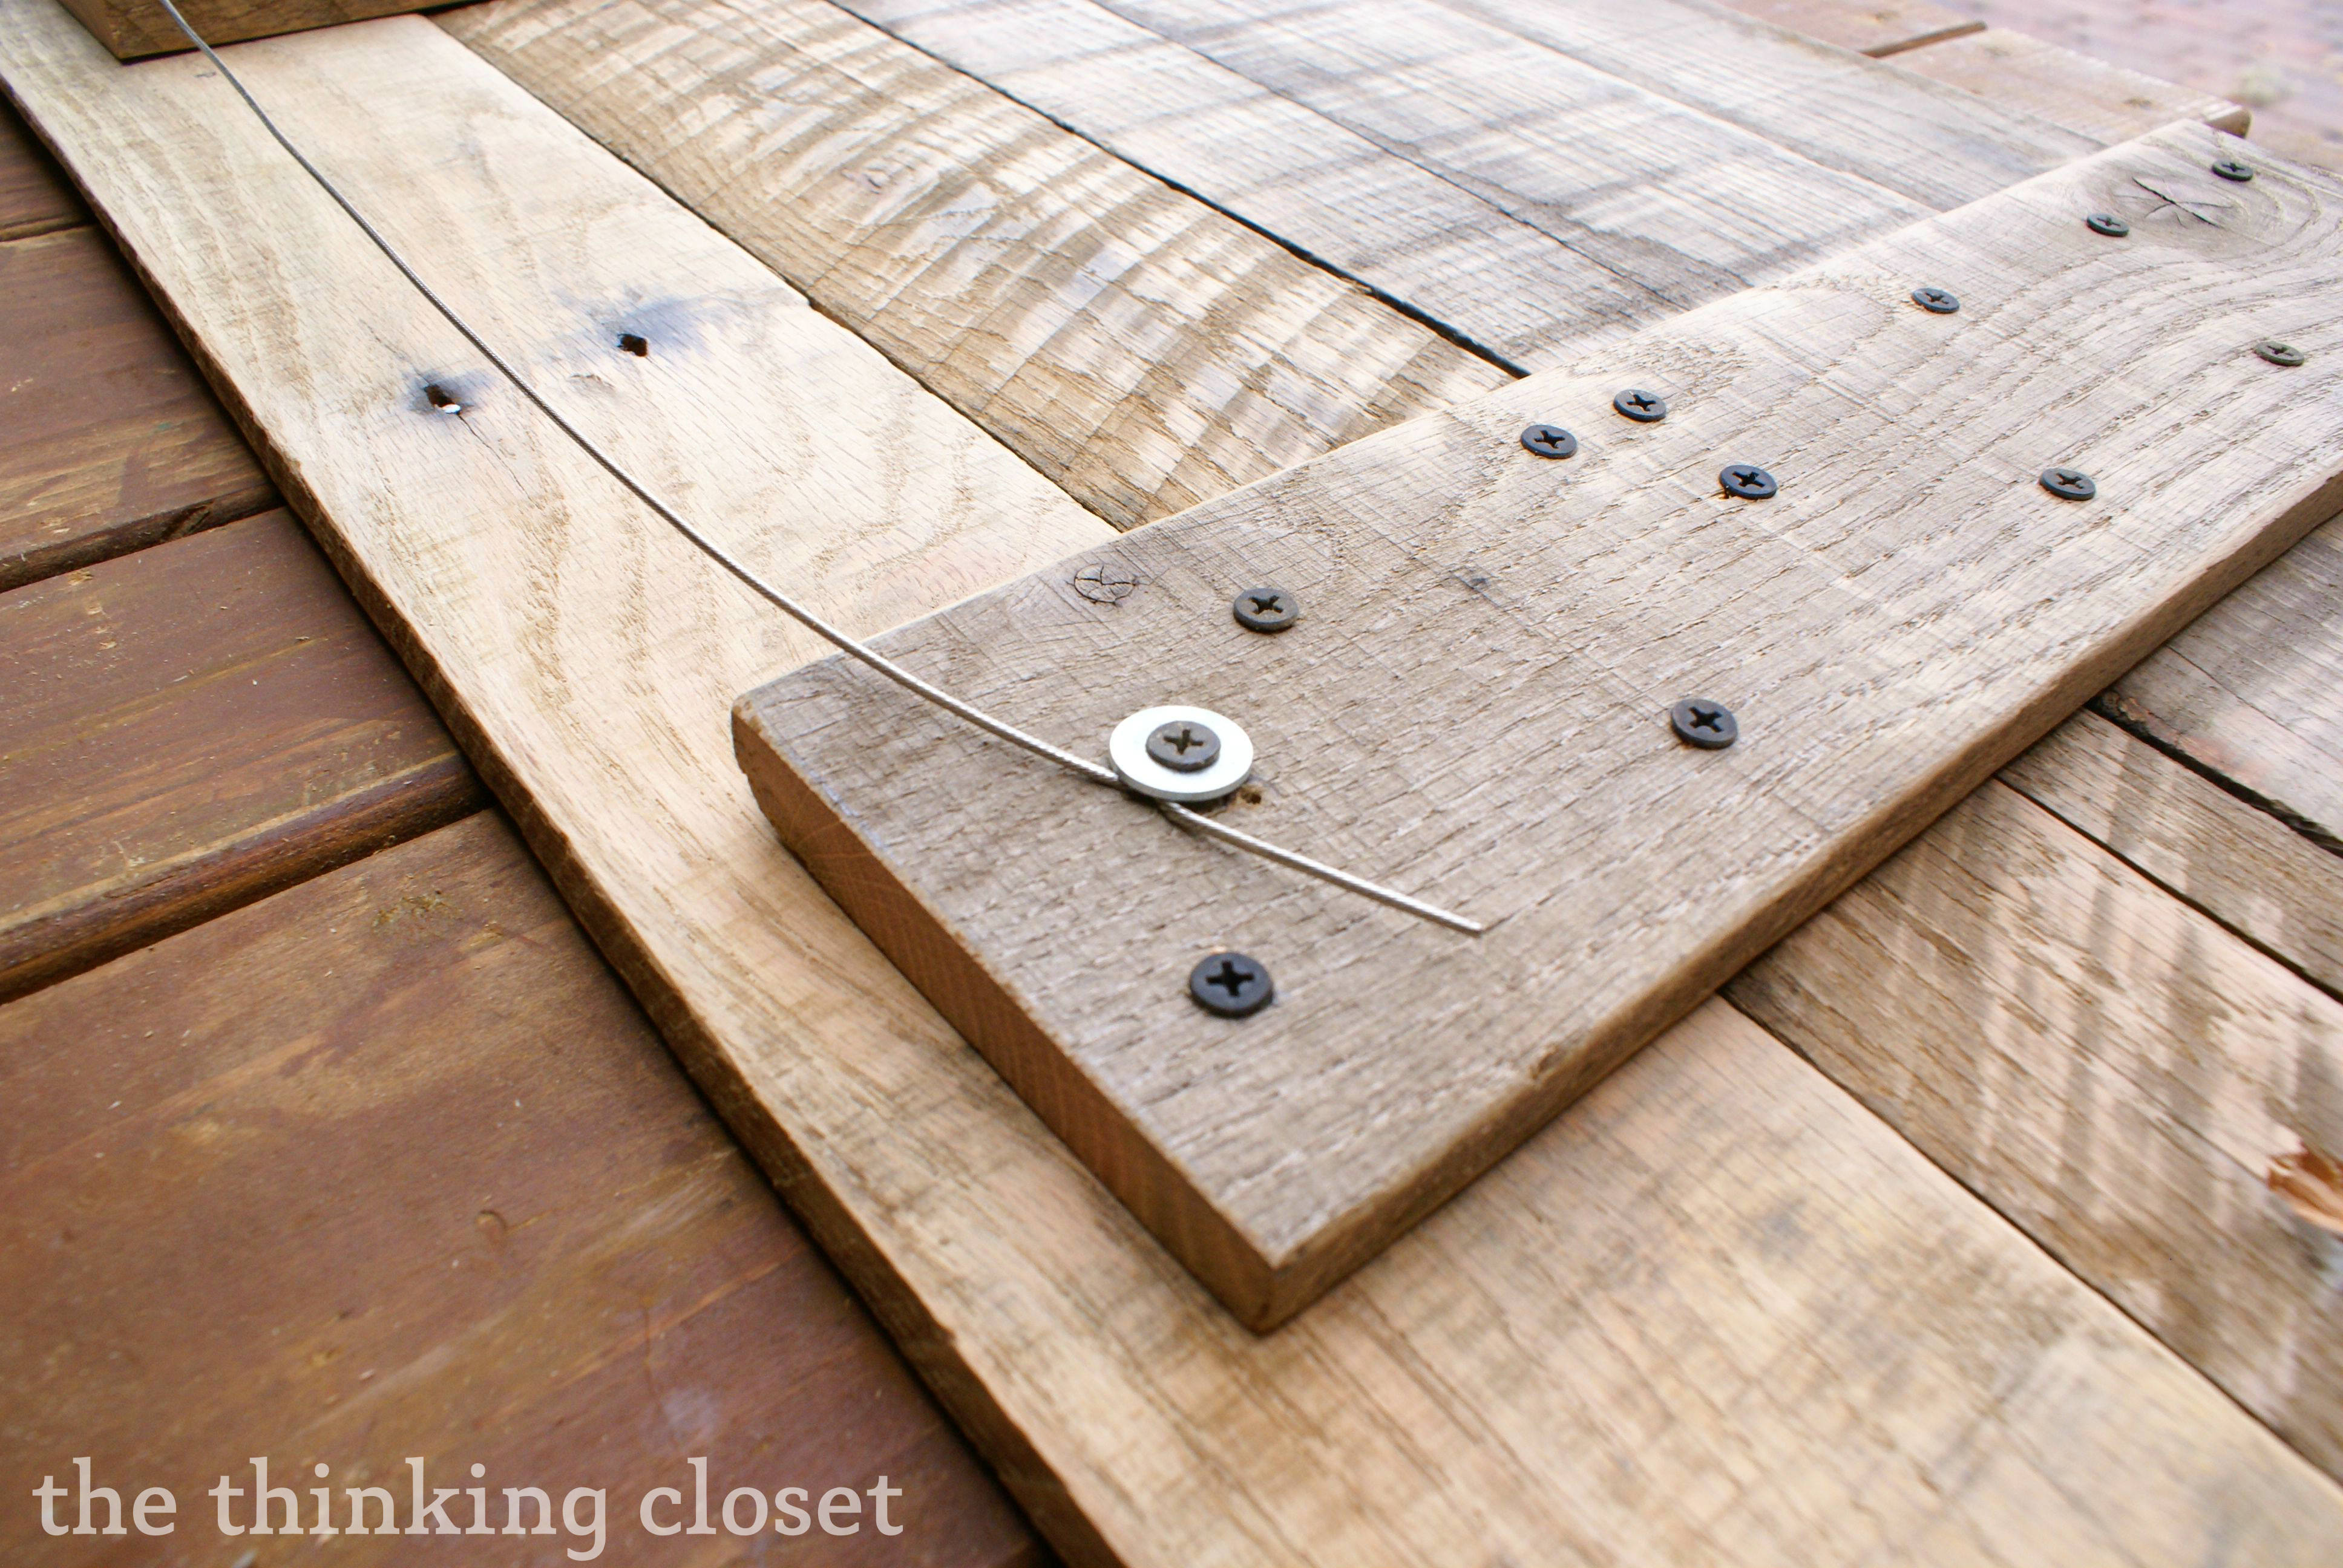
6. Put the horizontal boards good-side-down, and then lay the vertical braces on top.
7. With a pencil, mark 2 Xs on the vertical brace over each of the horizontal boards (diagonally placing these will maximize hold and minimize splitting). Now, remove the vertical braces and drill holes 3/16″ inches in diameter through each X.
8. Replace the vertical braces over the horizontal boards, and make sure everything is square. Clamp it all down. Optional: you can drill 1/16″ pilot holes through the holes in the verticals into the horizontals. This will decrease splitting, but is not absolutely necessary, especially if you are using softer wood.
9. Finally, select a drywall screw length that is about 1/8″ less than the combined thickness of the horizontal and vertical boards. While still clamped, drive screws through the holes vertical boards into the horizontal boards. You want a snug fit, so drive until the top of the screw is nearly flush with the wood surface.
10. Now that it is put together, do one final sanding over all edges and corners.
11. The next step is key for strength when hanging on a wall. Wind the cable or wire clockwise twice around a drywall screw, then drive the screw into a pilot hole on the top end of the vertical brace. You can put a washer on the screw to help clamp the cable into the wood. Make a matching hole on the other vertical and drive another screw with cable, so that there is slack in the wire/cable in between the 2 screws. This will hang on the bracket or screw on the wall. (This pallet will be relatively heavy, so I recommend finding the stud in the wall and tapping into that.)”
LAUREN: Thanks, Mark! You rock. Okay, here’s what I did with the lettering.
So, we knew that we wanted to use some vinyl letters we had gotten from Tweet Heart Wall Art on our pallet. (I have not yet invested in a Silhouette…it’s on my dream list, though.) Initially, I had planned to trace around the vinyl, remove it, and handpaint the text…but we sort of fell in love with the look of the crisp vinyl on the rustic wood (and I think it saved me a LOT of work in the end).
Here was my process of applying the vinyl lettering:
1. First, I cut up the quote into four separate pieces, so I could space things out as I wanted. I just used double-stick tape to keep things in place temporarily.

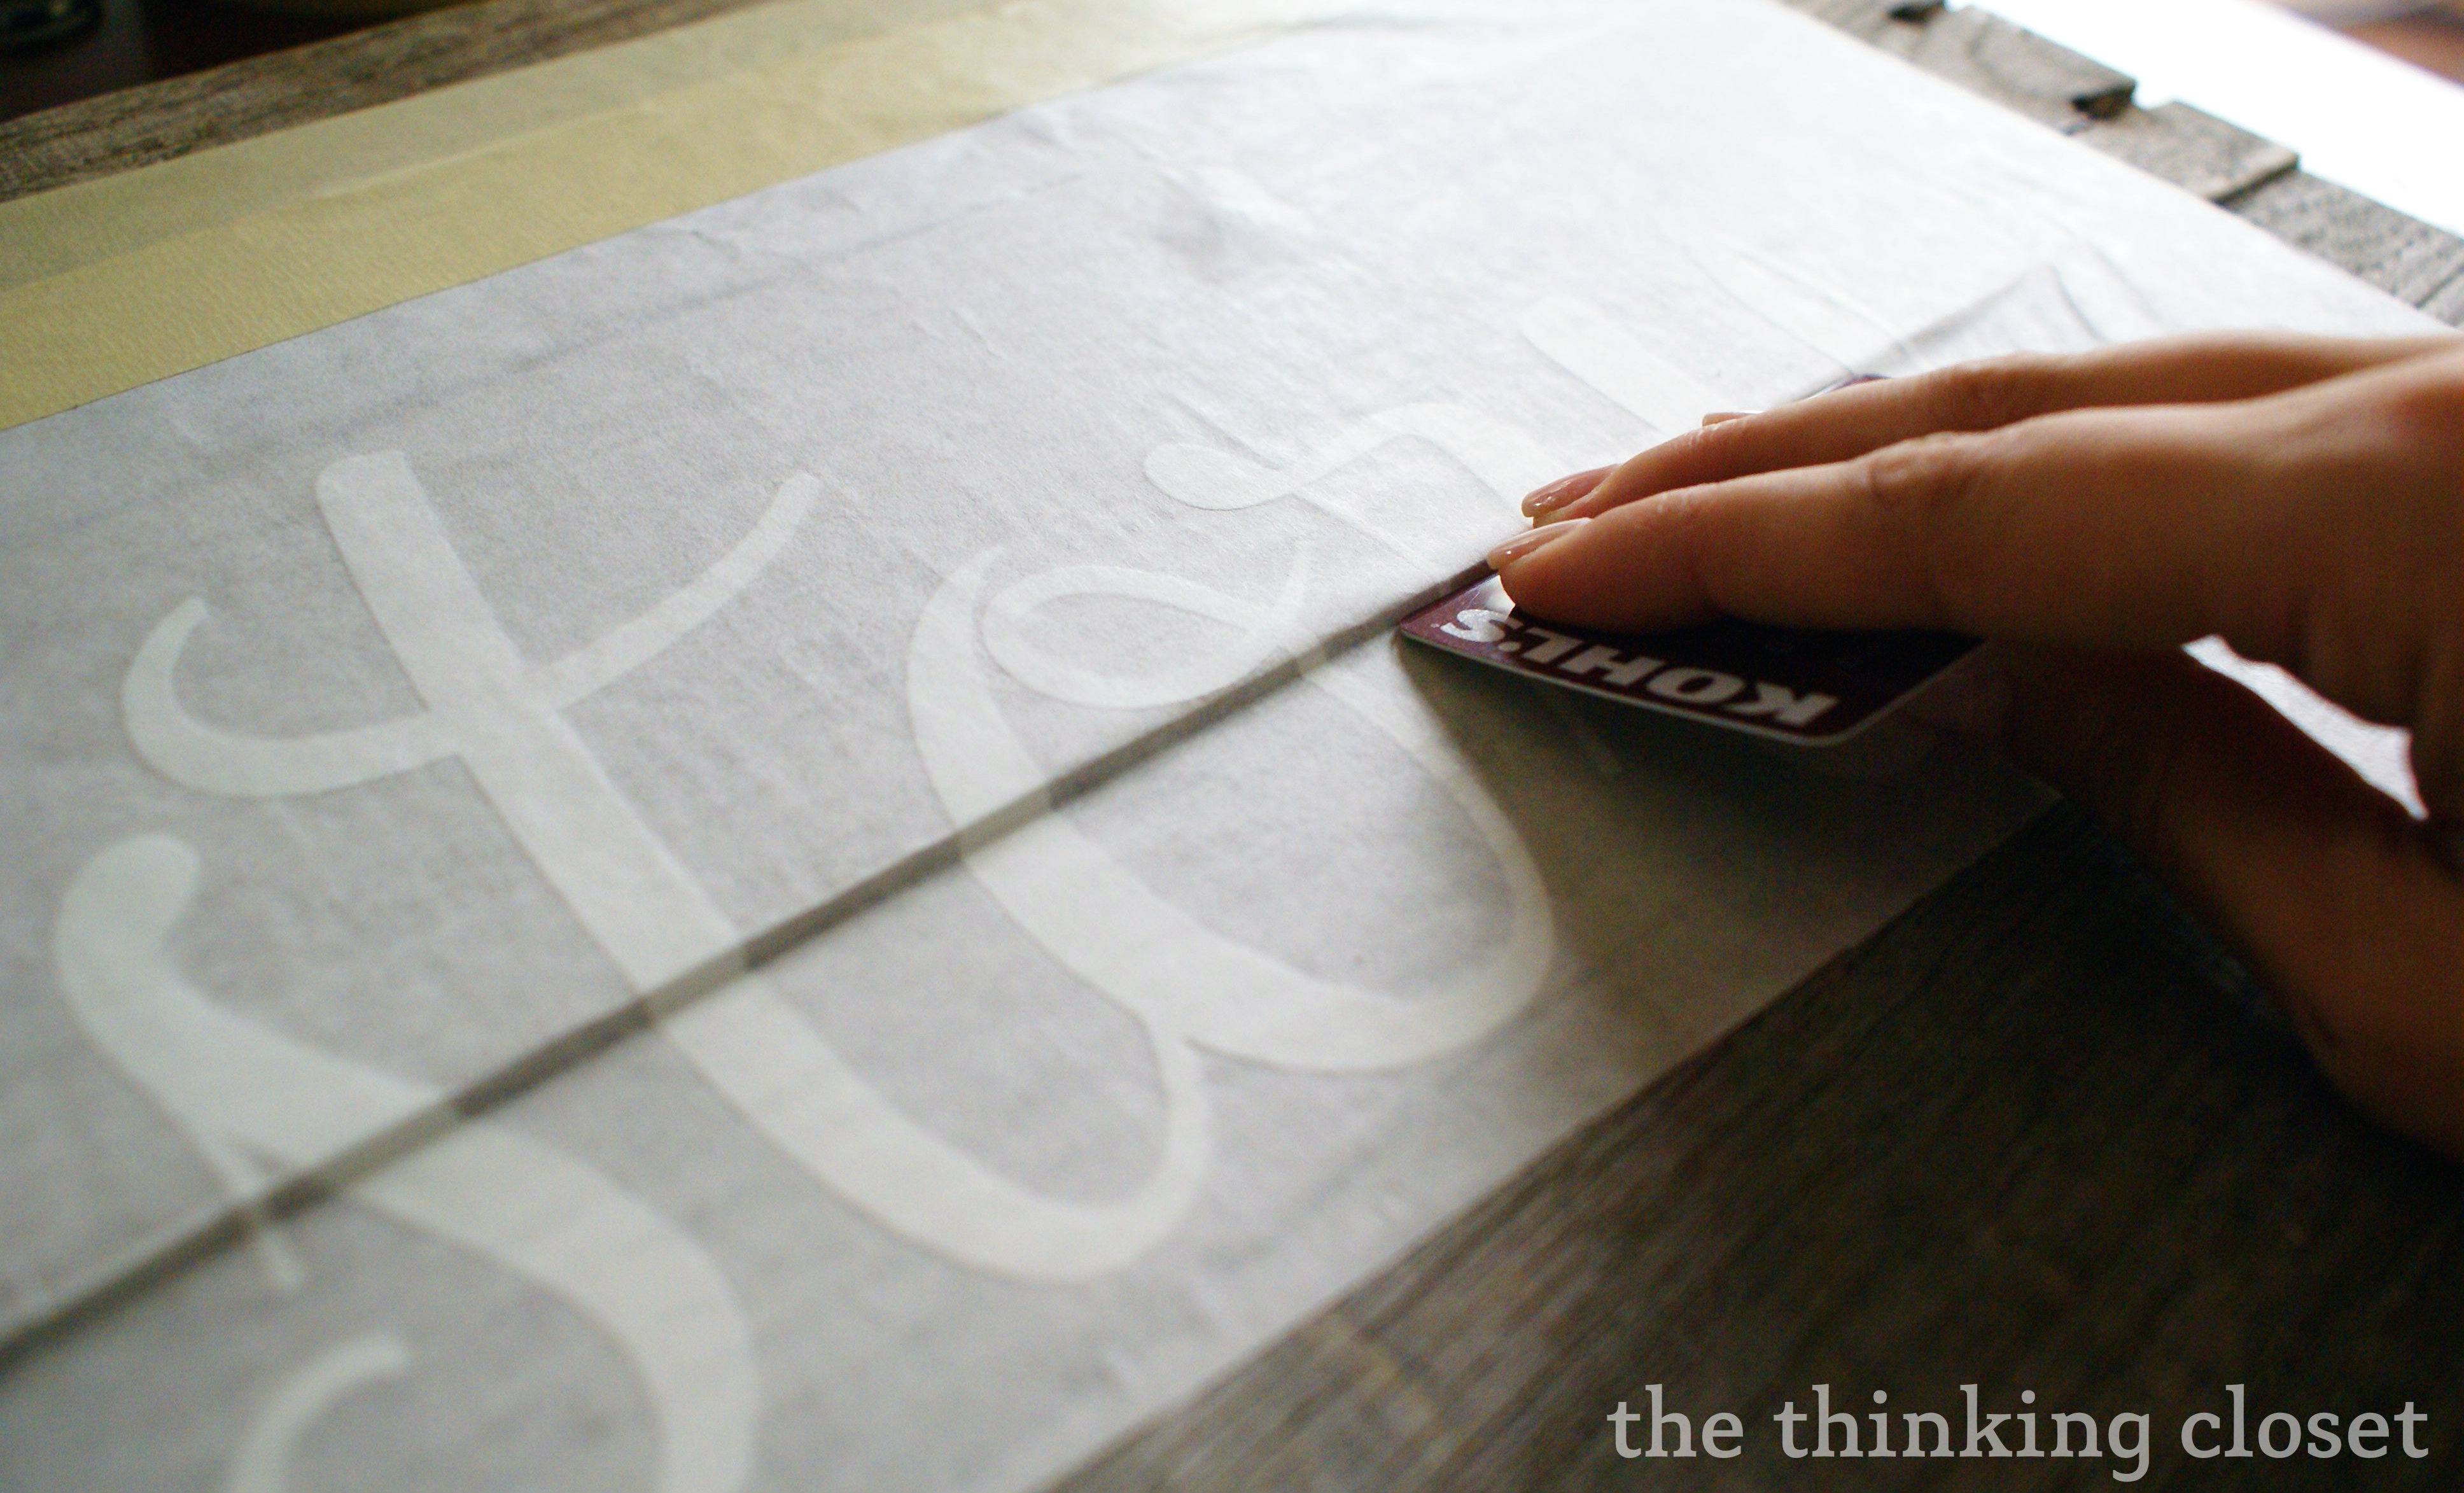
2. To transfer the vinyl onto the pallet, I placed a strip of masking tape on the top of one section at a time. Then, I lifted it up and carefully removed the backing, making sure not to let the sticky side touch the pallet just yet.

3. Then, I laid the vinyl letters down onto the wood working from top to bottom and using a credit card to ensure the vinyl stuck to the wood.
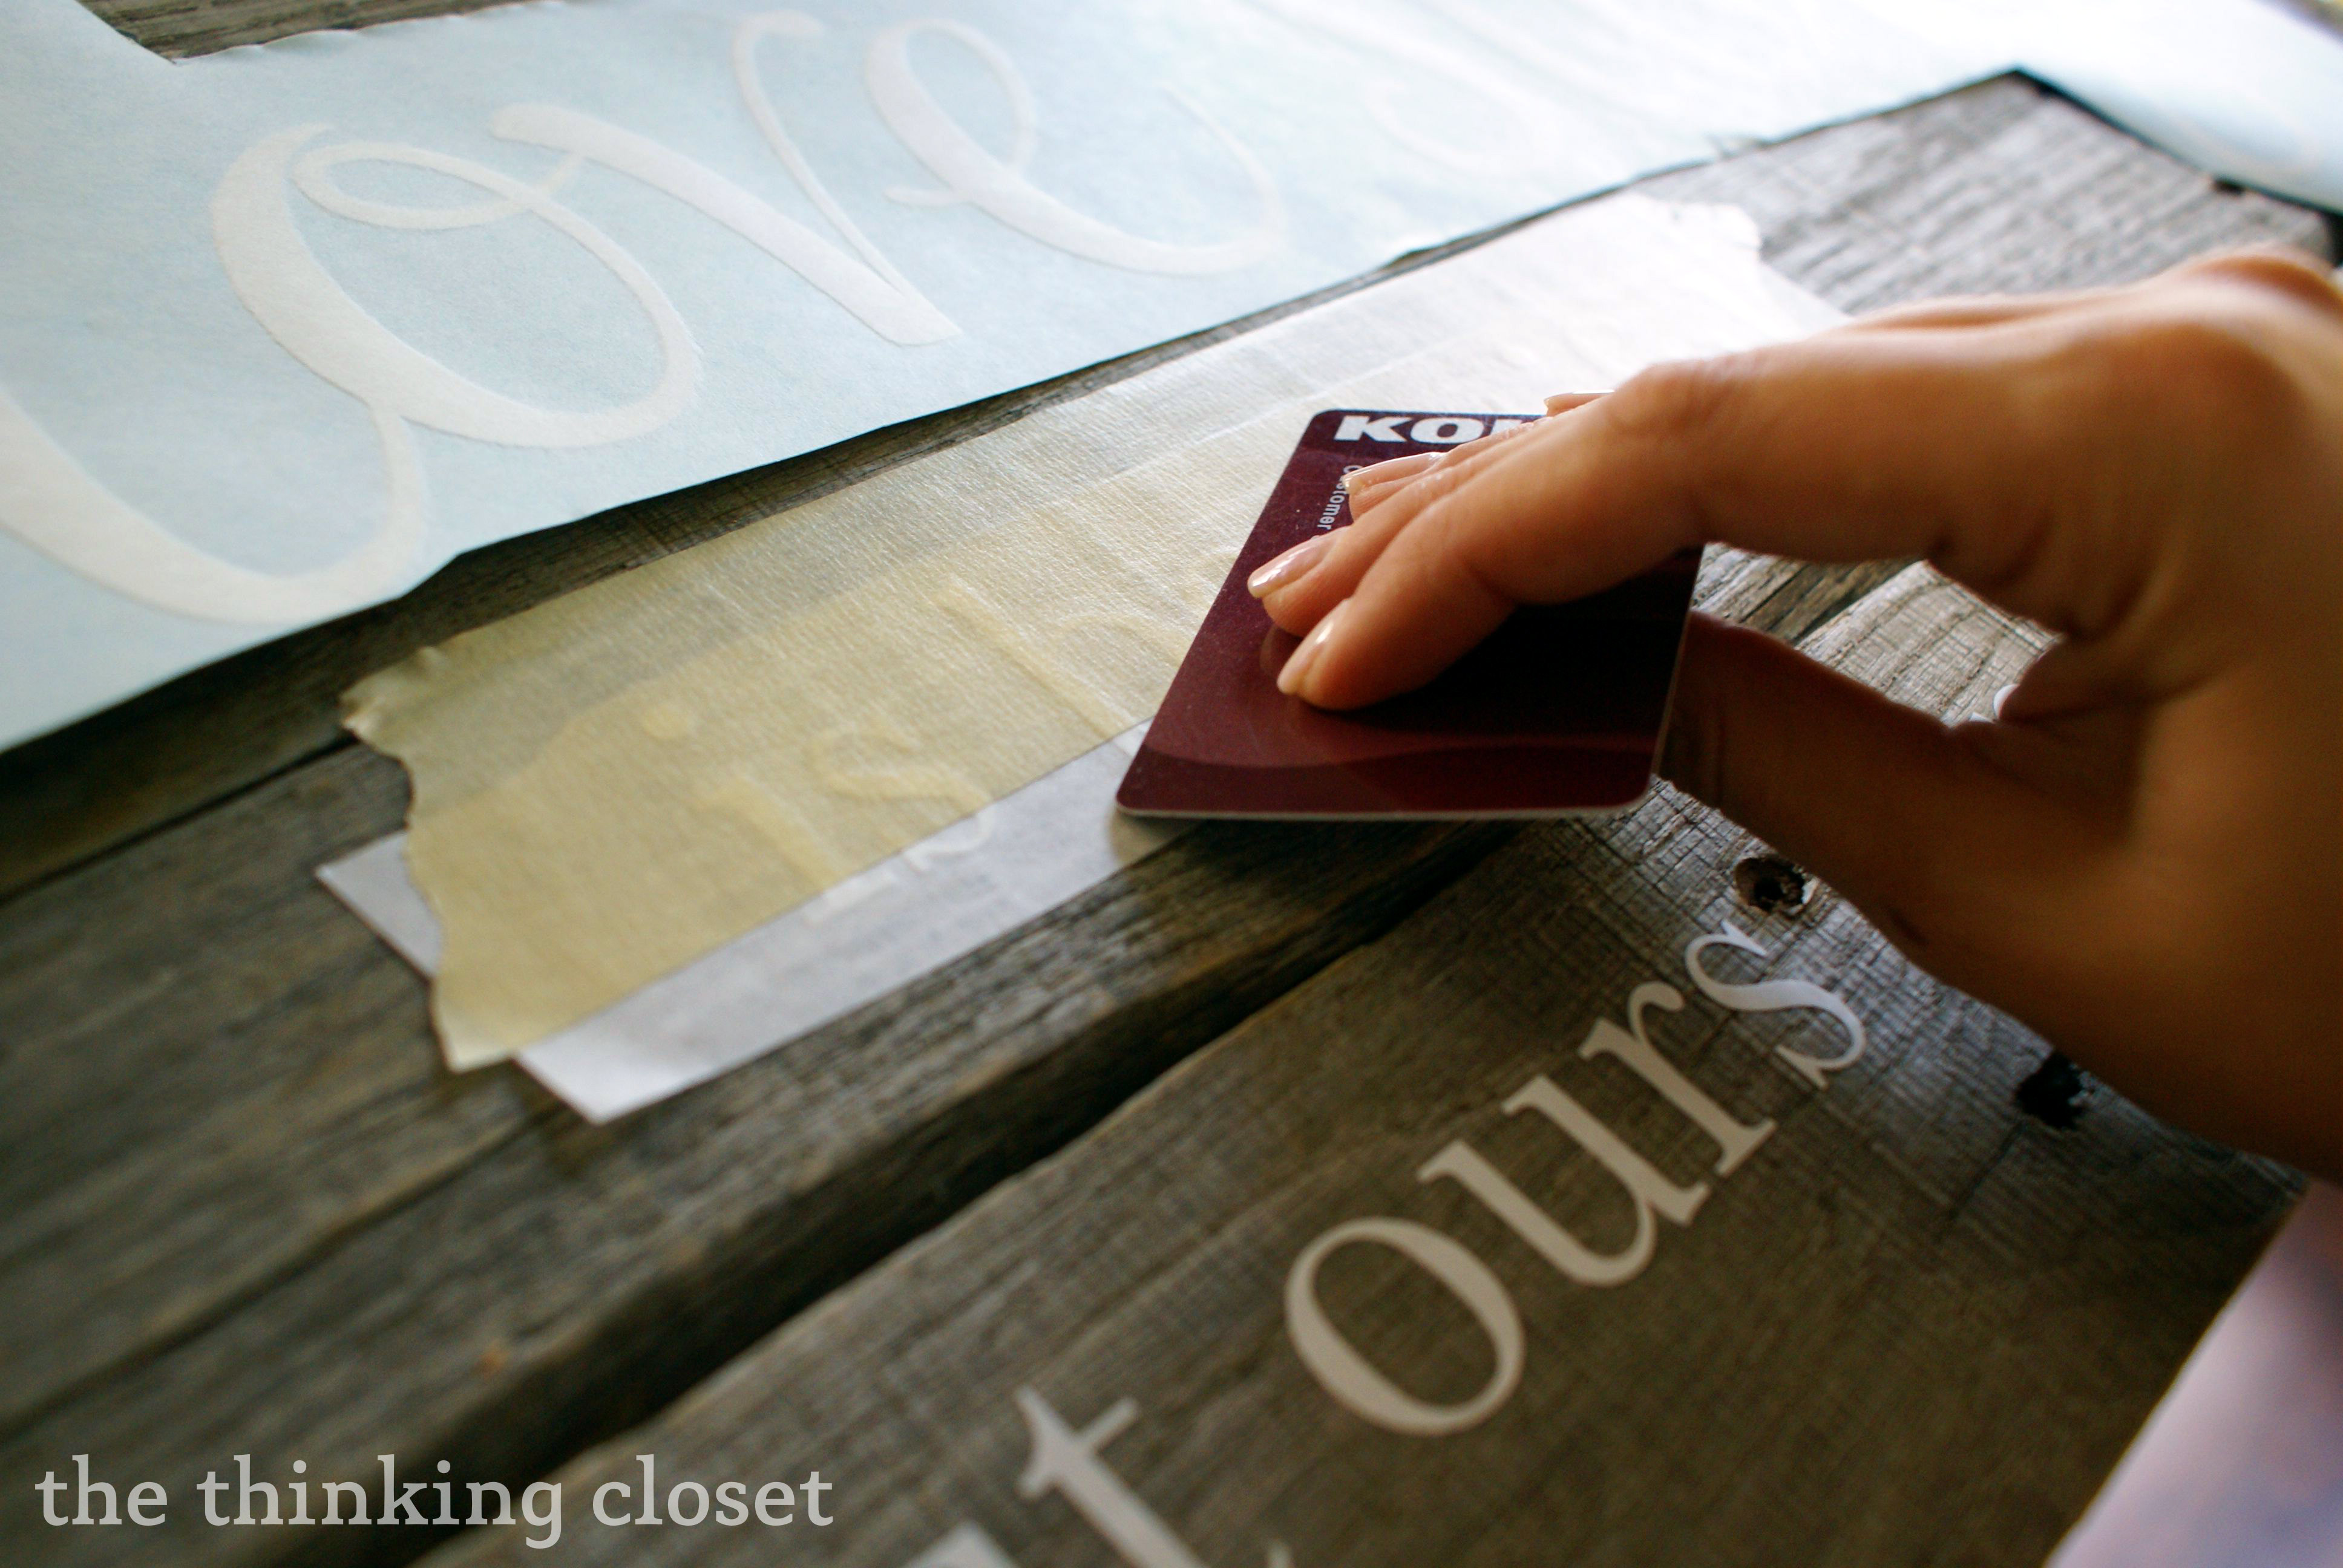
4. The next step was to remove the glossy backing, and I worked from left to right, giving the vinyl a good press with my fingers as I went along.

I was worried about the “love story” text because it spanned across two boards that had a considerable gap between them. However, I decided to use the credit card to press the lettering down the side of the wood (in the groove).

I actually kind of like how the vinyl looks going down the side of the wood, giving it more texture.
And here she is, all done!


We’ll eventually hang her up in our bedroom, and I plan to use a clear sealant on the surface. I’ll share updated info when I get there, but I was too anxious to share this to wait! [Update on 1/9/13: my pal Sonja informed me that putting sealant over vinyl causes discoloration and can sometimes shrink the vinyl, so I’m really thankful we decided to leave the wood in its natural state. Phew. Craft fail averted.]
Now, the question is…what project will this pile of pallets inspire next? Suggestions are welcome!

More Pallet Projects
Since this post was published, we have been doing a lot more with pallets (you could say we’re slightly obsessed). We recycled pallets into a…well…Rustic Pallet Recycle Bin:

We even built a pallet headboard for our Rustic Nautical Master Bedroom!

And we dedicated an entire post to sharing our tips and tricks for working with pallet wood. We hope it helps clear up any questions you may have and inspires you to pallet-all-the-things!


Hi,
did it last all these years?
I thought one would have to seal the vinyl with something to make it stand the test of time.
I look forward to your response.
Hi Gandré. Thanks for your question. I’m happy to report that YES! The vinyl has held up beautifully over the years (and in our humid Florida climate). I have nothing but rave reviews for Tweet Heart Wall Art and their products. No sealing was ever needed for this project!
Okay, Great, thank you for the swift response.
I have been reading some other tutorials and people tend to sand, varnish, then add a layer of polyurethane or similar and then apply the vinyl.
Greetings from Cape Town, South Africa!
LAUREN, I’m new to lettering on wood (pallet wood) but really like what you’ve done on your love story. Do you know if JoAnn Fabrics and Crafts sell the letter? Or where can I possibly fine different statements etc. that can be applied to wood? Really enjoyed your post. I really enjoy working with pallet wood and want to expand the possibilities by using stencils or lettering.
Any suggestions would be appreciated. Thanks.
Your best bet is to purchase vinyl letter online. Etsy is a great resource! Or you’ll see the link in my post on where I got my Love Story lettering. Or if you are looking to work with pallet wood regularly, you might consider investing in a digital craft cutter like a Silhouette machine. Here’s a link to a post where I cut my own vinyl stencil using my machine: DIY Rustic Pallet Christmas Tree. JoAnn sells these machines, too, but Amazon might get you a better deal. Best of luck, Ron!
I love your creations! Keep up the awesome work!
I do have one question, did you use a permanent vinyl like Oracal 651 AND is there some type of sealer or protector that can be brushed on when complete to make the vinyl last longer if used outside?
Thanks for the warm words, Jill. And this project was actually pre-Silhouette, so I the vinyl lettering is from a shop called Tweet Heart Wall Art. It is definitely permanent vinyl quality. It is still stuck to our pallet sign as strong as the day we created it…but if you are running into trouble with adhesion or if you are going to hang it outside, I’d try a Polycrylic sealant or spray, which another commenter said worked well. Best of luck!
We make vinyl signs too and didn’t put a coating over them and the vinyl started peeling off ? did your vinyl stay on? We ended up putting mod podge over the signs to seal the, and now they stay put. What kind of vinyl do you use?
Oh no, Heidi! I’m so sorry to hear that. We have not had any peeling issues, but I purchased this vinyl lettering from Tweet Heart Wall Art (linked above), so I do wonder if their vinyl is a higher quality than the kind you might buy for digital craft-cutters. You might look into sealing your vinyl signs with a non-yellowing poly like Polycrylic just to ensure they stand the test of time. Best of luck!
Hi! Your sign looks awesome. I have a question for you. Have you ever used just regular contact paper for the lettering? I have just recently started making signs and have been using contact paper but I’m worried the letters will eventually fall off. Anyone have any ideas? I actually sealed it with polyurethane. It looks fine, but am worried about letters falling off in the future :/
I love this! I recently completed my first DIY pallet project and am in love. I created a fabulous entry way organizer. If you are interested I would be willing to send you a picture. 😉
Awesome post.
I’ve been doing Vinyl projects for a couple of years now, and I finally found a sealer (after
much trial and error) that works, and it does not cause the letters to curl up or discolor. It
is by Min-wax and it is a Poly-Acrylic Spray. It is AWESOME. I do a lot of Vinyl on tile and after several projects that we sprayed with a Polyurethane with disastrous results, and a lot of wasted vinyl, we finally found someone that new what we needed and it was the Min-wax Poly-Acrylic Spray (Water-based). It works like a charm and I will never use anything else. Good luck and hope this helps.
I just found your blog (I know, where have I been?!) and love all your project ideas! Congrats on your 2nd blogiversary. I’ve already pinned two of your projects, and I can tell, I’m going to be here for awhile…thanks for your inspiration. Hope you’ll pop on by Altered-Artworks and say hey.
Aw, shucks. Thanks, Doreen! I’m glad to have you visit The Thinking Closet anytime. And I very much enjoyed my visit to Altered-Artworks. Love your creative gift ideas. #agirlaftermyownheart
LOVE this post I am definitely going to give this a try, plus we have tons of pallets around our farm just waiting to be used!
On TweetHeartWallArt I see there are 2 sizes for this quote, did you get the LARGE one or just the regular size?
Hey Alicia! Thanks so much for the warm words, and I’m DE-lighted to hear you are going to give this project a go (it remains one of my husband and my favorite collaborative projects EVA’). So, I was digging around the Tweet Heart Wall Art site and only found the one size that says it measures 23″ wide by 11″ tall. That is the correct one! Though as you can see in the pic, I cut ours up and spread it out a bit.
And if you DO decide to tackle this project and think of it, I’d love for you to send me a pic so I can feature you in my next Reader Showcase! Happy creating.
Someone told me the other day if you don’t heat the lettering they will start to peel off. Is this true? I’m scared to apply my new vinyl becausi don’t have the blow torch he said I needed to heat it o
No, that’s not true of vinyl lettering. Perhaps they were thinking of “heat transfer vinyl” for apparel? That requires heating with an iron in order for the HTV to adhere to the shirt…but regular vinyl is made to stick to wood signs as is. Ours has been up on the wall nearly two years now and there are no signs of peeling up! Best of luck with your project, Ann.
I stumbled on your tutorial and loved the details! Last post had been a good while back so I hope you have more suggestions now. Sooo questions…
1. What kind of wood should I use for smaller projects of vinyl when pallets aren’t available?
2. Is sanding the only thing necessary before applying vinyl if I stick to natural wood?
3. If I do decide to paint wood what kind of paint (i.e. oil base, latex base) would you suggest?
Sorry for 3 detailed questions but I am new to this craft & eager to work smarter not harder ! 🙂
Actually, Cassie, I need to update this post with a link to our newest post on using pallets, but let me share it here: We have a MUCH easier method now for disassembling pallets if you have a reciprocating saw.
Now, to answer your questions!
1. For smaller vinyl sign projects, I’d recommend using a hardwood like oak or walnut. You can buy those at Home Depot and even have them cut a piece for you. Or just keep an eye out for scrap wood on the side of the road. If you can easily press your fingernail in it, I’d leave it. But if it’s a hardwood, grab it!
2. Yes, sanding should be all you need to do before applying vinyl if you want the natural look (no stain). Just be sure to clean it well with a damp rag to get rid of the dust and remnant wood.
3. I tend to prefer latex paint over oil since you have less fumes to deal with and its much easier to clean-up. Also, it dries faster and won’t yellow over time. The only thing to remember with latex is that it swells the wood after drying, so you’ll need to gently sand with a fine-grit sandpaper in between coats, and use a damp rag to get rid of the dust. But no biggie!
No worries about the questions! I’m excited to hear you’re trying out a new craft realm. Do keep me posted with how it goes! And if you email me a pic of your finished sign, I’d love to feature you in my next reader showcase, Cassie! Best of luck.
This is exactly the idea and quote I am going to do for my wedding guest wooden thingy. I think I am going to seal the wood first, then put on my decals. Then is will make it easier for my guest to sign. 🙂
I can’t wait to start my first project this week! Thanks for directions and inspiration!
Wow!!
I’m just now coming across your blog and all I can say is wow! thank you so much for sharing this!! you are a lifesaver! keep up the creative, fantastic work!
Love this! Do you know what font you used?
Since it was a design created by Tweet-Heart Wall Art, I am not sure what font they used. Sorry! Perhaps you could try contacting the company?
Great tutorial.
I just bookmarked your site for reference.
Did find any good source of vinyl paper ? Can we order online?
Thanks for the info!
Max
Greetings! I’m a new reader, and I enjoy reading your blog. I’m thinking to make one too, but I’m still hesitating. Maybe you can share your blogging experience ? I’m looking towards for it.
This is such a cute project. I have some wood that this would be perfect for! Thanks for sharing!
Yay! Now, that I’ve visited your awesome blog and seen your stellar background, it’s clear to me why you’d be a fan of a wood pallet sign tutorial! Oh, and I’d love see pics of the sign you create, Jennifer. Do keep me posted, k?
that looks amazing, i think i will make one too! 🙂
Oooo, yes, Alisha! Do it! It’s truly one of our favorite DIY projects of all time. Well worth the elbow grease!
I love how this looks! Your tutorial and photography is excellent.
We would love you to share this or any of your amazing posts at our weekly Saturday Show Us How You Rock Link Party. It starts Friday’s at 6pm, hope we see you there!
Tracy
Love your website. I paint pallets as a solid part time job (only because I don’t want to quit my “day” job. I love using old rustic pieces and yes…they are free. People bring them to me and leave them in my yard. You can see all the pieces I’ve done on my website.
Have fun with it!
Ashley
Thanks, Ashley! Just took a gander at the pallets that you’ve painted and they’re incredible! You really are an artist. Ha ha, and I love that people just leave them in your yard, knowing you’ll find a use for them. I need people to start doing that for us, so that we don’t need to make pallet runs to Thomas Lumber all the time!
Hi. Hope you well. I really like your wood pallet sign- simple, yet beautiful. I’ve recently discovered lots of wood pallet projects on Pinterest. I was amazed what you can actually make from pallets- bookshelves, coffee tables etc. I love simplicity of this projects and the material is free. Crazy 🙂
Are you planning more of the “pallet craft” projects? Take care
Pinterest is FULL of wood pallet inspiration…that’s definitely where I first spied some wood pallet signs that convinced me I needed to make my own one day. Then, when the right vinyl saying came along along with a stack of FREE wood pallets, it was a done deal.
Yes, it’s amazing the kinds of projects folk have made. My friend Christina from Floridays Mom recently made a wood pallet headboard that turned out beautifully. Here’s the link if you want to check it out: http://www.floridaysmom.com/more-guestroom-progress-and-giveaway-winner/
Mark has been busy making good use of the remainder of our pallets, perfecting the art of the wood box. I haven’t yet shared any them on here, but I should! And I’d like for us to use the pallets to make a bedframe or headboard someday…though that’s a pretty big undertaking and we’d probably need to bring home some more pallets to take that on.
Thanks for your comment, Magda. And have a happy Sunday!
I think I “met” you after this very popular post and never really read it before. Thank you for the inspiration and info. I had to come back and see it now that I’ve dragged a pallet of my very own home. It is waiting in the driveway for a strike of inspiration, which I definitely found here. And props to you both for getting those pallets home! I drive a vehicle the size of a small bus and still had to wrestle my pallet in there amidst all the kids’ car seats! Can’t wait to see what’s coming next.
I’m sure you’re going to transform that pallet into something wonderful…maybe even a few somethings wonderful! I just can’t get enough of pallet creations these days…and if you’re looking for even more inspiration, Funky Junk Interiors had a reclaimed wood link up this week. I got lost for what might have been days looking through all the projects. Here’s a link to it: http://www.funkyjunkinteriors.net/2013/03/sns-178-reclaimed-wood-projects.html
I just love (nearly) all things from old, reclaimed wood. So this here is, in my view, a great project!
I think, wood from pallets might be a bit large, but I builded shelves, a lamp, a clock… out of old planks from wine crates. Maybe that’s some inspiration for you?!
Love, Midsommarflicka
Inspiration, indeed! That’s so neat that you used wine crates…those aren’t as prevalent here in the states, but we crafty ones would be scooping them up for d.i.y. projects for sure if they were. Thanks for sparking that idea in my noggin’.
Thanks!
Post is now updated! You rock.
Hey there, love your blog. Wanted to give you a heads up. You don’t put any sealant ont vinyl. It causes discoloration and can shrink the vinyl too. If you ever want to seal the wood, do it before you out the vinyl on. 🙂 a quick tip! 🙂
Thank you SO much for this tip! We ended up deciding not to seal it because we liked the natural look of the wood, but now I’m REALLY glad we didn’t do it and ruin the vinyl. (Clearly, I’m new at this whole vinyl thing.) Might go back in and make an edit to the post, so others don’t make that mistake. Thanks, Sonja!
At first look, I thought you may have inserted the text on the palette with pixlr! It looks so crisp! Well done, sis! I also love how you invited us on your journey to find wood and that we got to see the “jackpot” moment. How incredible to get that much free wood! And it was great to hear from Mark in the post…love that husband and wife collaboration! 🙂
Thanks, sis! That’s vinyl lettering for ya! And with my new Christmas gift (which will be revealed later), you’ll likely be seeing a lot more of vinyl lettering in my projects to come…. How’s that for a not-to-subtle teaser?
Thank you so much for linkin up to my Sunday FUNday party! I will be featuring you tomorrow 🙂 I appreciate you linkin up and can’t wait to make my own! XOXO
Whoo hoo! That’s super exciting! Thanks for the feature, Kristine.
So pretty! Love how this turned out. Loved and pinned. Thanks for sharing at MightyCrafty Mondays!
Thank you, kindly, Lissa! I appreciate you hosting your fabulous party week after week.
Love, love, love this! This is definitely on my to do list. Thank you for the wonderful tutorial and the pic of the pallets on top of your car was priceless.
Ha ha! I know, they didn’t really stack neatly, but did we pause to fix it? Nope. “Just keep stacking, just keep stacking….”
My husband and I work together on projects, too and his writing is totally over my head! Great project! I have a Cricut and have used it for several vinyl words projects in my home.
Marty@Marty’s Musings
Glad you can relate then, Marty! And I’m envious of your Cricut. One of these days, I’d love a Cricut or Silhouette so I can whip out my own text…you must have a lot of fun with yours.
Hahaha…this is totally cracking me up because I can relate so much! Major score and your artwork is AWESOME! XO, Aimee
Aw, thanks for stopping by, Aimee, and for hosting a great linky party week after week.
Great sign! What a great score…I would love to get my hands on some pallets! I love the pic of your car, made me laugh. The things we do for great finds that are free! I found your blog via Sugar Bee Crafts. Love your blog!
Ha ha! Glad we gave you a chuckle. I know, I think we both got a wild look in our eyes when we spotted the pallets. I probably would have only taken a couple, but Mark insisted we pile them high! 😉
Turned out beautiful!! I love it!!! I’ve only made a few things with pallet boards, but getting the boards off is NOT fun! I like the idea of cutting sections out, and then you only have to pull a few out. Love!!!
Yes! And I think Mark would have preferred not to have pulled ANY out, except that I asked him to get a couple because I liked the look of it.
Oh my goodness, I love this! It really is so beautiful. Makes me want to go find a palette right now! Oh and that is so awesome your husband wrote his part, what a trooper! I am stopping by from Sugar Bee Crafts!
Thanks, Natalia! I know, I was so glad Mark was up for sharing his portion. If I had tried to relay the information using my lack of technical jargon, it would have been a hot mess!
I totally have something like this on my to-do list. I want to get it finished before my hubby’s bday…we’ll see if that happens. what a great project
That’s awesome! And if you’re running out of time, invite him along to join you in the project. It ended up being a lot of fun for us…major bonding time.
This is beautiful!! I love how simple it is and… just perfect!! Well done 🙂
Thanks, Chrissy. Yes, I, too, love the simple rustic look…it’s what drew me to tackle one in the first place.
Love your pallet sign! This is a great project. Thanx for joining THT.
Yay! Thanks so much. And I appreciate you taking the time to check it out. Have a great week.
Thanks for this wonderful tutorial! I am pinning it 🙂
You are so welcome, Alana! Glad you enjoyed it.
Wow it looks gorgeous! I am TOTALLY going to check out that store… it’s pretty close to me, and I’ve always wondered where people get wood pallets. Even if there aren’t still free ones there, the store looks pretty awesome 🙂
They have a great selection in terms of their wood stock…not to mention the complimentary pallets! I guess they let the pallets build up for a while before taking them to the pallet graveyard. Hopefully there are some good ones when you visit. If not, stop by our house to have some of ours!
I don’t know if I can find the wood, but I love it!
We didn’t either…and then, there it was! (I might have even missed it if Mark hadn’t seen it.) Keep hope alive!
Very cool, I love how it turned out! I turned a pallet into a bath shelf in a similar way (with a few long pallet boards and two shorter cleats on the back); it’s a really sturdy way to hold stuff together! Thanks for sharing at The Fun In Functional!
Bath shelf – – great idea! That just may have to be our next pallet project. Thanks for the visit, Jessi!
Visiting from Sew Darn Crafty. This is gorgeous.
Thanks for visiting all the way from New Zealand!
I love love love your sign and pinned it to my Tutorial board (giving your blog credit, of course). Really cool sign.
I appreciate that! Thanks, Jeannie.
This is super cute!
Thanks, Jess & Linz. I was pleased with how it turned out. Eager to make more pallet creations!
So beautiful and simple. The words are just lovely.
You’re so sweet! Thanks. Yes, I fell in love with that quote when I first read it.
that is so good! the pallet part would stump me though i reckon! thanks for sharing.
Yes, I would have been a bit lost myself without the hubster. But it would certainly be a good challenge, and I know there are a slew of other wood pallet tutorials with other methods for putting together the sign. Some just involve wood glue!
Love your sign! If you get a chance, stop by the Tuesday To Do Party and link up!
http://blackberryvine.blogspot.com/2012/11/tuesday-to-do-89-and-88-list-makers.html
If you leave a comment, you’ll be automatically entered for the Christmas Tee Shirt give-a-way!
Smiles!
Jami
http://www.blackberryvine.blogspot.com
Thanks for the invitation, Jami! Will be sure to link it up at your party next week – – it’s one of my regular stops on Tuesdays.
This is a great project and perfect for you and Mark to do together. It added to the collaboration that he wrote a section of this blog-post. I loved seeing the blue vintage bell jar next to the sign. I agree with Mark, your photos are very good! You are blessed to have a crafty-partner!!
Thanks, Mama. Yes, God is good! I’m so thankful for a hubby who is not only so handy, but such a great writer. Hopefully, he’ll have the opportunity to share on my blog again. I’m also looking forward to your guest post one day…. 😉
Gorgeous! I’ve been wanting to try this. Thanks for the inspiration!
You are so welcome! I’m so glad you stopped by, Jessica. I very much enjoyed visiting your blog today.
I love this for so many reasons! I love that you collaborated with your husband on this one. My hubby is like a kid at a candy store too whenever we go to Lowes or Home Depot (which is frequently.) It makes it easy to get Christmas presents though. A new power tool always makes me the most thoughtful and awesome wife ever 😉 Now I am feeling the urge to drag him along to load some pallets on the top of our car and make that beautiful sign 🙂 Or maybe I could make him help me add a ruffle to something or help with a hair tutorial 😉
Ha ha! I know what you mean. I got Mark a drill press for Christmas one year, and I think it’s one of his favorite gifts that I’ve ever given him.
And that would be absolutely incredible if you got your hubby to help with one of your hair tutorials! 😉 (As if they weren’t already amazing….)
My husband has asked me to make a wood sign for him for awhile now and I haven’t had the time b.c I am doing the painted route. But this is a great alternative and yours turned out really good!
Thanks! Yes, it was something I had been wanting to do, as well, for quite a while. We just didn’t have the wood pallets until now! Hope you have a ton of fun making yours…whenever life permits.
What a great quote on such a super cute sign….
hugs x
Crystelle
Thanks, Crystelle! Love your creativity with the tie skirt. So fun.
Love your project. I pinned it too:) Following you via link. Follow my blog too:) I posted http://www.sewsweetvintage.com/2012/11/reversible-holiday-note-board.html to the vintage farm house party:)
I appreciate the pin, Michele. Already following you in bloglovin’.
Really good job on the pictures, Lauren. You compose them in a simple yet interesting way, and the black edges make them so crisp.
Thanks, buddy! It was so fun to do this project together – – and thanks for taking the time to write up your “how-to.” Of course, my mind is spinning with ideas for our next collaboration!
This really turned out great, what a wonderful post and tutorial! And I have enormous pallet envy! We have been on the look out for free piles by dumpsters and have not had such luck yet.
Kenley
Kenley, don’t give up hope! I had kept my eyes peeled for curbside pallets for a LONG time before we happed upon our jackpot. Do have a local hardware or lumber shop? I would have never thought to look there, but I guess they get regular shipments on pallets and wait until the stack piles up before taking them to junkyard. I’ll just have them deliver them to your house next time. 🙂
Hehe, Thanks 🙂 And thanks for the tips! I’ll keep my eyes peeled!
This is beautiful! The possibilities are endless…
My thoughts exactly. Thanks, Adwoa.
It looks great! I love the way your ‘man’ jumped in the middle. I could almost hear his voice (not that I have ever heard either of your voices 😉 ). I’ll need to reread a few times. I am still not sure how you made the vinyl lettering. Maybe I just haven’t had enough coffee yet?
I know! It was so fun to pass over the laptop and say, “Your turn!” And I know what you mean about being able to hear someone’s voice in their writing. As a former English teacher, that’s something that really resonates. (I feel like I know your voice, as well!)
And the vinyl lettering was actually purchased from Tweet Heart Wall Art. I wish had a Silhouette, which could certainly do the job for me…but until I do, I’ll have to use other means. Lil Blue Boo has a couple of great tutorials for making wood signs without vinyl, which I recommend you check out. Here’s one and here’s the other.
what a lovely sign!!! I really really love. How special that you worked on it together :o)
It was really fun to collaborate on this one! Mark actually picked out the quote, as well, when we were shopping for vinyl…. I contemplated doing the whole thing myself as a surprise b-day gift, but I knew that he’d probably cringe to see my wood-working. 😉 I’m so glad we worked together instead.
How pretty!!! I love it, can’t wait to see if hung up… Such a rustic, yet beautiful piece.
And he fact that you got it from Thomas Lumber which is 5 mins from me is too funny. I remember seeing you were also in Florida, but I didn’t realize we were actual neighbors! Too funny!!!
Thanks, Christina! I didn’t realize you were so close, either! Wow, what a small world. That just may have to merit a coffee date sometime soon!
where did you get the vinyl? LOVE THIS!
Tweet Heart Wall Art! They are great. You’ll see the link to their shop in the post!