
D.I.Y. Galaxy Print Infinity Scarf

“Can we pretend that bleach spots on a navy tee are like shooting stars? I could really use a scarf right now, scarf right now, scarf right no-ow-ow!”
Just some parodied lyrics to a classic hook that played in my head as I pulled my D.I.Y. Galaxy Print Infinity Scarf out of the dryer and wrapped it around my neck.
You see, some of my bleach spots had smeared, so what I intended to look as “stars” really did look like they were shooting through galaxy of my scarf. That’s what I like to call a happy accident.
Actually, there were several unexpected twists and turns in today’s scarf project…but we prevailed! And I’m eager to share with you all what I learned along the way so you, too, can make your own Galaxy Print Infinity Scarf.
After all, it’s Scarf Week!

Did you catch the kick-off yesterday with my 10 Minute Fringe Infinity T-Shirt Scarf? Well, I just can’t get enough of the t-shirt infinities, so we’re back at it again, but with today’s theme:
Dyed, Painted, & Stamped Scarves
I’m actually just one of 13 “scarfies” sharing D.I.Y. tutorials with blogland today. So, be sure to stick with me to the end so you can check them all out! It’ll be JAW-some. {Grin.}
Now, raise your hand if you went to bed as a youth with glow-in-the-dark stars on your ceiling. Or if you have an obsession with black holes and what really happens inside of them. Or if you saw the movie Interstellar and loved it.
Okay, well, I raised my hand three times just now, which explains my excitement over using the powers of bleach to create an intergalactic accessory worthy of Scarf Week.
Won’t you join me as we travel to another dimension for today’s tutorial?
Supplies
Here’s what you’ll need to gather up supplies-wise before getting started:

- dark plain t-shirt (the bleach will react differently to each color…so embrace the surprise)
- fabric scissors or extra-sharp scissors
- liquid bleach
- water
- spray bottle
- disposable foam brush
- old toothbrush
- disposable cup
- rubber gloves
- protective eye-wear
- wax paper, cardboard or a garbage bag
- Clorox bleach pen (I found mine at Target)
- bucket
- vinegar
Tutorial
Step 1. Wear your “painting clothes.” Truly, make sure you’re wearing clothes that you don’t care a thing about. Because it’s really not a matter of if you will get bleach on them during this project, but when.
Step 2. Cut it up! Using your fabric scissors (or extra sharp scissors), cut your t-shirt across the imaginary lines just beneath the armpits and just above the bottom hem. Cut out any interior tags, as well. And there you have it: an instant infinity-scarf! If you wanted, you could stop right here. But we can make it even more awesome. So, let’s keep going.

Step 3. Chemistry class. Next, you’re going to create a mixture of bleach and water, half of which you put in the spray-bottle and half in the disposable cup. So, now is good time to start rocking your protective eyewear and rubber gloves. Like with any strong chemical, be sure to work over the sink and in a well-ventilated area, careful not to get any on your skin.
Nearly every tutorial I read in my research recommended 1 part bleach and 1 part water…and I did start out with that, but I ultimately found that wasn’t strong enough for my shirts. So, I upped it to more like 2 parts bleach and 1 part water.

Step 4. Prep the “spray zone.” A good “spray zone” is a well-ventilated area where you’ll feel freedom to use bleach without too much worry about clean-up.
You’ll see from the photos that I initially set up my “spray zone” outside on the gravel. However, I found the bleach was very slow acting when I worked outside, and my theory is that it had to do with the hot and humid weather we’ve been having (in the high nineties). I know the bleach can take upwards of an hour to react with the fabric, but it literally looked like nothing had changed after 60 minutes. Once I moved my “spray zone” inside to the bathtub, the bleach started to take action. Problem solved!
Once you’ve chosen a good “spray zone,” place a piece of wax paper, cardstock or a garbage bag in between the two layers of your infinity scarf. That way, you have more control over your spray design and don’t run the risk of one side leaking through to the other.

First, press out the material flatly…then, choose a few different areas to twist into swirls. These will become the centers of your galaxies!

Step 5. Bleach time! For a haze or concentrated area (like in the galaxy centers), use the spray bottle and really saturate the area well. For darker dots, splatter the bleach mixture from the disposable cup a few feet above using the foam brush. For smaller clusters of sprays, use an old toothbrush and spritz on the bleach by running your thumb across the bristles. Have fun exploring all of these techniques!
And if you have the time, I recommend doing a test run on the scrap pieces you cut off from the shirts, that way you can see how your shirt responds to the bleach. And this is a step I wish I had taken because…

…for some reason, the purple shirt DID NOT want to bleach. No matter how much bleach I threw at it and no matter how long I waited, outside or inside, it stayed purple. Stubborn little tee! I suppose I admire its tenacity.
But like I said, once I moved indoors to the bathtub “spray zone,” the navy shirt started turning lovely shades of amber, and I ended up doing a few different cycles of bleach spraying, splattering, and spritzing on both sides.
I used a blow-dryer in between cycles to speed up the process!

Step 6. Star power. Now is the time to reach for your Clorox bleach pen, and if it has two different tip sizes, opt for the smaller. I used mine to draw small dots and circles across each side of the infinity scarf, so my galaxy would have stars! I found that the bleach gel in my pen was quite concentrated, and I could see it start working immediately.

Step 7. Rinse it out. Now, you’ll want to rinse out your scarf in a bucket or utility sink filled with 1 part vinegar to 3 parts water. This mixture will halt the bleaching process; otherwise, the bleach would continue to eat away at the fabric. {Sidenote: if you decide to run it through the washing machine, make sure it’s on its own for its first cycle.}

Step 8. Let it dry! I popped my scarf in the dryer on its own for a quick dry. And when I pulled it out, that’s when I really could see how magnificent my Galaxy Print Infinity Scarf had turned out.
Isn’t she heavenly? (Pun intended.)

Backyard Photo Shoot
All that was left to do was to throw that Galaxy Print Infinity Scarf around my neck and head outside for a backyard photo shoot.


Wouldn’t it be a fun summertime activity to work with kids to create their own scarves that document ACTUAL constellations? (I think so!)
I mean, how cool would it be to wear a science project around your neck?! (Pretty cool, I think.) Or if they didn’t like scarves, they could keep them as t-shirts!

Here’s the double-wrap look…which I think might be my favorite!


Now I want to host a Star Wars movie marathon because I have the perfect scarf for the occasion!
Oh, and that reminds me of a joke…

Q: How do you organize a space party?

A: You planet.
And on that cheesy note, that’s a wrap!

Want More Scarf Week Inspiration?
The dyed, painted, and stamped scarf fun has only just begun! Be sure to chomp those shark scarf teeth into each of these inspirational D.I.Y. projects hitting the blog-o-sphere today.
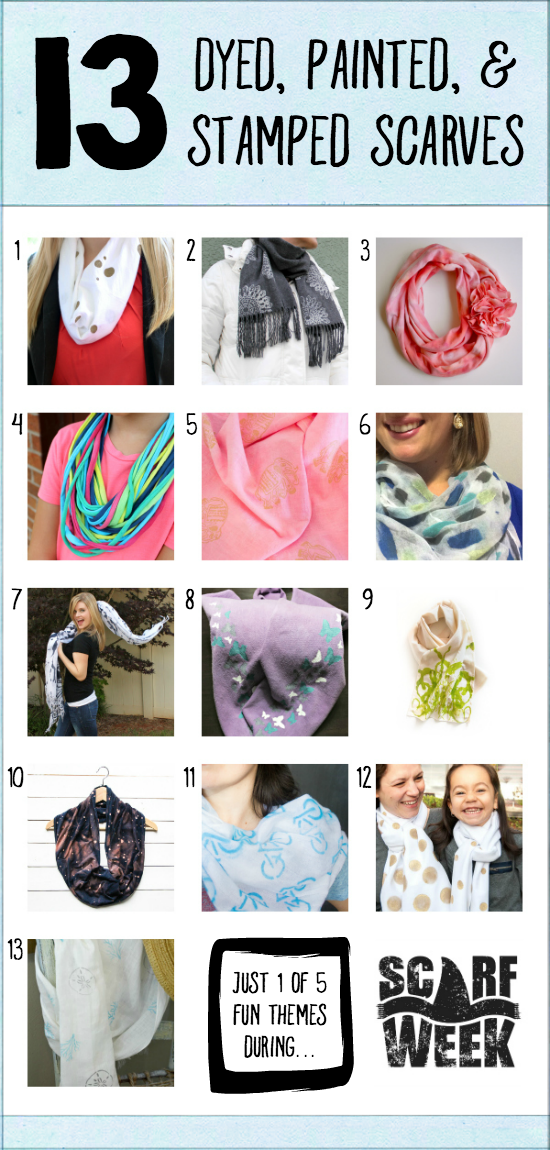
Click the images above or links below to check ’em out.
1. Tie Dye Infinity Scarf Using Super Soaker Water Gun by The Southern Couture
2. From Drab to Fab: Stenciled Scarf Makeover by Creative Savings
3. Flower Embellished Ice-Dyed T-Shirt Infinity Scarf by Architecture of a Mom
4. Tie Dyed Scarf {tutorial} by Ginger Snap Crafts
5. DIY Pink And Gold Elephant Scarf by Practically Functional
6. How To Create A Brush Stroke Scarf by The Small Stuff Counts
7. Abstract Ink Blot Black and White Scarf Dyed with the Sun by Where the Smiles Have Been
8. Creating a Butterfly Infinity Scarf by Crafty Bonds
9. Rorschach Inspired Art with Yarn by It Was Weekend
10. D.I.Y. Galaxy Print Infinity Scarf by The Thinking Closet (you’re here!)
11. Graffiti Bicycle Scarf by Tried & True
12. DIY Gold Polka Dots Scarf by The Crafting Nook
13. DIY Linen Scarf by H2O Bungalow
Coming Soon….
Here’s a glimpse at what’s coming up later this week!

To access all 5 days of Scarf Week in one special spot, click HERE to visit the “home base” post for this series. I’ll be adding each day’s clickable collage to that page as they go live this week. It’s one you’ll want to pin for later. And be sure to follow along on social media with our hashtag, #ScarfWeek2015.
It’ll be wave after wave of killer inspiration, no fish-bones about it!
See you tomorrow for my next scarf victim tutorial! Mwah ha ha.
Stay scarfy, y’all.
![]()
Lauren,
Fantastic project! I have teenagers who enjoy projects involving science and requiring protective gear. This will be a fun activity for us! Thanks!
Denise
I love it! And I’m now more excited than ever to try working with bleach one day… Definitely have to try that!! 🙂
I totally agree with Mom L.!
Far out! Just sayin’….
This scarf is especially magical!
Lauren, I have said many times you could put on a burlap bag and look elegant … but your scarfs are truly magnificent! Love love them!! (and you!)
WOW, your scarf turned out so beautifully!
Lauren, your scarf puns are just hysterical! I keep hoping if I read your blog for long enough, some of that witty humor will rub off on me 😉 Very cool galaxy scarf. It’s amazing what a little bleach can create!
I’ve always wondered how to make those bleach galaxies and now I know! We’re planning on making a visit to a nearby observatory and I’m totally making this scarf to go. So geeky, right? Also, your space party joke was a huge hit at our breakfast table this morning! 😀
This ones a winner… or should I say it’s out of this world! Haha! Super idea using bleach and a bleach pen. I’ll share that we have those glow in the dark stars on the ceiling, in my office. They are so fun at night, I didn’t have the heart to take them down!
What an fun scarf and I can’t believe it was created from an old tee and some bleach! Pinning 🙂
That turned out seriously amazing! I never knew bleach could be so artistic. 🙂 Thank you so much for organizing scarf week. You are awesome!
Ok, this is freaking amazing!!! Seriously, it’s stunning. The dots from the bleach pen really take it out of this world (pun intended, haha!). I just may have to give this a go sometime, and since I live in Huntsville and am surrounded by all things NASA, this would fit in (but still stand out) perfectly! Thanks for hosting Scarf Week again and letting me be a part of it! 🙂
Beautiful!! I love it Lauren!