
Ombre Paint Chip Earrings & Free Cut File

For some women, their signature fashion piece is shoes. For others, it’s bags. And for me, without a shadow of a doubt, it’s big n’ bold earrings.
And what do I love even more than big n’ bold earrings? Well, big n’ bold earrings I made myself out of materials I got for free, of course! Does it get much better than that? I think not.
I had been inspired by the paper earrings I’ve seen around blogland for some time now, like these by crafterhours and these by Cutesy Crafts. And then one day it struck me that paint chip swatches would be the perfect material for paper earrings. Not only are they sturdy like cardstock and perfect for the ombre look, but they cost nothing other than the gas to drive to Home Depot. And we’re there practically every other week anyway, so, done and done!
Here’s the easy breezy tutorial for any of you who share my affinity for big n’ bold earrings on the cheap.
Tutorial
Step 1. Pick out various shades of your favorite paint chip swatches from your local home improvement store. The rectangle swatches will give you the most bang for your buck freebie.


Then, go home and snap some photos of your paint chip swatches because let’s face it – – they’re extremely photogenic.
Step 2. Design your earrings. You can really use any shape at all with this design, but I decided to go with a classic circle shape, stacked in three different shades of color.
Since I have a Silhouette machine, I used my Silhouette Studio software to create my circles, each with a tiny hole punch where the jump ring will attach through.
Free Cut File
To make your lives a little easier, I’m offering up my design to you all for FREE. You can sign up to download your free cut file in either V2 or V3 format using the nifty form below or by clicking HERE. {Fine print: this design is for personal use only and is not to be used for commercial purposes. Thanks!}

Step 3. Cut your paint chip circles. I simply used the “Textured Cardstock” settings on my Silhouette machine to cut my paint chip circles. Mine cut cleanly without any issues, but I always highly recommend that you run a test cut since all paper can cut slightly differently, especially depending on the sharpness of your blade.
For each set of earrings, you should end up with: 4 large circles, 2 medium, and 2 small.

If you don’t have a Silhouette machine, you can still do this project tracing circles onto the back of your paint chips and use old-fashioned scissors or an x-acto knife to cut them out. It might even be just as fast!
Step 4. Use adhesive spray to glue your two large circles together. Because the back of my paint swatches had text and images on them, I glued the two large circles together, so that when the earrings flip around, they’re still a solid color. And that’s important for this design because these earrings do have some nice movement to them. You don’t need to worry about the medium and small circles since they’ll lie flat atop the large circles.
My spray adhesive of choice is Elmer’s Multi-Purpose Spray Adhesive (affiliate link).

Step 5. Use pliers to attach your jewelry findings.

First, attach a jump-ring through the ear wire and close it up. Then, run a second jump-ring through the set of three circles, and then through the first jump ring, making sure the ear wire is facing the right direction. Use your pliers to close it up, and you are done!


You can have fun repeating this process in various shades of swatches! I was even able to get 2 sets of earrings out of just three swatches of color.


And since these earrings make great gifts, just use an extra paint swatch on which to display them. You can just use a safety pin to create two tiny holes for the ear wires to slip through.

And here’s a little vertical pin-action for my pinner friends in the house:

More Earring Inspiration
If you’d like to check out another fun earring tutorial, especially if Perler beads strike a nostalgic chord in you, click HERE.

More Paper Inspiration
Well, paper is the theme for this month’s Silhouette Challenge, which happens to be going down to-day! So, I encourage you to hop around to visit my blog friends who are all sharing paper projects they made using their Silhouette. You can even click the pictures on the collage below to hop from site to site. Fancy, huh?
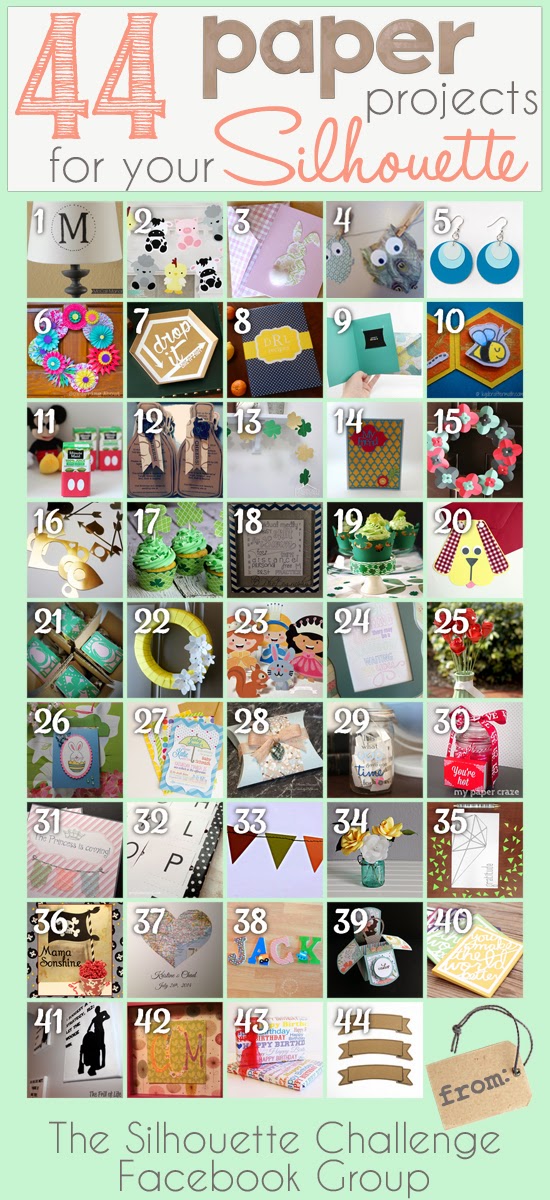
1. McCall Manor // 2. The Turquoise Home // 3. Creative Savings // 4. Sandpaper and Glue // 5. The Thinking Closet // 6. Sowdering About in Seattle // 7. Persia Lou // 8. From Wine to Whine // 9. Dream a Little Bigger // 10. Please Excuse My Craftermath… // 11. Play. Party. Pin. // 12. Everyday Paper // 13. Practically Functional // 14. A Tossed Salad Life // 15. My Favorite Finds // 16. The House on Hillbrook // 17. Adventures in All Things Food // 18. A Glimpse Into Barb’s Life // 19. TitiCrafty // 20. The Experimental Home // 21. feto soap blog // 22. Creative Ramblings // 23. The Stamp Doc // 24. Ginger Snap Crafts // 25. Simply Kelly Designs // 26. Whats Next Ma // 27. unOriginal Mom // 28. Bringing Creativity 2 Life // 29. Cutesy Crafts // 30. My Paper Craze // 31. Create & Babble // 32. Grey Luster Girl // 33. The Sensory Emporium // 34. Lil’ Mrs. Tori // 35. Black and White Obsession // 36. Mama Sonshine // 37. Weekend Craft // 38. Creative Carnival // 39. Peace, Love and Joyce // 40. Tried & True // 41. The Frill of Life // 42. Dragonfly & Lily Pads // 43. Get Silvered // 44. Minted Strawberry
Enjoy!

Those are super cute! I would never have thought of using paint chips for earrings! Great job!
Now I can make some earrings so that I match our new kitchen! Since I don’t have a silhouette yet, was thinking I could use a quarter, nickel, and dime to make the hand-drawn circles on the back of the paint chips. Do you think those would be good sizes?
Our new kitchen colors are Benjamin Moore, cream, barley, and gold leaf!
I agree, these are too cute!
thanks for linking over at Take-A-Look Tuesday via Sugar Bee Crafts – – you were featured earlier today!
–Mandy, SugarBeeCrafts.com
Woot woot! Thanks so much for the feature, Mandy! I’m honored.
Talk about repurposing! These are too cute!
Love, love, love these Lauren! 🙂
How freaking clever are you!! These are so cool and I cannot wait to make some for me and my bestie right away!! Love the inspiration here at your blog!!
Oh yay! Taunya, you’ll have SO much fun making them and even more fun ROCKING them knowing how easy and inexpensive they were. If you end up making some and think to snap a picture, I’d love for you to send it to me! One of my favorite things in the world is putting together my quarterly Reader Showcase post, and I’d love to include you and your photo in it! Here’s my email: thethinkingcloset {at} gmail.com. Take care!
What a great idea – and you can really do any shape too!
It’s true, it’s true, Danielle! I had grand plans to do a rectangle version (with one end cut at a diagonal) and a diamond version, but alas, life got away from me (as it is apt to do). But as soon as I gift these sets away, I’ll have to try some new ones!
Love these! So easy and fun! (When I finally get a cutting machine, these’ll be on the list!)
bugaboo, mini, mr & me
Thanks so much, Kimberly! Hope you can get your hands on a digital craft cutter soon…you’re going to have a field day, I know it!
These are really cute. Sadly in the UK are paint samples are all very thin and meanly sized, and they will keep printing the company name and the name of the colour all over them – it’s like they don’t realise people what them for craft purposes! I’m a little jealous of those useful looking multi coloured rectangles you have there.
Also sadly I am a silhouette machine free zone, but I do have some lovely circle punches I was given for Christmas that might work for this, got to be resourceful!
Bummer that your paint samples aren’t craft-worthy, Julie! And circle punches would work perfectly for this project…we’ve just got to brainstorm how you can get your hands on some fun, FREE, colorful paper. I wonder if any companies will send paint samples to the UK via snail mail? Might be worth a shot!
Good idea, be worth an email at least, wouldn’t it? Our paint samples are the long thin ones with 5 or 6 colours in a line. They are useable for crafts as long as you don’t want anything bigger than about 2cm x 3cm! I do save all coloured envelopes that come through the door, they are a pretty good free source of coloured paper, but sometimes I want card (I suppose I could go to the shops and buy some as a last resort!)
For now I will just try to be happy for my US bloggy friends!
Lauren,
Your love for crafting and seeing the beauty in the simple pieces of life, jumps off the page of your blog today. Wow!
SC Buddy,
Karen Marie,
Dragonfly & Lily Pads
Karen, if you were a student in my English class, I’d congratulate you for your successful employment of vivid imagery! Instead, I’ll just send you a big thanks for your delightful and encouraging comment. Hugs!
One of the cutest and most Creative ideas I’ve seen in a long while Lauren! Fabulous!
Wow! Thanks so much, Krista! That means a lot coming from a DIYer as talented as you, my dear. P.S. I hear you’re coming to Haven this summer. Eeeeeeek! I cannot wait to meet you face-to-face!
I made something like this in the past – it’s really a great way to make inexpensive AND colorful earrings in a snap!
I love how yours turned out, Aki! And that you worked 4 different colors into the mix. Yes, such a fun and easy project. (I need more of those. I’m always over-complicating things. Lol!)
These came out really great Lauren! You truly are the queen of earrings. I have to admit, I’ve been becoming addicted to them myself as of late. And your’e not helping that addiction! 😉
Tee hee. Just call me an enabler! 😉 Also, thanks for dubbing me with such a fabulous title! I just may have to add that to my resume!
Too cute! With all the different colors of paint swatches available the possibilities are endless!
I know, right, Cindy?! So many swatches, so little time! 😉
Girlfriend, you always amaze me. Love it!!!! I know, seriously, why didn’t I think of that? Because I knew Lauren would think of it for me, and I could pin it LOL! Love!!!!!!
Ha ha. You’re too funny! Well, you definitely returned the favor because now my gears around turning on the paper wreath front. Thanks for the inspiration, friend!
I’m totally in love!!!! How didn’t I think of that????? Ooooh you gave me some ideas to make some of these LOL. XOXO
Ha ha. How didn’t you think of it? Well, you’re too busy creating yummy-licious cupcakes and adorable St. Paddy’s day wrappers, that’s why! 😉 Hugs and kisses back at you!
I’m also a lover of big and bold earrings. It’s my thang! So, of course, I LOVE this idea. And I have tons of paint swatches. I’m just going to have to try it, I think. Thanks for the free cut file, my friend!
Sweet! I do hope you get to use the cut file, Laura. I could totally see you rockin’ the ombre earring look like a boss! (And I LOVE that you already have the paint swatches on hand. You’re my hero.)
I’ve just become and earrings girl, and I love these! And paint chips? Awesome!
Welcome to the Earrings Girl Club! (It’s a happenin’ place to be, let me tell ya. Tee hee.) And thanks for inspiring so much with your chipboard earring tutorial last spring. Ever since then, I’ve been determined to make some paper earrings of my own…and with this month’s Challenge, the timing was too perfect. Also, thanks for being Challenge Coordinator extraordinaire. You’re zee best, Jessica!
Cute! Love these, Lauren! Paint chips are such great crafty-materials!
Thanks, girl. And yes, I totally agree: paint chips are SO much fun to craft with. I’ve actually been waiting for the perfect excuse to incorporate them into a project for some time now…and well, the Silhouette Challenge paper theme was just too perfect! 😉
Hi Lauren,
I’m with you, I LOVE big, bold earrings! But unlike you, I would have never thought about making earrings from paint chips!!! You are so creative. I definitely have to stop at Lowe’s soon! I’m so excited to be a part of this incredibly talented Silhouette Challenge group.
Peace, Love and Joy,
Joyce
LOVE these!!! Another great reason to invest in a Silhouette Portrait! Thanks for sharing your creativity!
L<3VE!
This are fabulous Lauren, Such a fun idea – you’ll co ordinate with your clothes and the walls 😉
I knew the minute I saw those cute earrings, that you must have come up with them!! They are ROCKIN’! I have several paint chips that I have collected. Now it’s time to make some of your earrings!! Thanks for the free file. ♥
So smart Lauren and cute!! And I love displaying them on a paint chip. That is the ultimate cute, crafty touch!
Love these! And I love the idea of gifting them on another paint chip.
What an awesome idea Lauren, definitely trying this!
So lovely!
How resourceful and adorable! I love how you put them on a paint chip to display slash give away. Such fun!
What a great idea! 2014 is the year of the handmade gift in my household and these are just perfect (and cute to boot!!!).
Super cute!!! I might just have to make some as gifts… I couldn’t wear them because I forget about my jewelry when I get in the shower… I don’t think they would make it! 🙂 Thanks for inviting me to join the Silhouette challenge group… I am loving my first challenge!
CUTE! I’m going to have to make some of these…like lots of these. I love them!
What a fun idea, I love all the color options you have with these!
Very cute!!! Love these!
Wow, fabulous idea! What a great way to coordinate the colors!
Oh! These are so cute!! Can’t wait to try them!
What a great idea!
These are super cute and something I can totally see myself making! Great job!
LOVE these! The possibilities are endless!
Love your earrings Lauren! Only you would think of this!
So cute Lauren! This would be a fun thing for a girls night or crafty party. TFS
These earrings are super cute Lauren! You got me at “free” You can’t beat free, especially for something that looks so pretty! Pinning!