
DIY “Give Thanks” Fall Sign
The other day, my MIL and I were talking about how many fantastic friendships I’ve made as a result of blogging. And it’s true! Blogging has put me in direct contact with so many women whose interests align with mine…it’s almost like meeting dozens of long-lost twins all around the world! One of those long-lost twins is Courtney. She shares in my love of Silhouette creations as well as coastal decor. Plus, in the dictionary, next to “sweet,” you’ll see Courtney’s smiling face. Meet YOUR new long-lost twin, Courtney.
* * * * *
 Hello everyone! I’m Courtney, and you can find me over at Crafts by Courtney where I blog about kids and home decor crafts with some parties thrown in! I’m very excited to be guest posting over here at The Thinking Closet for the fabulous Lauren!
I spent a lot of time thinking of the perfect post I was going to do for Lauren; I recently posted a Fall Harvest Sign and knew I wanted to make another sign for the house.
I loved the idea of making a “Give Thanks” sign to match my new coastal decor I’m going for. Once I got my plans together, I knew it would be perfect for The Thinking Closet readers, especially since it’s a Silhouette project. I hope you enjoy!

Materials
- Wood Board
- Vinyl
- Gold Spray Paint
- White Chalk Paint
- Transfer Paper
- Finishing Wax
Getting Started
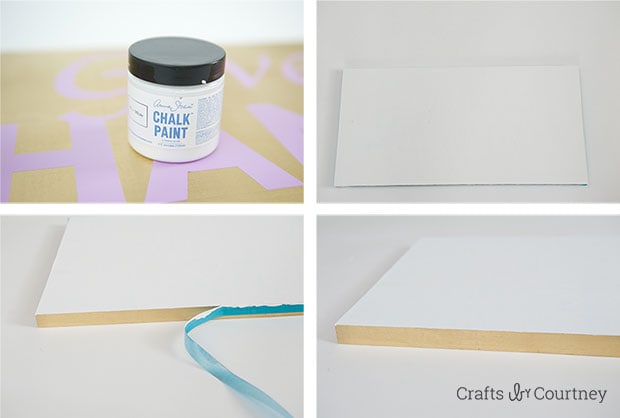
I had a scrap piece of wood left over from another project (12″x24″). I also pulled out some vinyl and my gold spray paint. In this picture, you see I had Americana Decor chalk paint, but in step 5, I decided to change the paint color to Annie Sloan’s Pure White.
I couldn’t wait to get started on this project! I’ve been having so much fun making these signs for the house.

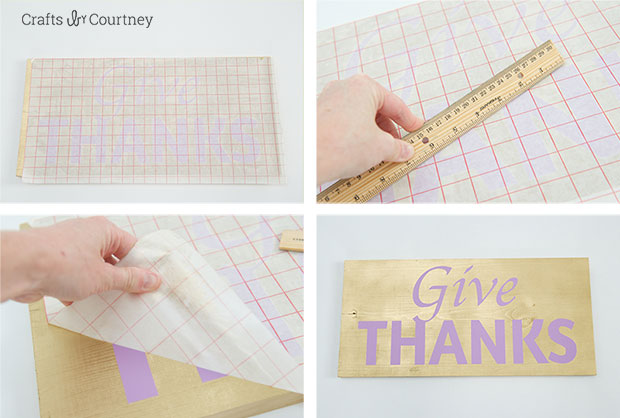
Step 1 – Cut Text
I picked out the my perfect text combination in Silhouette Studio, changing my page setting to 12″width and 24″ height so I could cut my text on one sheet of 12″ x 24″ vinyl.

Step 2 – Transfer Text to Contact Paper
Next, it’s time to transfer!
I took off all the excess vinyl around my letters (weeding) and laid my transfer paper over top. I smoothed it down with a credit card. Then, set it aside.

Step 3 – Paint Your Wood Board
Now it’s time to paint that piece of wood! I decided I wanted to spray paint my background. I had this beautiful gold spray paint that I knew would really “POP” against my pure white.
I took the board outside and sprayed 2 coats on the board, letting each one dry for 15 minutes.
I loved how the wood kind of looks stained with the gold pray paint. You can still see all the beautiful knots in the wood.

Step 4 – Transfer Text to the Wood Board
Yay, now we get to transfer the text to the board. After peeling up the transfer paper with my text, I made sure to center the text first, then firmly pressed the transfer paper down onto the board. I pulled out my “Handy Dandy” ruler to help ensure the vinyl would stick to the wood.
After I was satisfied that the vinyl had transferred, I pulled up the transfer paper to see my wonderful saying!
Step 5 – Add Final Layer of Paint
At the last minute, I decided I wanted to use Annie Sloan’s Pure White and not the old white from Americana Decor since I thought the white would look better against the gold.
I wanted the sides of the sign to be gold, so I just taped them off. I went over the top of the board with 3 coats of chalk paint, letting each coat dry for 20 minutes.
Love that “POP” of gold on the sides!!!
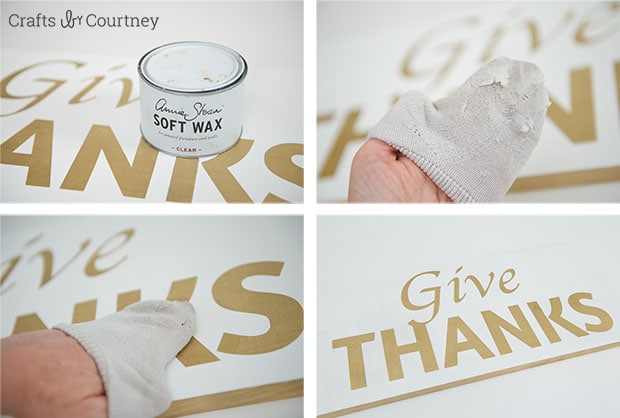
Step 6 – Pull Up Vinyl Text
Now comes my favorite part: pulling up the vinyl! (I just get so excited.)
I used my “Trusty” weeding tool to to pull my vinyl up. The vinyl always comes off super easily.

Step 7 – Add Wax to Seal
Finally I sealed the sign with some extra Annie Sloan wax I had. I wiped on a coat with an old baby sock I had (I’m always saving the kids’ old socks and washcloths for projects like this).
Just let it dry for 20 minutes, and then you’re ready to display your “Give Thanks” Fall Sign!
Finishing Touches
I think the sign turned out great, and I’m so excited to display it with all my new fall decor projects I’ve already been working on.

To Close
I want to give Lauren a BIG THANK YOU for inviting me to guest post over here while she’s working on her eBook!
I hope everyone enjoyed my tutorial; I really had fun working on it. Make sure to stop by my blog, Crafts by Courtney, and take a look around!

Here are some recent post I’ve worked on this fall:
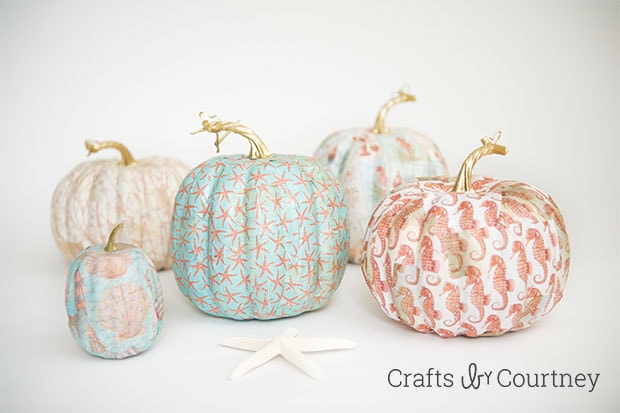
Fall Coastal-Theme Pumpkins using “Handy Dandy” Modge Podge.
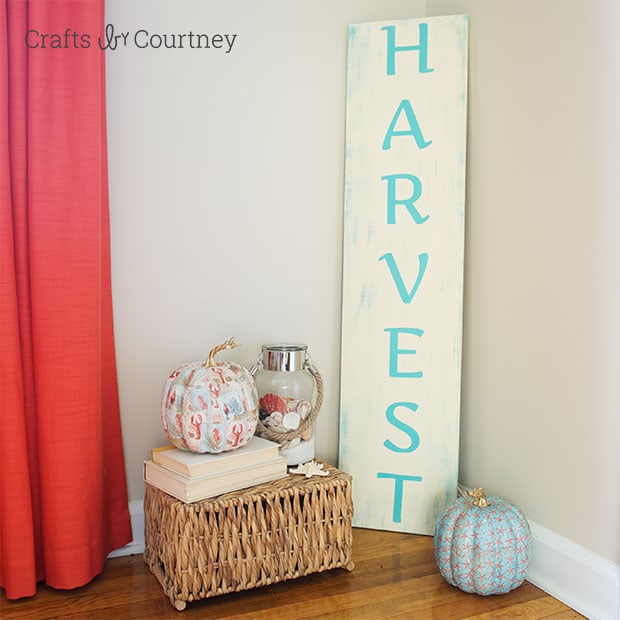
My Fall Harvest Sign using more of a beachy theme with non-traditional fall colors.

I want to paint and wax an old cheap metal floor lamp, only thing is do I sand the metal down a little so the paint adheres to it better or just paint over it. The waxing is clear because it will be used a lot.. I will be using a celery green color…Thanks
5-31-18 Thursday
Hi Lauren I just finished waxing my cedar chest with clear wax and want to use dark wax next Do I buff next then use the dark wax?
Hi Sandy! I haven’t worked with dark wax before but The Purple Painted Lady is my go to resource when it comes to Annie Sloan questions…especially waxing. Check out her post on dark wax HERE.
I want to GIVE THANKS for this lovely post. Pinning the sign and coastal-themed pumpkins!
Great colors!
So glad you enjoyed it! Courtney’s color palette is always so coastal and dreamy! I just wish I could snap my fingers and teleport those pumpkins to our “fantel” display. So fantastic!
This turned out great! Nice job Courtney…love the gold you used. I’m so obsessed with everything gold right now 🙂
I love this! And I love Courtney! And I love Lauren! So much to love in this post… 🙂
You are too kind, Melissa! Thanks for ALL the love you shower upon us!
Courtney, this sign is beautiful and I know I keep saying this but I need a silhouette machine! I love making signs but hand painting large signs by hand seems like a pain when I see how easy the right tools make it! Love this!
I still kinda sorta can’t believe you haven’t joined team Silhouette yet, Katie. Your contact paper world will be blown out of the water! 😉 Maybe we can get you sucked in by Christmas? #craftypeerpressure
I have a Silhouette and have hardly used it. I think it scares me!!! I was so used to my Cricut. What fonts did you use and size of each? I have seen where people have made picture frames with their names and established on them. Bought the frames, thought I would try, but could not figure it out. This is awesome!
Jenny, are you a part of my Silhouette Challenge Facebook group yet? If not, that’s a GREAT place to troubleshoot when you run into issues with your Silhouette machine. Feel free to read more about it HERE.
Jenny, thanks for stopping by! When I first got my Silhouette I was a little scared as well, BUT now that I used it, I realized it’s not so scary at all BUT exciting. I love pulling out my machine for new projects. So just give it time. Plus Laurens Silhouette group is perfect for asking questions and showing off projects.
Ok, back to your question now here are the fronts I used an the links to find them:
“Give” font is Apple Chancery an can be found at —> http://www.fontpalace.com/font-details/Apple+Chancery/
“THANKS” font is Amaranth (Bold) and can be found at —> https://www.google.com/fonts#UsePlace:use/Collection:Amaranth:700
It looks like the front size was 72. I hope this helps an inspires you to get started on the Established sign!
This sign has an elegance to it that I really love!
Visiting as a follower from the CbC site <3
I couldn’t agree more, Rachel. I love it when craft projects don’t look to “crafty” and are elegant looking at something from the store. Courtney definitely nailed it with this one. Thanks so much for stopping by!