
Nautical Star Burlap Banner: Stencil Material Tutorial
Ready for a super do-able tutorial for creating your own burlap banner using Silhouette *stencil material? Plus a free download for a nautical star cut file? I thought so. Let’s do this!

I think one of the quickest and easiest ways to make a new home feel like your home is through hanging pictures and decorating bare walls. Don’t you? Even just adding one piece onto a previously blank wall can infuse a space with so much warmth and life.
And yet, I find that the initial excitement over decorated walls all too quickly wears off for me, and wall art can quickly become “white noise,” fading into the background. It’s like I don’t even see it anymore.
{Does this happen to anyone else?}
Well, my solution to keeping things fresh and new for us is to change out some of our wall art with the changing seasons. And there’s the perfect spot at the base of our living room gallery wall for seasonal banners.
So, I’ve been slowly but surely building up my banner arsenal. So far, I’ve got fall covered…

…Christmas…

…Valentine’s Day…

…and now, my newest banner on the block has a patriotic vibe going on, perfect for this season between Memorial Day and the Fourth of July. I give to you, my Nautical Star Banner:

The best part is that when I was looking up free clip art from which to create my stencil, I had no idea that the star I envisioned is referred to as a “nautical star.” I only thought of it as a vintage metal star, but clearly, this star was meant for our walls. We are nautical-obsessed, after all.
For You
Today, I’d love to share with you all three things:
- A FREE Silhouette cut file for the nautical star stencil I designed.
- A step by step tutorial for how to use one of Silhouette America’s newest and most ground-breaking products, the stencil material.
- A clickable collage of 27 other patriotic creations by my Silhouette Challenge buddies. So. Much. Inspiration.
And now, because the type A in me is diggin’ the number system I just developed, let’s go through these one at a time. And you can hop around to whatever is most valuable to you…or even better, all four!
1. Free Cut File
For you folk with your own digital craft-cutter, I’m happy to share the Nautical Star Stencil I created with y’all in the form of a FREE cut file. You can sign up to download your free cut file in either V2 or V3 format using the nifty form below or by clicking HERE. {Fine print: this design is for personal use only and is not to be used for commercial purposes. Thanks!}

2. Stencil Material Tutorial
Step 1. Design the stencil. I found a free clip art image of a nautical star that I traced in Silhouette Studio. Then, I used “bridges” in order to connect the “islands in my design.” Essentially, I used the weld and eraser tools to create those bridges from tiny rectangles. This allowed me to have one intact stencil for my entire design (the shadowed nautical star and the square outline).

If you’re trying to create a stencil out of text, then here’s a great video with tips on how to do that.
Step 2. Test-cut your design on cardstock. I’ve made too many mistakes not to do test-runs. And since I’ve never cut a stencil with bridges before, I wanted to ensure I had enough support on those triangles as well as the square border in order to keep the whole stencil intact while still allowing room for paint. Lo and behold, I did!
Step 3. Cut your design out of the stencil material. The stencil material comes on a 12″ x 24″ roll, so you don’t need a mat.

Instead, just feed the stencil material directly into your machine. Don’t forget when loading your stencil material to select “load media” instead of “load mat.”

As always, I did a test cut on my stencil material to make sure my blade settings were right on. As you may recall from my first tutorial using the new V3 software, the test cut button is a little tricky to find. Make sure you don’t select “send to Silhouette” at the bottom of the CUT SETTINGS window (see above screenshot), but instead proceed to SEND TO SILHOUETTE window. There, you’ll see a teeny tiny triangle in the upper right-hand corner of the gray box. Select it while your mat/media is loaded and your machine will cut out a tiny box and triangle in the upper right-hand corner.

I’m really glad I did do a test cut because it turned out that my V3 software was acting buggy and even when I manually set my blade to the recommended settings for stencil material (blade 9, depth 18, speed 1) it wasn’t cutting through. I have a Mac and was able to switch back to my V2 software (legacy edition) without replacing my V3 software, and it cut with the recommended settings no problem. So, all that to say, if you run into cutting issues, it might not be the media, but could be a bug in the new software.
Step 4. Weed the unwanted parts of your stencil. First, I just weeded or removed the sections of the stencil that were unwanted.

Step 5. Peel the paper backing off of your stencil and apply it to your project surface. My absolute favorite thing about the new stencil material is that it has a sticky backing, which helps create a strong bond between the stencil and material you are stenciling.

In my case, I decided to use–no surprise here–cream-colored burlap. Even though it blankets my entire workspace in tiny hairs and is a beast to clean up, I just love the rustic look so much that I’m willing to put up with it!

The hairs did get stuck to the stencil each time I used it, but I only needed to cut 2 total stencils in order to paint 10 stars…a much better ratio than if I had been using vinyl or freezer paper.

Step 6. Apply your paint or ink to the project surface. For my color palette, I chose to stay in the neutral zone not only because I sometimes like to do that with holidays, but because then it would better match our living room gallery wall. So, I mixed my slate-colored paint, and since this is a decor item that I don’t plan to wash, I used plain acrylic. However, if you are stenciling a clothing item you plan to launder, check out this post for tips on using fabric medium with your acrylic paint.
As always when stenciling, I made sure the edges of my stencil were firmly adhered to the burlap; and then, I used a foam brush to dab the paint onto the burlap in an up and down motion, not side to side.

Using this method, I barely had any bleeding, which is remarkable considering what a fibrous fabric burlap is! I dare say that my first foray into using the stencil material was extremely successful; and I really see this as being a game-changer for those who want to re-use stencils.
TIP: If you can’t complete your project in one sitting, simply cover your paint cup (brushes included) in saran wrap and store them in the fridge. Depending on how much paint you have in your cup, you can go 1 – 2 days without your paint drying up. In fact, the paint behaved much better after 2 days in the fridge!
Step 7. Touch up the unpainted “bridges.” I set a timer and after 20 minutes with the overhead fan on, I could peel away the stencil without worry of the paint being wet still.

Then, I took a very tiny paintbrush and simply hand-painted over the gaps of paint in the star and the square border where the bridges had been.

And I repeated step 5 and 6 until all 10 of my nautical star squares were painted.

Step 8. Cut out your burlap squares. I then just grabbed a pair of scissors and cut out my burlap squares, leaving a small border beyond the painted outline.

Step 9. Glue your burlap squares to some twine, hang, and enjoy! I used my Burlap Love Banner as a guide, along with a ruler, to help me with spacing. And then, I simply adhered the twine using a string of hot glue to the backs the squares.


Annnnd, here she is in her final hanging place:


Seeing this project hung up as “the new banner on the block,” I’m delighted with how it turned out.
I love that I can call it my Fourth of July banner…but it also works as everyday decor. And that’s rather convenient because someone (cough cough) likes to leave her holiday decor up long after the holiday has passed. In fact, someone (cough cough) may have left a certain Christmas tree up until Valentine’s Day a few years ago. But I’m not naming names. {Wink.}

3. Want to Check Out More Silhouette Projects?
My Silhouette Challenge buddies and I are all sharing patriotic projects on our blogs today, so peruse the projects below for a wealth of Silhouette inspiration!
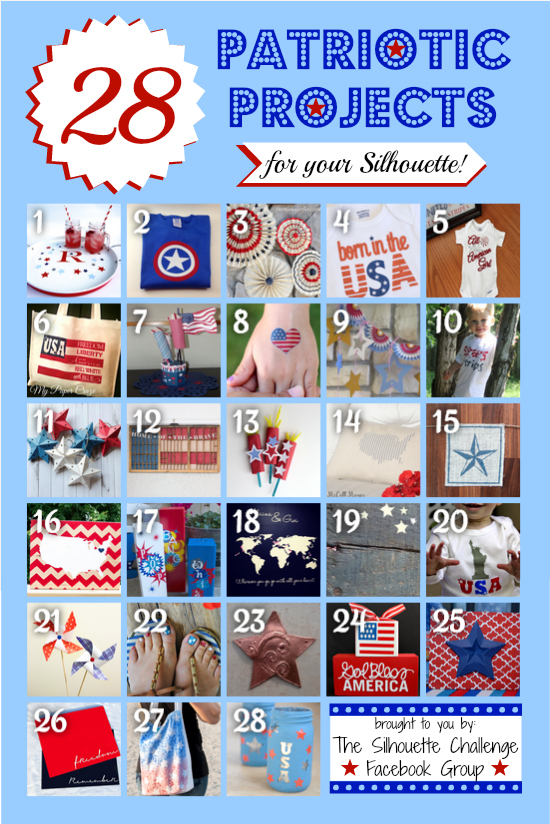
1. Our Rosey Life // 2. My Mom Made That // 3. The Kim Six Fix // 4. Create & Babble // 5. The Frill of Life // 6. My Paper Craze // 7. Kate’s Paper Creations // 8. Simply Kelly Designs // 9. Dragonfly & Lily Pads // 10. Mama Sonshine // 11. Lil Mrs. Tori // 12. Tried & True // 13. It Happens in a Blink // 14. McCall Manor // 15. The Thinking Closet // 16. unOriginal Mom // 17. Sowdering About // 18. Weekend Craft // 19. The Outlandish Momma // 20. Adventures in All Things Food // 21. Practically Functional // 22. Silhouette School // 23. Please Excuse My Craftermath… // 24. Ginger Snap Craft // 25. Pineapples And Pinecones // 26. Black and White Obsession // 27. TitiCrafty // 28. Architecture of a Mom //
And this concludes another epically-long post. Hopefully it added a bit of brightness to your day!

*Full Disclosure: This post contains affiliate links, meaning that if you make a purchase after clicking through, I may receive a small commission. Please rest assured that as always, I only recommend products that I use and love like my Silhouette Cameo!
I have been trying and trying to figure out how to do this in the Cricut. We have the nautical star design, but turning it into a stencil with the “bridges” is the challenging part. Any chance you have some experience with Cricut machines??
So pretty, Lauren!
This is super cute, Lauren! Thank you bunches for linking up and partying with us!
This banner is like all the other ones you created so far: It looks wonderful!
Although … this one here may be my favorite to day 🙂
Oh my goodness, Lauren. I freaking love this. It could totally stay up and not have to be just for the 4th. It’s absolutely gorgeous!
Love the nautical banner! Thanks for sharing at Inspiration Monday!
Debbie
I’m so late to the party on this but LOVE your banner! If you get around to making another one..you can just send it over here. You KNOW it will fit in well 🙂 XXOO
This burlap banner is awesome. I’ve been wanting to get the stencil material and try making my own. I’ve just been using the vinyl for my stencils. I’ll have to grab some next time I go to Michaels.. You did a great job with it!
I had no idea you could create a stencil on your silhouette! I have been wanting to make over my filing cabinet, and was planning on buying a stencil, but would love to make one instead. However, the island-bridge thing is totally confusing me. Is there a tutorial that explains it? Your banner looks so cute!
Love your banner! What a beautiful idea!
Your burlap banner looks fab! And I hate the burlap bonus mess too (oh well). I haven’t used the stencil material yet and you’ve totally inspired me to give it a try!
Lauren,
Great idea incorporating the Star banner with a way to use at least all summer or with other seasons and added decor for fall or winter too?
SC Love,
Karen Marie
Dragonfly & lily Pads
Was so excited to see the finished product, Lauren – simply gorgeous! LOVE the burlap color you chose! Just an fyi that burlapisthebomb.com is an available domain name…could be a winner!! 😉 Big hugs!
Ooooh I am loving this banner! Now I just need to win the silhouette so I can start taking advantage of all your free files 🙂 Pinned!
Very cute Lauren! I love burlap and nautical themes paired together. Thanks for the stencil info too 🙂
Trust you to find a way to integrate nautical and patriotic into a single project. 😀 I love how it came out, and it fits your decor to a T. As a matter of fact, I think it fits better than any of your other banners do!
P.S. – It’s great to see that the stencil material holds up well!
Super cute idea! We would love for you to come and link up with us at Your Designs This Time! http://elizabethjoandesigns.com/2014/06/designs-time-no-13/
I am obsessed with all things nautical.. and this project is perfect!
LOVE! I am so obsessed with nautical, but unfortunately in a land locked area, it seems like there are limited opportunities to make it part of my home decor. Love the painting on the burlap. It’s gorgeous!
Love the burlap banner! It’s perfect!
I see that you switched to the “New” version of studio. Do you like it? and do you recommend me to move up? I do ALOT of print and cuts and I’ve heard that is where Silhouette has fallen short on the new software.
This is fabulous burlap banner, Lauren! Love the idea of using stencil. Question, did you use also fabric paint from Silhouette or can I use any kind of paint? THANKS!
Love love love and love! You could even move this to your bedroom after you’re finished with it for the season! 🙂
This is just perfect for summer…4th of July…and just so vintage and nautical! Will you put it in your nautical bedroom after the summer?
Pinning this for future use as our family room is Americana style and this would look great!
All of the patriotic projects are wonderful and unique…can’t believe it’s getting so close to the 4th!
LOVE this. Nautical + Americana is one of my favorite looks. Ready for a terrible, terrible confession? I bought myself a Silhouette in November. I took it out of the box sometime over the winter. And I still haven’t made anything with it yet!
Love how this garland doesn’t scream “Fourth of July”–you could keep it up all summer with no guilt!
Your banner looks great. I need to try that stencil material!
Your banner looks great; it’s so very you!! I like that it’s a simple element you can change out every few months to freshen up your space – smart idea!!